Java is among the popular programming languages used for Desktop and Web application development. It's also being used to develop mobile applications for Android. This tutorial provides the steps required to install multiple versions of Oracle JDK and OpenJDK on the same system. Oracle provides the JDK in the form of downloadable zip since Java 11, hence this tutorial provides the steps to install Oracle JDK using the zip for Java 11, Java 12, Java 13, and Java 14. It also provides the steps to install JDK 8 since it's one of the major version of Java and Oracle have announced to support it till the year 2030. Also, Android SDK Tools requires JDK 8 since it does not work for Java 9 or higher versions.
Notes: It's recommended to completely remove the existing versions of Java by following How To Uninstall Java From Windows. Also, make sure that you are completely aware of the installed Software dependent on the existing version of Java and knows to fix the missing Java reported by such Software.
Install Java 8
We can install Java 8 on Windows 10 using the installer provided by Oracle. How To Install Java 8 On Windows 10 provides the complete steps to install Java 8 on Windows 10.
Notes: I have installed Java 8 at C:\Java\Oracle to keep it separate from OpenJDK versions installed at C:\Java\OpenJDK. The Java 8 installations location should be similar to C:\Java\Oracle\jdk1.8.0_241 and C:\Java\Oracle\jre1.8.0_241. The bin directories should be similar to C:\Java\Oracle\jdk1.8.0_241\bin and C:\Java\Oracle\jre1.8.0_241\bin.
Install Java 11 or Higher
This section provides the steps required to install Java 11 using the zip provided by Oracle. The steps should be the same for Java 12, Java 13, and Java 14. Open the Java 11 Download Page having the options to download Java 11 for Windows 10 as shown in Fig 1.

Fig 1
Now download the zip for Windows as highlighted in Fig 1. It will ask to accept the License Agreement as shown in Fig 2.

Fig 2
Accept the License Agreement. It will enable the Download Button after accepting the License Agreement as shown in Fig 3.

Fig 3
Now click the Download Button to download the JDK 11. It might also ask to log in before starting the download.
To install Java 11, extract the download at C:\Java\Oracle so that the bin directory path is similar to C:\Java\Oracle\jdk-11.0.7\bin. Now test the Java version on the console as shown in Fig 4.

Fig 4
It shows the Java 8 installed in the previous section using the installer. Now right-click the This PC Icon on the Desktop and click the Properties Option as shown in Fig 5.

Fig 5
Now click the Advanced System Settings Option as shown in Fig 6.

Fig 6
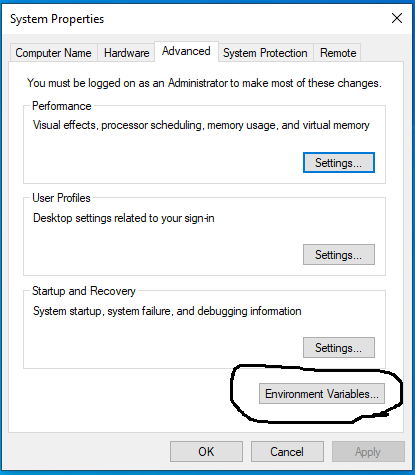
It shows the Advanced Options as shown in Fig 7.

Fig 7
Now click the Environment Variables as highlighted in Fig 7. It shows all the environment variables for the currently logged in user and all the users as shown in Fig 8.

Fig 8
We have to update the Global Path variable as highlighted in Fig 8. Now click the Edit Button to view the values as shown in Fig 9.

Fig 9
I have also highlighted the Path configured by the Java 8 installer. Now click the Delete Button to delete it as shown in Fig 10.

Fig 10
Now click the OK Button to close the Edit Dialog. Also, select the local Path variable as highlighted in Fig 11.

Fig 11
Click the Edit Button to update the local Path variable to add the path to Java 11. It will show the default values as shown in Fig 12.

Fig 12
Now click the New Button and add the path to Java 11 bin as shown in Fig 13.

Fig 13
Click the OK Button thrice to close all the Advanced Settings Wizards. This is how we can configure the Java version to be accessed via the command line. Now again type java -version on the console to check the active Java. It might still show the Java 8. Now close the existing Console and open a new one and again type java -version. It should reflect Java 11 configured by us on the environment variable as shown in Fig 14.

Fig 14
Similarly install Java 12, Java 13, and Java 14. We can even switch back to Java 8 to develop Android applications and switch back to Java 11, Java 12, Java 13, or Java 14 to use the latest features of Java. The Java versions installed on my system are shown in Fig 15.

Fig 15
Install OpenJDK
Similar to Java 11 to Java 14, we can also install multiple versions of OpenJDK on the same system using the zip files available for OpenJDK. We just have to configure the environment variable to use the appropriate version of OpenJDK based on the project requirements.
I have installed OpenJDK 14 at C:\Java\OpenJDK\jdk-14 and the bin directory should be similar to C:\Java\OpenJDK\jdk-14\bin. We have to specify this bin directory on the environment variable to switch to OpenJDK 14.
Summary
This tutorial provided the steps required to install Java 8 on Windows 10 using the installer and it also provided the steps required to install multiple versions of Java without using the installer for Java 11, Java 12, Java 13, Java 14, and OpenJDK 14. You may also submit your comments to join the discussion on installing multiple versions of Java on Windows 10.

