FileZilla is a free and cross-platform FTP client widely used to communicate with the FTP servers to upload and download files. FileZilla consists of both Client and Server applications. The client application is available for Windows, Linux, and macOS. This tutorial provides the steps required to install the FileZilla client application on macOS Catalina. The steps should be the same on other versions of macOS including Sierra, High Sierra, and Mojave.
Download FileZilla
Open the official Download Page of FileZilla to start downloading FileZilla for macOS. It shows the available download options as shown in Fig 1 and Fig 2.

Fig 1

Fig 2
Now click the Download Button as shown in Fig 2. It will start downloading FileZilla for macOS.
Install FileZilla
This section provides the steps to install the FileZilla FTP client on macOS Catalina. Now double-click the installer downloaded by us in the previous section. It will self extract FileZilla as shown in Fig 3.

Fig 3
Now execute the FileZilla by double-clicking it. It will ask for system permissions as shown in Fig 4 and file access permissions as shown in Fig 5.

Fig 4

Fig 5
Click the OK Button to allow FileZilla to access the files. It will show the Welcome Dialog on the first launch as shown in Fig 6.

Fig 6
Click the OK Button to close the Welcome Dialog. This completes the installation of FileZilla on macOS Catalina.
Uninstall FileZilla
We can uninstall or remove FileZilla from the macOS by simply deleting the executable file extract by us in the previous section.
Connect With FTP Server - Quickconnect
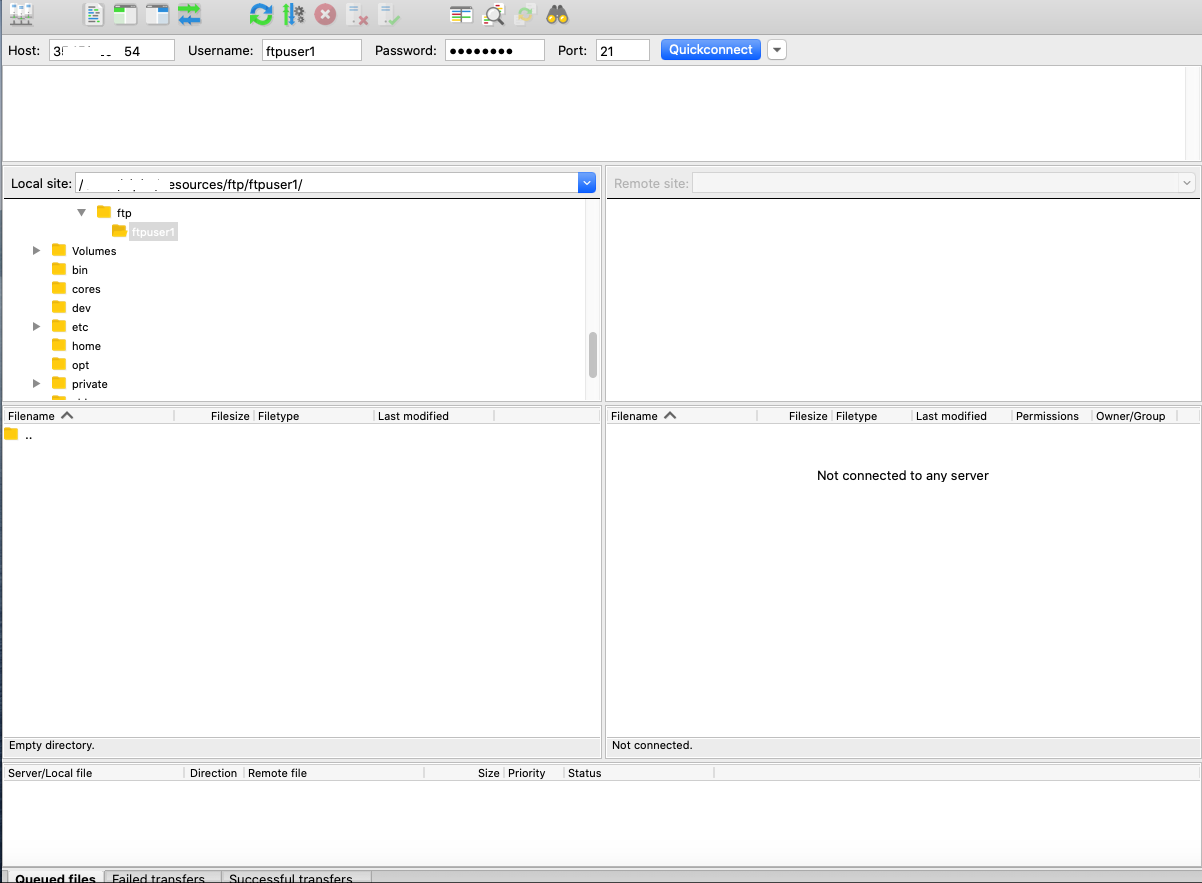
This section provides the steps to quick connect to FTP server using FileZilla FTP client. Now fill the server details as shown in Fig 7.

Fig 7
Click the Quickconnect Button after filling the Host, Username, Password, and Port. It will ask to remember passwords using the Remember Passwords Dialog as shown in Fig 8.

Fig 8
Choose appropraite option to remember the passwords and click the OK Button. In case the server is communicating over an insecure protocol, it will also show the security warning as shown in Fig 9. The remote server must always be configured to use FTP over TLS to securely transfer files between the local system and remote server. The clear password and files must not be transferred over insecure connection for production usage.

Fig 9
Click the OK button for testing purposes. It will successfully connect with the server and list the directories and files available at the root directory of the FTP user as shown in Fig 10.

Fig 10
Now transfer file by simply double clicking it or right-click and choose Upload Option as shown in Fig 11.

Fig 11
FileZilla will show 533 error in case write permission is not provided by the server. Now open the files directory having read and write permissions as shown in Fig 12.

Fig 12
If we try to transfer the file to the directory having appropriate permissions, it will transfer over the FTP protocol as shown in Fig 12. These are the easy steps to transfer files between the local system and remote system/server over the FTP protocol.
Connect With FTP Server - FTP over TLS
This section provides the steps to securely connect to the FTP server using the Site Manager of FileZilla. Now open the Site Manager by clicking File -> Site Manager as shown in Fig 13.

Fig 13
It will open the Site Manager as shown in Fig 14.

Fig 14
Click the New Site Button to create and configure a site as shown in Fig 15.

Fig 15
Now click the Connect Button to connect with the FTP server. It might show an SSL certificate warning in case of self-signed certificates as shown in Fig 16.

Fig 16
Click OK Button to accept the self-signed SSL certificate. FileZilla must connect to the FTP server using TLS as shown in Fig 17.

Fig 17
This is safer than communicating with FTP server in clear.
Summary
This tutorial provided the steps required to install the FileZilla FTP client on macOS Catalina and also showed how to connect with the FTP Server using SSL/TLS encryption.

