Thunderbird can automatically detect the email server configurations while adding the email accounts. It queries to ISPDB, Configuration server at ISP, Configuration file on local disk, guessing, and manual configuration. This tutorial provides the steps to configure the Nginx Server Block for the Thunderbird lookup using the autoconfig.example.com subdomain where example.com is your domain.
You may also refer to Thunderbird Autoconfiguration Using Apache Virtual Host.
Prerequisites
This tutorial assumes that the Nginx Web Server and Email Server are already installed on the system. You can follow How To Install And Configure Nginx on Ubuntu 20.04 LTS, Configure Virtual Host Or Server Block On Nginx, How To Install Let's Encrypt For Nginx On Ubuntu, and Install Mail Server On Ubuntu 20.04 LTS Using Postfix, Dovecot, and Roundcube.
It also expects that a CNAME record pointing to your Nginx Web Server already exists for autoconfig.example.com.
--------------------------------------------------------------------------------------
Name				Type	Value				TTL
--------------------------------------------------------------------------------------
autoconfig.example.com.		CNAME	mail.example.com		300
--------------------------------------------------------------------------------------
Add Server Block
This section provides the steps to add Server Block or Virtual Host with basic configuration as shown below.
# Server Block
sudo nano /etc/nginx/sites-available/autoconfig.example.com

# Content
server {
        listen 80;
        server_name autoconfig.example.com;
        root /var/www/example.com/autoconfig;
        index index.html index.htm;
        location / {
                try_files $uri $uri/ =404;
        }
}
# Save and exit the editor - Press Ctrl + o -> Press Enter -> Ctrl + x
Add Autoconfig Settings
Now we will create the virtual host directory and add the email server settings for thunderbird autoconfiguration. Create the virtual host directory and configure thunderbird as shown below.
# Create Directories
sudo mkdir /var/www/example.com/autoconfig
sudo mkdir /var/www/example.com/autoconfig/mail

# Add configuration file
sudo nano /var/www/example.com/autoconfig/mail/config-v1.1.xml

# Content
<?xml version="1.0" encoding="UTF-8"?>
<clientConfig version="1.1">
	<emailProvider id="mail.example.com">
		<domain>mail.example.com</domain>
		<displayName>Example Mail Server</displayName>
		<displayShortName>Example</displayShortName>
		<incomingServer type="imap">
			<hostname>mail.example.com</hostname>
			<port>993</port>
			<socketType>SSL</socketType>
			<authentication>password-encrypted</authentication>
			<username>%EMAILADDRESS%</username>
		</incomingServer>
		<incomingServer type="imap">
			<hostname>mail.example.com</hostname>
			<port>143</port>
			<socketType>STARTTLS</socketType>
			<authentication>password-encrypted</authentication>
			<username>%EMAILADDRESS%</username>
		</incomingServer>
		<incomingServer type="pop3">
			<hostname>mail.example.com</hostname>
			<port>995</port>
			<socketType>SSL</socketType>
			<authentication>password-cleartext</authentication>
			<username>%EMAILADDRESS%</username>
		</incomingServer>
		<incomingServer type="pop3">
			<hostname>mail.example.com</hostname>
			<port>110</port>
			<socketType>STARTTLS</socketType>
			<authentication>password-cleartext</authentication>
			<username>%EMAILADDRESS%</username>
		</incomingServer>
		<outgoingServer type="smtp">
			<hostname>mail.example.com</hostname>
			<port>465</port>
			<socketType>SSL</socketType>
			<authentication>password-encrypted</authentication>
			<username>%EMAILADDRESS%</username>
		</outgoingServer>
		<outgoingServer type="smtp">
			<hostname>mail.example.com</hostname>
			<port>587</port>
			<socketType>STARTTLS</socketType>
			<authentication>password-encrypted</authentication>
			<username>%EMAILADDRESS%</username>
		</outgoingServer>
	</emailProvider>
</clientConfig>
# Save and exit the editor - Press Ctrl + o -> Press Enter -> Ctrl + x
This completes the email server configuration by specifying the email provider and domain name. The config-v1.1.xml file also includes multiple incomingServer elements specifying the hostname, port, socket type, authentication type, and username parameter. We can also have a cut-down version of this XML document by specifying the secure ports as shown below.
<?xml version="1.0" encoding="UTF-8"?>
<clientConfig version="1.1">
	<emailProvider id="mail.example.com">
		<domain>mail.example.com</domain>
		<displayName>Example Mail Server</displayName>
		<displayShortName>Example</displayShortName>
		<incomingServer type="imap">
			<hostname>mail.example.com</hostname>
			<port>993</port>
			<socketType>SSL</socketType>
			<authentication>password-encrypted</authentication>
			<username>%EMAILADDRESS%</username>
		</incomingServer>
		<incomingServer type="pop3">
			<hostname>mail.example.com</hostname>
			<port>995</port>
			<socketType>SSL</socketType>
			<authentication>password-cleartext</authentication>
			<username>%EMAILADDRESS%</username>
		</incomingServer>
		<outgoingServer type="smtp">
			<hostname>mail.example.com</hostname>
			<port>465</port>
			<socketType>SSL</socketType>
			<authentication>password-encrypted</authentication>
			<username>%EMAILADDRESS%</username>
		</outgoingServer>
		<outgoingServer type="smtp">
			<hostname>mail.example.com</hostname>
			<port>587</port>
			<socketType>STARTTLS</socketType>
			<authentication>password-encrypted</authentication>
			<username>%EMAILADDRESS%</username>
		</outgoingServer>
	</emailProvider>
</clientConfig>
Also, the domain can be different than the email server domain as shown below.
<?xml version="1.0" encoding="UTF-8"?>
<clientConfig version="1.1">
	<emailProvider id="mail.example.com">
		<domain>mydomain.com</domain>
		<displayName>My Domain</displayName>
		<displayShortName>My Domain</displayShortName>
		<incomingServer type="imap">
			<hostname>mail.mydomain.com</hostname>
			<port>993</port>
			<socketType>SSL</socketType>
			<authentication>password-encrypted</authentication>
			<username>%EMAILADDRESS%</username>
		</incomingServer>
		<incomingServer type="imap">
			<hostname>mail.mydomain.com</hostname>
			<port>143</port>
			<socketType>STARTTLS</socketType>
			<authentication>password-encrypted</authentication>
			<username>%EMAILADDRESS%</username>
		</incomingServer>
		<incomingServer type="pop3">
			<hostname>mail.mydomain.com</hostname>
			<port>995</port>
			<socketType>SSL</socketType>
			<authentication>password-cleartext</authentication>
			<username>%EMAILADDRESS%</username>
		</incomingServer>
		<incomingServer type="pop3">
			<hostname>mail.mydomain.com</hostname>
			<port>110</port>
			<socketType>STARTTLS</socketType>
			<authentication>password-cleartext</authentication>
			<username>%EMAILADDRESS%</username>
		</incomingServer>
		<outgoingServer type="smtp">
			<hostname>mail.mydomain.com</hostname>
			<port>587</port>
			<socketType>SSL</socketType>
			<authentication>password-encrypted</authentication>
			<username>%EMAILADDRESS%</username>
		</outgoingServer>
		<outgoingServer type="smtp">
			<hostname>mail.mydomain.com</hostname>
			<port>587</port>
			<socketType>STARTTLS</socketType>
			<authentication>password-encrypted</authentication>
			<username>%EMAILADDRESS%</username>
		</outgoingServer>
	</emailProvider>
</clientConfig>
This completes the server configuration to guide Thunderbird by providing the email server ports and authentication mechanism.
Enable Server Block
After adding the required configurations, enable the server block and reload the Nginx Web Server as shown below.
# Enable server block
sudo ln -s /etc/nginx/sites-available/autoconfig.example.com /etc/nginx/sites-enabled/autoconfig.example.com

# Reload Nginx
sudo systemctl reload nginx
# OR
sudo service nginx reload
This enables the server block to be queried by Thunderbird while adding an email account.
Add Email Account
This section provides the steps to add an email account to Thunderbird for the first time and subsequent email accounts. Thunderbird asks for the account details on the first launch as shown in Fig 1.

Fig 1
Provide the name, email, and password and click the Continue Button. It also asks for the domain account for the first time as shown in Fig 2.

Fig 2
Now provide your domain username and click the Continue Button. It probes the email server and queries the domain autoconfig.example.com. On finding the server settings, it shows the email server details as shown in Fig 3.

Fig 3
We can click the Done Button to add the email account. We can also click the Manual config Button to further update the settings as shown in Fig 4.

Fig 4
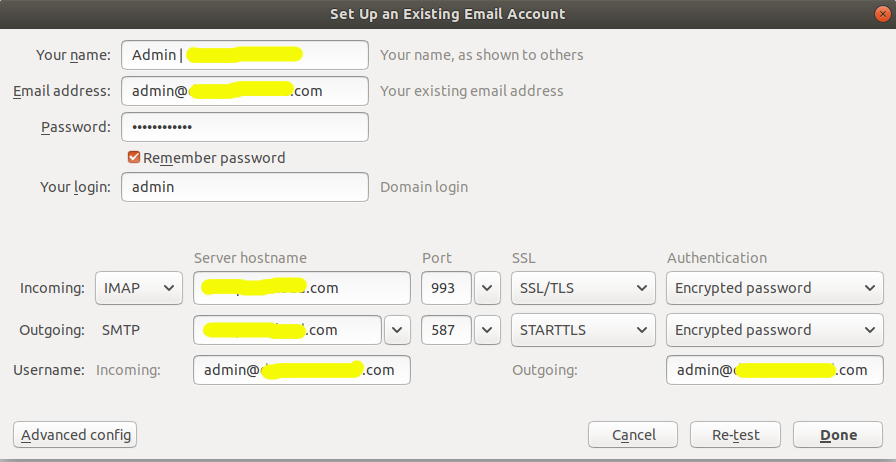
I have changed the SMTP port to 587 as shown in Fig 5.

Fig 5
Now click the re-test to again probe the server and test the settings. It shows the success message on verifying the configurations as shown in Fig 6.

Fig 6
Now click the Done Button to confirm the settings after probing the email server. It will add the email account to the library of the account as shown in Fig 7.

Fig 7
We can further add the subsequent accounts as shown in Fig 8 to Fig 12.

Fig 8

Fig 9

Fig 10

Fig 11

Fig 12
Thunderbird will pull the emails from the email server by clicking the Inbox as shown in Fig 13.

Fig 13
This is how we can add email accounts to Thunderbird by probing the email server having the autoconfig.example.com server block.
Summary
This tutorial provided the steps to add the virtual host and configure it for Thunderbird to support the autoconfig feature. It also provided the steps to add accounts to Thunderbird using the autoconfig feature.

