WampServer is an bundled application to install PHP, Apache Web Server, MariaDB, MySQL, phpMyAdmin, and Adminer. It makes it easy to install all the applications or software required to develop PHP applications. In this tutorial, we will discuss all the steps required to install the most recent version of WampServer i.e. WampServer 3.2.3 on Windows 10 for developing PHP applications.
Download WampServer
Click Here to open the WampServer site and scroll down as shown in Fig 1. It shows the most recent version of the Wamp Server i.e. 3.2.0 and bundled with Apache 2.4, PHP 5.6, PHP 7.3, PHP 7.4, MySQL 5.7, MySQL 8.0, MariaDB 10.3, MariaDB 10.4, Adminer 4.7, and PhpMyAdmin 4.9.

Fig 1
Now click on the title WAMPSERVER 64 BITS (X64) 3.2.0 and it will show a message dialog as shown in Fig 2.

Fig 2
Click the Download Directly Link which leads to the SourceForge Repository of WampServer or Wamp Server having the latest and all the previous releases as shown in Fig 3.

Fig 3
Now click the Download Button in case your download does not start. It will start downloading the file wampserver3.2.3_x64.exe. You can also download the previous releases by clicking the Files Tab to start the download of the older versions of WampServer. You can also follow the link having the latest build to download it manually.
Install WampServer
Double click the installer to start the installation. It shows a popup having language selection options as shown in Fig 4.

Fig 4
Select the appropriate language for WampServer and click the OK Button. It shows the next popup having License Agreement details as shown in Fig 5.

Fig 5
Accept the License Agreement and click the Next Button. It shows the next popup having information specific to the installation as shown in Fig 6.

Fig 6
Click the Next Button to move ahead. The next popup provides options to choose install location as shown in Fig 7.

Fig 7
The default installation path is c:\wamp64. You may choose a different location if required. Select the appropriate install location and click the Next Button. The next popup provides options to choose the installation components as shown in Fig 8.

Fig 8
Installing Apache, PHP 5.6, MariaDB, PhpMyAdmin, Adminer, and PhpSysInfo is mandatory. It also provides options to choose the versions of PHP, MySQL, and MariaDB. I have selected the most recent versions of PHP, MariaDB, and MySQL. We can also install MySQL separately using its own installer as shown in How To Install MySQL 8 With Workbench On Windows 10.
Click the Next Button to continue installing the Wamp Server. The next screen provides options to configure the Start Menu Option as shown in Fig 9.

Fig 9
Update the Menu name if required and click the Next Button. The next popup asks confirmation before starting the actual installation as shown in Fig 10.

Fig 10
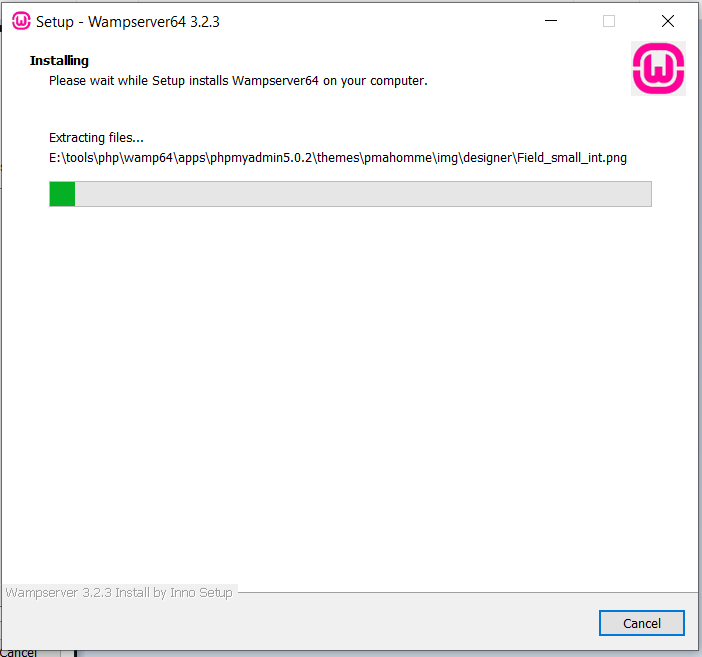
Click the Install Button to start the installation. It will show the installation progress as shown in Fig 11.

Fig 11
The installer asks for Default Browser and Editor and provides options to change it as shown in Fig 12 a and Fig 12 b.

Fig 12a

Fig 12b
Press the Yes Button in case the default browser has to be changed; otherwise, click the No Button to keep IE, i.e. Edge, as the default browser. Based on your selection, the default browser will be set for WampServer. The installer completes the installation and shows warning messages, as shown in Fig 13.

Fig 13
Click the Next Button to process the installation. After completing the installation, the last popup shows the success message as shown in Fig 14.

Fig 14
Click the Finish Button to close the installer. These are the basic steps required to install the WampServer on Windows 10.
Verify Installation
Execute the desktop shortcut icon to start WampServer. It will start MySQL and Apache configured for PHP. It might show the error of missing MSVCR110 DLL as shown in Fig 15. Downloading and installing the Visual C++ Redistributable will resolve this issue.

Fig 15
Now open the browser and test the URL http://localhost to confirm the installation. The default page will look similar to the one shown in Fig 16.

Fig 16
Summary
In this tutorial, we have installed the most recent version of the WampServer i.e. WampServer 3.2.3 on Windows 10 and also confirm the installation by opening the landing page of the Wamp Server.

