In the previous tutorials, we have discussed the steps required to install WampServer, PHP 7 or PHP 8, and NetBeans 11 or NetBeans 12. We have also discussed the steps required to debug PHP programs in CLI mode and remote debug PHP web applications as listed below.
- How To Install WampServer on Windows - The most recent version of WampServer while writing this tutorial supports up to PHP 7.3.1. The steps should be the same for the standalone installation of the Apache Web Server.
- How To Install NetBeans 11 for PHP on Windows OR How To Install NetBeans 12 for PHP on Windows
- How To Debug PHP In NetBeans On Windows
- How To Remote Debug PHP Web Apps In NetBeans On Windows
In this tutorial, we will discuss all the steps required to locally debug PHP web applications using Xdebug, NetBeans and WampServer installed on localhost.
Create
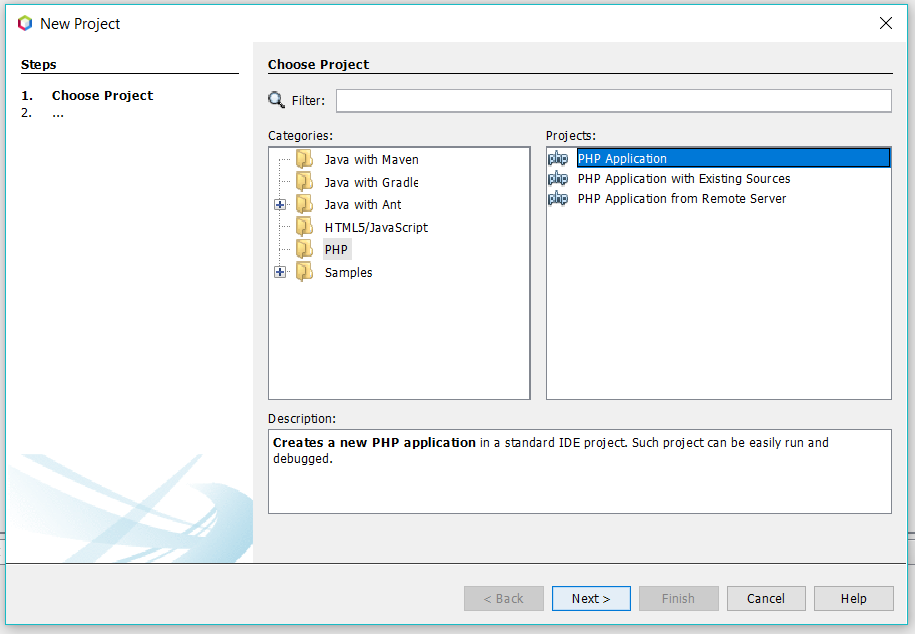
The very first step is to create a project locally either directly in the www directory of the WampServer or Apache Web Server or any other directory with appropriate alias and configurations to access the project via the browser. Click on File -> New Project or press Ctrl + Shift + N to create a project in NetBeans. It will show the New Project wizard as shown in Fig 1.

Fig 1
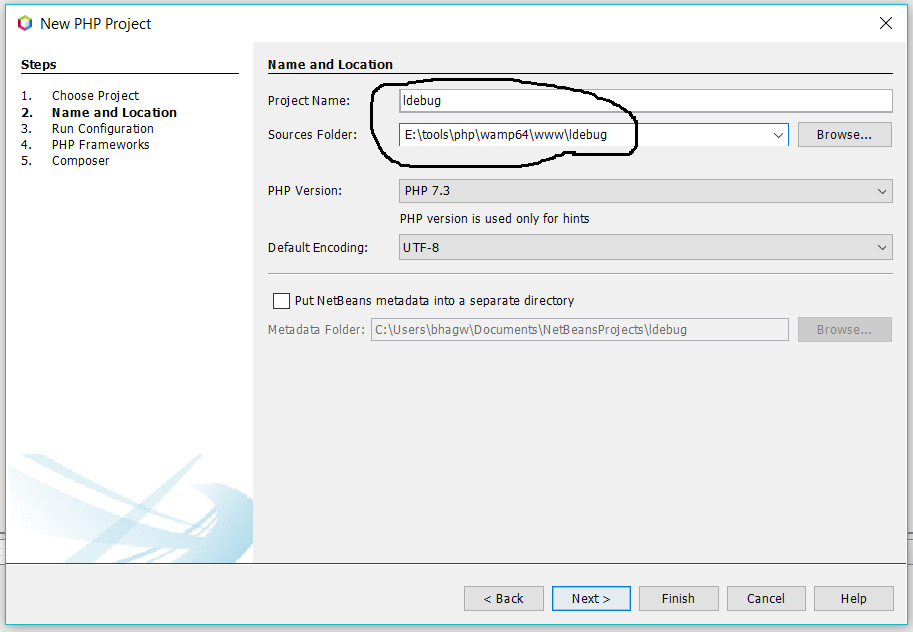
Also, select PHP under categories and PHP Application as the Project Option as shown in Fig 1. Click the Next Button to navigate to the Name and Location step. It will show the Name and Location wizard as shown in Fig 2.

Fig 2
Provide the Project Name and Sources Folder based on your project needs. Also, select the appropriate PHP version matching the

Fig 3
The Run As should be set to the local web server and the Project URL should be the URL to access the project on localhost as shown in Fig 3.
Click on the Next Button twice and leave the options to choose PHP Frameworks and Composer configurations blank. You can configure PHP Frameworks and Composer based on your project needs. Click the Finish Button to complete the project setup and create the project.
A default index.php file will be added to the project root with an HTML template as shown in Fig 4.

Fig 4
Now update the index.php file as shown in Fig 5. Also, add the breakpoint as we did in previous tutorials.

Fig 5
Execute Project
Right click on the index.php file and click on the Run Option or press Shift + F6 to execute the program. It will open the browser and shows the output as shown in Fig 6.

Fig 6
We can also configure the browser by right click on Project and then selecting the last option Project Properties. Now choose your preferred browser as shown in Fig 7 so that NetBeans will run and open your project in the selected browser.

Fig 7
Debug Project
Right click on the index.php file and click on the Debug Option or press Ctrl + Shift + F5 to start the debug session. It will open the browser and shows the blank screen without executing the program since the debugger will pause at the first line of the program as shown in Fig 8.

Fig 8
Now, click the Continue Button and the debugger will pause at line number 15 having the next breakpoint as shown in Fig 9.

Fig 9
Now again press the Continue Button and the first iteration of the for loop will execute. The debug pointer will again stop at line number 15 i.e. the next breakpoint as shown in Fig 10. Similarly, we can use the other options including Step Into, Step Over, Step Out, and Run to Cursor to find the issues in the code.

Fig 10
Note that the value of $i is changed on the variables stack. In case we are sure that the issue is identified, we can remove the breakpoint and again press on the Continue Button to complete the execution. The browser will halt until the execution completes and shows the output at the end. The final output should be similar to the one shown in Fig 11.

Fig 11
We can remotely debug a local PHP web application using NetBeans and Xdebug.
Summary
This tutorial provided the reference links to install WampServer, PHP 7 or PHP 8, and NetBeans 11 or NetBeans 12. It provided all the steps required to locally debug a PHP project using the NetBeans IDE.

