In the previous tutorial, we have discussed debugging a PHP program using Eclipse for PHP on Windows. In this tutorial, we will go further and remote debug the PHP applications deployed on a web server. It assumes that Java, PHP, and Apache Web Server are already installed on the system. You might have already installed PHP and Apache Web Server while installing WAMP or XAMPP.
This tutorial also assumes that you have already gone through How To Debug PHP In Eclipse On Windows to get the basic concepts of debugging.
Notes: You may follow How To Install PHP 7 On Windows or How To Install PHP 8 On Windows to install the most recent version of PHP 7 or PHP 8. The other relevant tutorials include How To Install Java 11 On Windows, How To Install Java 15 On Windows, How To Install OpenJDK 15 On Windows, How To Install WampServer on Windows, How To Install XAMPP On Windows 10, How To Install XAMPP With PHP 8 On Windows 10, and How To Install Eclipse for PHP on Windows.
Also, this tutorial provides all the steps required to debug PHP using Xdebug 3.
You can also follow NetBeans tutorials at How To Debug PHP In NetBeans On Windows, How To Remote Debug PHP Web Apps In NetBeans On Windows, and How To Debug PHP Web Apps In NetBeans On Windows.
Install PHP
You can install PHP by following How To Install PHP 7 On Windows, How To Install PHP 8 On Windows, How To Install WampServer on Windows, How To Install XAMPP On Windows 10, or How To Install XAMPP With PHP 8 On Windows 10.
Install Java
You can install Java by following How To Install Java 11 On Windows, How To Install Java 15 On Windows, or How To Install OpenJDK 15 On Windows.
Install Eclipse for PHP
You can install Eclipse for PHP by following How To Install Eclipse for PHP on Windows.
Debugging Concepts
You can learn the debugging concepts by following How To Debug PHP In Eclipse On Windows. Also, make sure that you have configured the PHP used by your web server. This tutorial also assumes that you have properly configured Xdebug and tested it using the basic program as discussed in How To Debug PHP In Eclipse On Windows.
Create Project
In this step, we will create the project to remotely debug the PHP script. Create the HelloWorld project by clicking the New -> Project as shown in Fig 1.

Fig 1
Choose the option PHP Project as shown in Fig 2.

Fig 2
Now click the Next Button. The next wizard provides options to configure the project name, location, and also provides options to specify the PHP version as shown in Fig 3.

Fig 3
Now, click the Finish Button to create the project. It creates the HelloWorld project as shown in Fig 4.

Fig 4
Now create the PHP script i.e. index.php by right-clicking on Project -> New -> PHP File as shown in Fig 5.

Fig 5
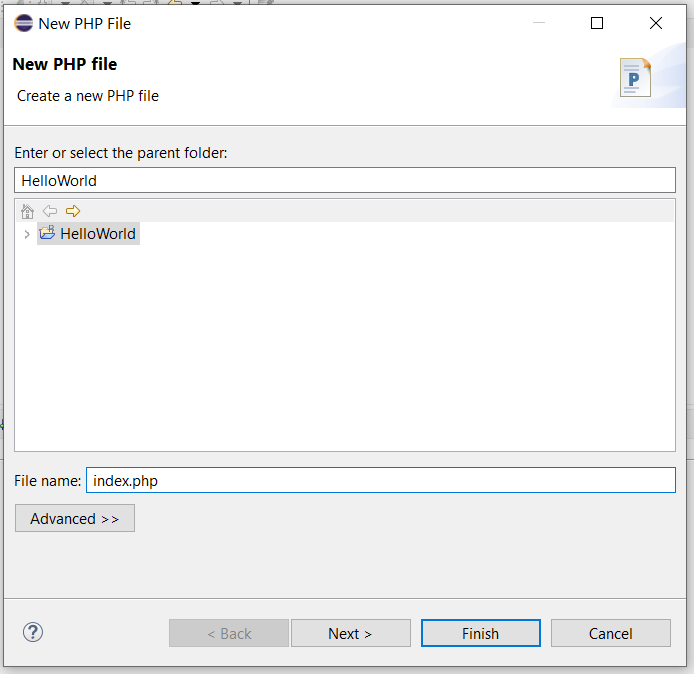
Now, configure the PHP file as shown in Fig 6.

Fig 6
Click the Finish Button to create index.php. Also, update the file as shown in Fig 7.

Fig 7
This is all about creating the PHP project and writing the first program to learn the debugging concepts. Now, create the appropriate alias for the web server so that we can access the project via browser as shown in Fig 8.

Fig 8
Execute Project
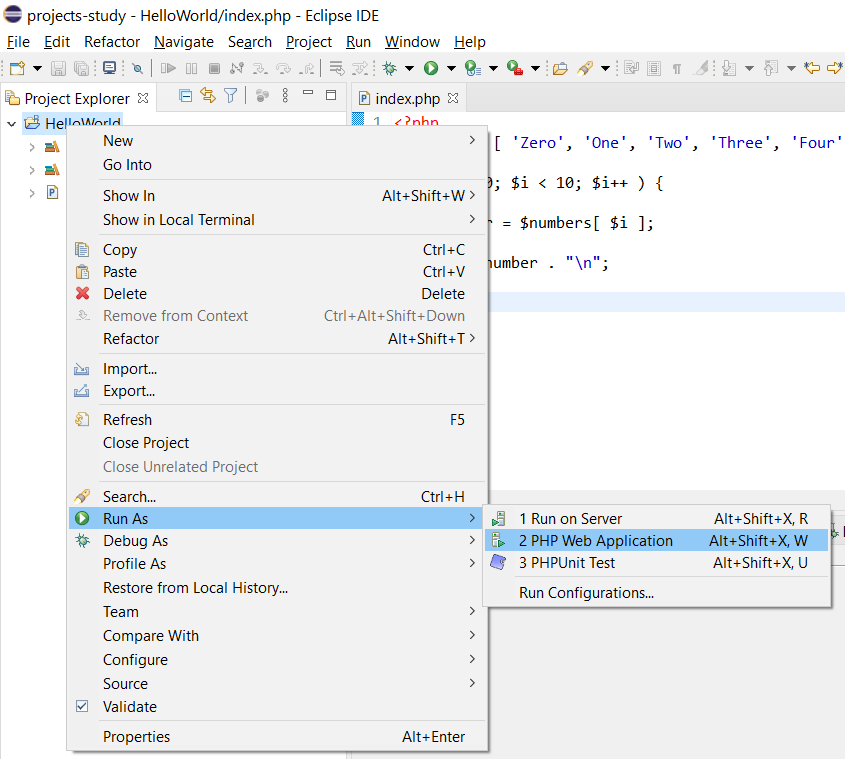
In this step, we will execute the project from Eclipse. Now, right-click the Project -> Run As -> PHP Web Application as shown in Fig 9.

Fig 9
In the absence of PHP server configuration, it might show the error - Failed to launch on PHP server, Reason: Launch target not found as shown in Fig 10.

Fig 10
We must create the Run Configuration to execute the project as a Web Application. It can be done as shown in Fig 11.

Fig 11
Now, click the Run Configurations as shown in Fig 11 and click the New Launch Configuration as shown in Fig 12.

Fig 12
Configure the Run Configuration as shown in Fig 13.

Fig 13
Now click the Apply Button to save the Run Configuration and click the Run Button to launch the project on the Web Browser. It will execute the project and shows the output within the in-built browser as shown in Fig 14.

Fig 14
Remote Debug
In the previous steps, we have created the HelloWorld PHP project in eclipse and executed it by creating the Run Configuration. In this step, we will debug the same project using the same Run Configuration. Now add a breakpoint at line number 6 as we did in How To Debug PHP In Eclipse On Windows. It should show the breakpoint as shown in Fig 15.

Fig 15
Now, click the Debug and choose HelloWorld Run Configuration as shown in Fig 16.

Fig 16
It will show the Launch Error as shown in Fig 17. The error states - Launch Configuration 'HelloWorld' could not be started in debug mode. There is no debugger specified in corresponding 'Default PHP Web Server' server configuration.

Fig 17
Now open the Debug Configurations Wizard as shown in Fig 18.

Fig 18
It will show the Debug Configuration for the HelloWorld Run Configuration with the Debug Tab as shown in Fig 19.

Fig 19
Now click the Debug Tab to view the debugger configuration as shown in Fig 20.

Fig 20
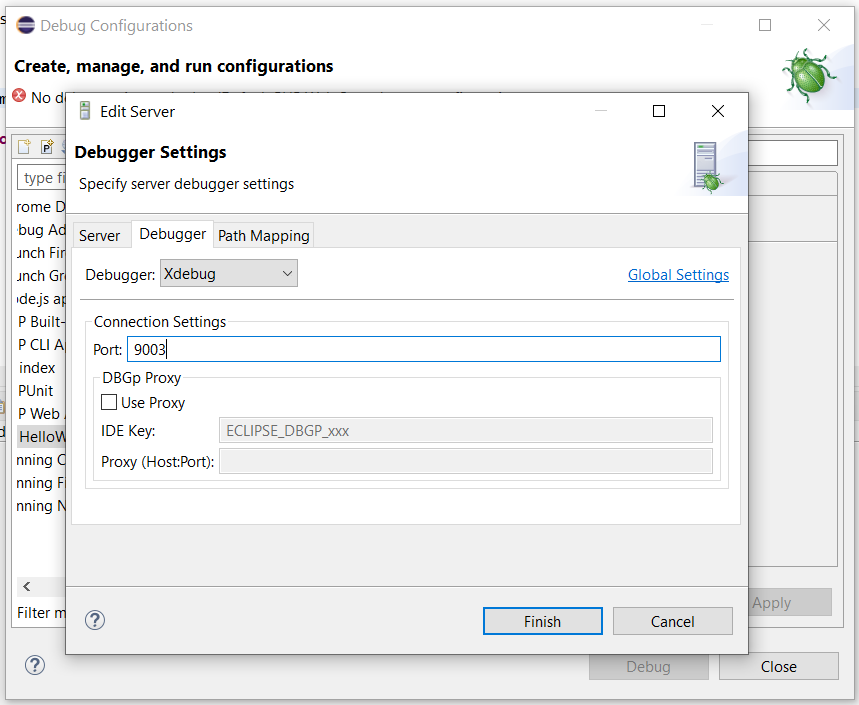
It shows that there is no debugger configured for the Default PHP Web Server. Now, click the Configure Button to configure the debugger. It shows the options to configure the debugger as shown in Fig 21.

Fig 21
Choose Xdebug as the debugger and specify the port as 9003 to debug with Xdebug 3. Also, click the Finish Button to close the wizard. It will show the debugger configured by us as shown in Fig 22.

Fig 22
Now, click the Apply Button and click Debug to start debugging the PHP script. It will stop the pointer at line number 1 and ask to switch to Debug Perspective as shown in Fig 23.

Fig 23
Now, click the Switch Button to switch to Debug Perspective. The Debug Perspective should be similar to Fig 24.

Fig 24
Now click the Resume Button to move the debugger pointer as shown in Fig 25.

Fig 25
Fig 25 shows that the debug pointer is moved to line number 6 after clicking the Resume Button. Now again click the Resume Button to move to the next breakpoint as shown in Fig 26.

Fig 26
Also, check the variables stack. The variable $i is set to 1 and the variable $number is set to Zero after the first iteration of the for loop.
This is how we can debug the PHP Web Applications in Eclipse using the Xdebug. Now, double-click the breakpoint to remove it and again click the Resume Button to execute the script. It should show the output in the in-built browser as shown in Fig 27.

Fig 27
Note that the debug session parameter is configured while debugging the project which is missing in case we run the project using the Run Configuration as shown in Fig 14.
Summary
This tutorial provided the reference links to install PHP 7, PHP 8, Java 11, Java 15, WampServer, XAMPP, and Eclipse for PHP. It also provided the steps to create the HelloWorld project and execute the PHP script as a Web Application. The last section of the tutorial provided the steps to debug the same PHP script by configuring the Debugger.

