In this post, we will discuss all the steps required to install Eclipse for PHP development on Windows. The Eclipse version available while writing this tutorial was eclipse ide 2018-12. The steps should be
Notes: This post assumes that Java is already installed on the System. In case Java is not installed, follow the links to install Java 10 or Java 11 on Windows. It also assumes that PHP is installed on this system either using XAMPP or WampServer. We can also install PHP separately as explained here.
Step 1: Download Eclipse for PHP
Click Here to open the Eclipse download page having the list of all the variations available for download. Click on Eclipse IDE for PHP Developers title. It shows the description and all the versions of Eclipse available for download. Click on the link Windows 64-bit to download the Eclipse for Windows 64-bit installation. It opens the download page having Download Button as shown in Fig 1.

Fig 1
Step 2: Extract The Download
After the download is done, extract it to the specific location. It should look similar to Fig 2.

Fig 2
Step 3: Desktop Shortcut
Now create a desktop shortcut icon by following the below-mentioned steps.
Right click on eclipse.exe -> Click on Send To -> Click on Desktop

Fig 3
Double click the shortcut icon to execute the Eclipse installed by us. It will show the options to choose Workspace as shown in Fig 4.

Fig 4
It might also show Windows Security Alert as shown in Fig 5.

Fig 5
The default workspace layout looks similar to the one shown in Fig 6.

Fig 6
Step 4: Configure PHP
In this step, we will configure the PHP installed either with XAMPP or WampServer or standalone. Follow the below-mentioned steps to configure the Eclipse for PHP installation.
Tool Bar -> Click Window -> Click Preferences -> Click PHP -> Click Installed PHP
The panel looks like the one shown in Fig 7.

Fig 7
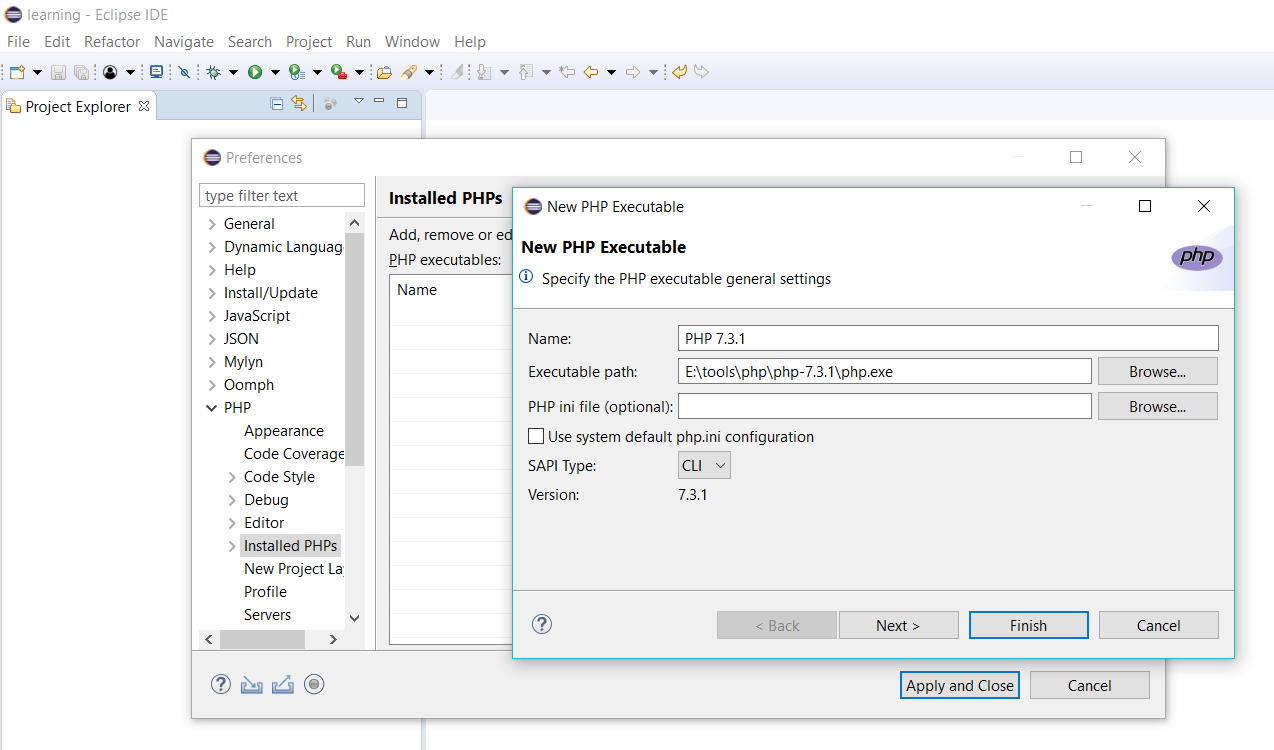
Now click on Add Button on Installed PHPs Panel and fill the details as shown in Fig 8. These details might differ based on the PHP version and location on your system. You can also configure the php.ini file if it's available. Click on Finish Button to configure the installed PHP.

Fig 8
Now click on Apply and Close Button to close the Preferences Panel. This is how we can configure the installed version of PHP for Eclipse.
Step 5: Hello PHP
In this step, we will write a simple Hello PHP program.
Click on File and then click on New Project in order to create a project. It will show the Project Panel as shown in Fig 9 and Fig 10. Click on Finish Button to create our first PHP project using Eclipse.

Fig 9

Fig 10

Fig 11
Edit the file and write Hello PHP using echo as shown in Fig 12 and save the file.

Fig 12

Fig 13
The final output will be displayed on

Fig 14

