NetBeans is one of the most popular and free IDE used to develop PHP applications. It provides several in-built features including code hinting, database tool, git, svn, etc required to develop software using PHP. It enables the plugin for PHP when required. This tutorial provides all the steps required to install NetBeans 12 for PHP development on Windows 10 using the installer provided by Apache. The highlights of NetBeans are available on the Official Page from Apache as shown in Fig 1.

Fig 1
Prerequisites
NetBeans assumes that the appropriate version of JDK is installed on the System. NetBeans 12 needs at least JDK 8 to continue the installation. You can follow How To Install Java 15 On Windows, How To Install OpenJDK 15 On Windows, or How To Install Java 8 On Windows 10 to install the most recent version of JDK on your Windows system.
Download NetBeans 12
Click the Find Out More Button as shown in Fig 1. It will navigate to the NetBeans Features Page as shown in Fig 2.

Fig 2
Now click the Download Button to navigate to the Downloads Page of NetBeans as shown in Fig 3.

Fig 3
I have highlighted the download options for windows using the installer. Now click the Windows Installer Link. It will open the page having download links from the mirror sites as shown in Fig 4.

Fig 4
Now click the suggested download link as highlighted in Fig 4. It will start downloading the most recent release of NetBeans 12.
Install NetBeans 12
In this step, we will install NetBeans 12 for PHP on Windows 10 using the installer downloaded by us in the previous step. Confirm the currently installed and active Java version as shown in Fig 5.

Fig 5
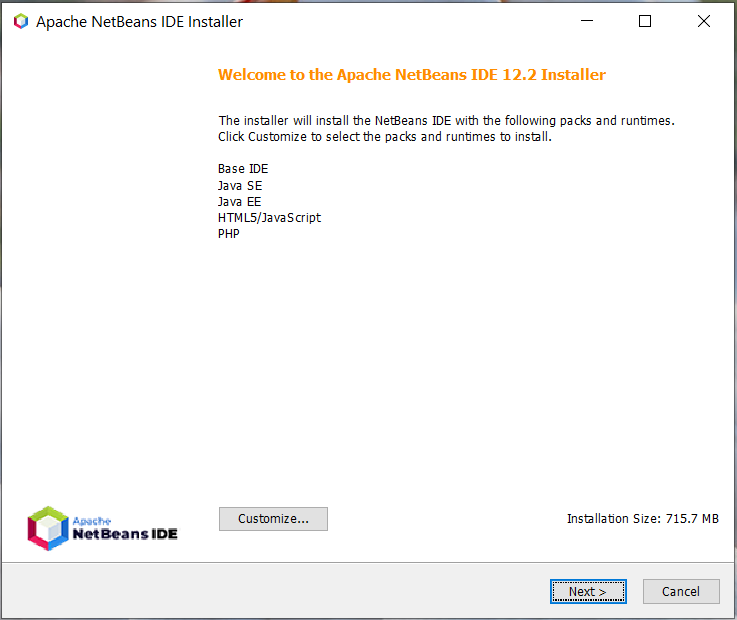
Execute the installer to start installing NetBeans on Windows. It will ask for system permissions to continue the installation. Click the Yes Button to continue the installation. Next, it will show the Welcome Screen having options to choose the components as shown in Fig 6.

Fig 6
It provides options to customize the components to be installed using the Customize Button as shown in Fig 7.

Fig 7
I kept all the components selected and clicked the Next Button to continue the installation. The installer asks to accept the License Agreement on the next screen as shown in Fig 8.

Fig 8
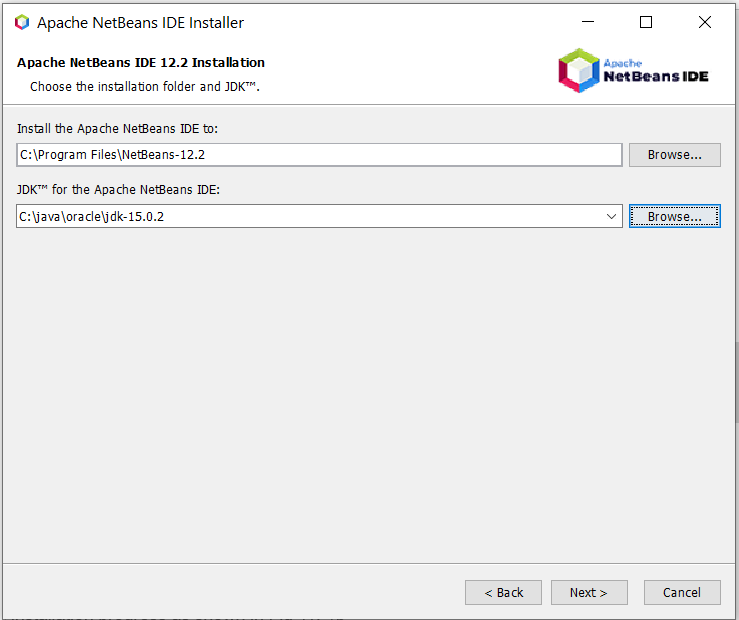
Now click the Next Button to configure the installation path and JDK path as shown in Fig 9.

Fig 9
Click the Next Button to progress the installation. The next screen shows the installation summary and provides options to get updates as shown in Fig 10.

Fig 10
Now click the Install Button to start the installation. It will show the installation progress as shown in Fig 11.

Fig 11
It will show the Success Screen after completing the installation as shown in Fig 12.

Fig 12
Now click the Finish Button to close the installer.
Launch the IDE
We can launch the IDE using the launcher icon placed on the Desktop. It might ask to import settings from the old installation as shown in Fig 13.

Fig 13
Choose the appropriate option. It will start the IDE and shows the Welcome Screen and the Default Layout as shown in Fig 14 and Fig 15.

Fig 14

Fig 15
This completes the installation of the most recent version of NetBeans i.e. NetBeans 12 on Windows 10.
Create PHP Project
Start the IDE in case it's not running. Now click the File Options on Main Menu -> New Project. It will show the New Project Wizard as shown in Fig 16.

Fig 16
Select PHP from the Categories option and also select PHP Application from Projects option as highlighted in Fig 16. The NetBeans 12 will show a message in the description section to enable appropriate plugins required for PHP development, in case it's the first project. Now click the Next Button. On the next wizard, NetBeans will find the corresponding plugins required for PHP development and shows the project configuration options as shown in Fig 17.

Fig 17
You can choose the appropriate location of the project and PHP version depending on your project needs.
Provide the project name and location based on your requirements and also select the PHP version. I have selected PHP 7.4 since it's already installed on my system. You can follow How To Install PHP 7 On Windows and How To Install PHP 8 On Windows to install the most recent version of PHP. You can also install PHP bundled with XAMPP or WAMP by following How To Install XAMPP On Windows or How To Install WampServer on Windows. Now click on the Next Button. The next wizard provides options to choose the project's runtime configurations. I have selected Script for this tutorial as shown in Fig 18.

Fig 18
It also asks for the corresponding PHP Interpreter to execute the program for the Script Option. The configuration should be similar to the one as shown in Fig 19 and Fig 20.

Fig 19
Click the Apply Button to apply the PHP Interpreter configurations.

Fig 20
Apart from the Script Option to run the PHP program on the console, there are few more options specific to Runtime including Local Web Site, Remote Web Site, and PHP Built-in Web Server. This tutorial does not discuss the additional Runtime configuration. After selecting the Script as a Runtime option, we can also select the location where PHP is installed.
Now click the Next Button. The next screen provides options to configure the PHP Frameworks as shown in Fig 21.

Fig 21
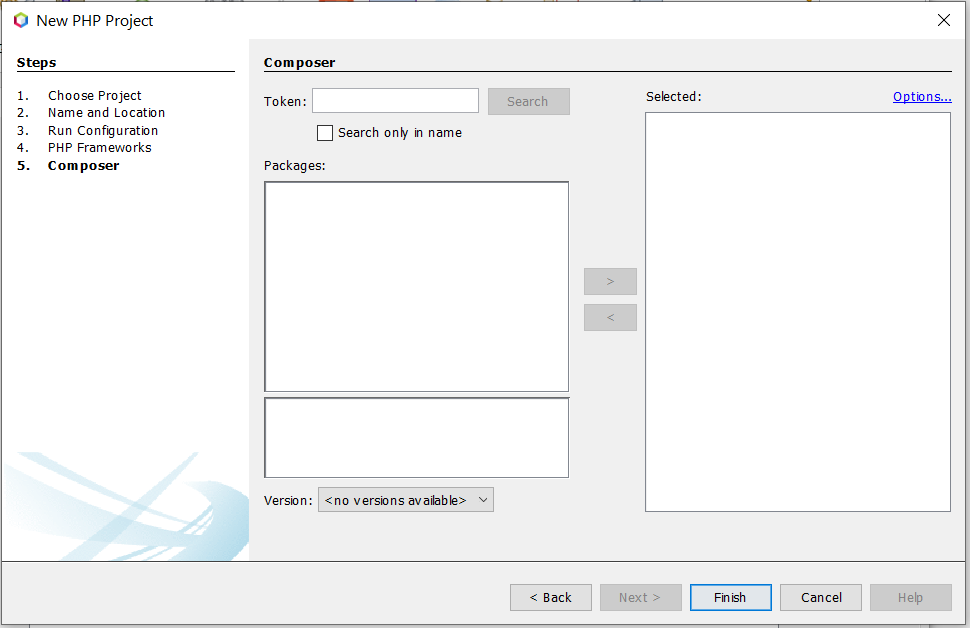
Now click the Next Button. The next wizard provides options to configure Composer as shown in Fig 22. We will simply skip this step since we will be writing a simple Hello World program in this tutorial.

Fig 22
Now click the Finish Button to complete the project set up. The project with the default index.php file created by NetBeans looks like Fig 23.

Fig 23
Hello PHP
In this step, we will update the index.php program and execute it on the console. Write Hello PHP as shown below.
<?php
echo "Hello PHP !!";
Now right-click on the index.php file in the Projects Window on the left panel. Also, click on Run to execute the program as shown in Fig 24. You can also select the File on Projects Window and press Shift + F6 to execute the program.

Fig 24
It will show the output as shown in Fig 25.

Fig 25
These are the basic steps required to write and execute PHP programs using NetBeans 12.
Summary
This tutorial provided all the steps required to install the most recent version of NetBeans 12 on Windows for PHP development.

