NetBeans is one of the most popular and free IDE used to develop JAVA, PHP, and JavaScript applications. It provides several in-built features including code hinting, database tool, git, svn, etc required to develop software using Java, PHP, JavaScript, HTML, CSS, and many other languages. It enables the plugins for PHP, JavaScript, etc when required. This tutorial provides all the steps required to install NetBeans 11 on Ubuntu 18.04 LTS using the installer provided by the Apache. The highlights of NetBeans are available on the Official Page from Apache as shown in Fig 1.

Fig 1
Prerequisites
NetBeans assumes that the appropriate version of JDK is installed on the System. NetBeans 11 needs at least JDK 8 to continue the installation. You can follow How To Install Java 14 On Ubuntu, How To Install OpenJDK 14 On Ubuntu, or How To Install Java 8 On Ubuntu to install the most recent version of JDK on your Windows system. The installer threw an error (java.lang.NoClassDefFoundError: java/util/jar/Pack200) with Java 14, hence I have to switch back to Java 8 on my system path.
Download NetBeans 11
Click the Find Out More Button as shown in Fig 1. It will navigate to the NetBeans Features Page as shown in Fig 2.

Fig 2
Now click the Download Button to navigate to the Downloads Page of NetBeans as shown in Fig 3.

Fig 3
I have highlighted the download options for Ubuntu using the installer. Now click the Ubuntu Installer Link. It will open the page having download links from the mirror sites as shown in Fig 4.

Fig 4
Now click the suggested download link as highlighted in Fig 4. It will start downloading the most recent release of NetBeans 11. Also, verify the installation by following the instructions at the bottom of Mirrors Page.
Install NetBeans 11
In this step, we will install NetBeans on Ubuntu using the installer downloaded by us in the previous step. Confirm the currently installed and active Java version as shown in Fig 5.

Fig 5
Execute the installer to start installing NetBeans on Ubuntu using the commands as shown below.
# Downloads Directory
cd /data/setups

# Execute the Installer
./Apache-NetBeans-11.3-bin-linux-x64.sh
Next, it will show the Welcome Screen as shown in Fig 6.

Fig 6
It provides options to customize the components to be installed using the Customize Button as shown in Fig 7.

Fig 7
I kept all the components selected and clicked the Next Button to continue the installation. The installer asks to accept the License Agreement on the next screen as shown in Fig 8.

Fig 8
Now click the Next Button to configure the installation path and JDK path as shown in Fig 9.

Fig 9
Click the Next Button to progress the installation. The next screen shows the installation summary and provides options to get updates as shown in Fig 10.

Fig 10
Now click the Install Button to start the installation. It will show the installation progress as shown in Fig 11.

Fig 11
It will show the Success Screen after completing the installation as shown in Fig 12.

Fig 12
Now click the Finish Button to close the installer. It will create the Desktop Launcher Icon to start the IDE from the Desktop.
Launch the IDE
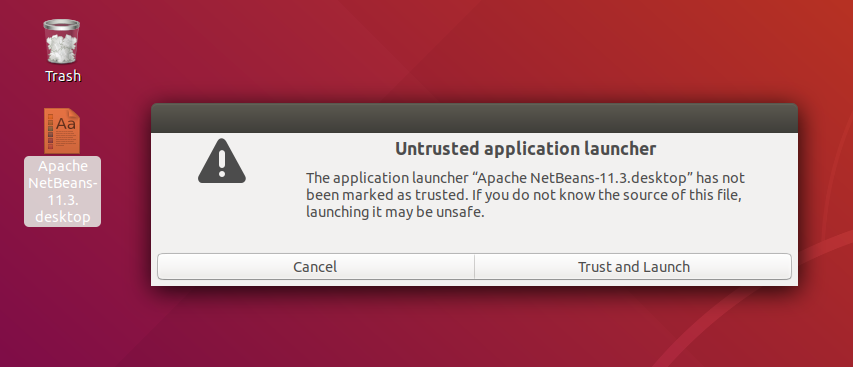
We can launch the IDE using the launcher icon placed on the Desktop. It will ask to use the Launcher for the first time as shown in Fig 13.

Fig 13
Click the Trust and Launch Button to start the IDE. It will start the IDE and shows the Welcome Screen and the Default Panels as shown in Fig 14 and Fig 15.

Fig 14

Fig 15
I have re-configured the most recent version of Java i.e. Java 14 to be the default JDK as shown in Fig 16.
# Check version
java -version

# Configure Java
sudo update-alternatives --config java

# Configure Java Compiler
sudo update-alternatives --config javac

# Check version
java -version

Fig 16
Hello World
This section provides links to HelloWorld projects using Netbeans.
Hello World Program In PHP Using NetBeans
Hello World Program In Java Using NetBeans
Summary
This tutorial provided all the steps required to install the most recent version of NetBeans 11 on Ubuntu for Java, JavaScript, and PHP development.

