This tutorial provides all the steps required to create the bootable USB of Ubuntu 20.04 LTS using Rufus On Windows. The bootable USB can be further used as Ubuntu Live USB to try out Ubuntu without installing it. The same bootable USB can be used to fresh install Ubuntu. We can even use the Ubuntu Live USB to repair or fix a broken configuration.
This tutorial shows how to create the bootable USB of Ubuntu 20.04 LTS. The steps should be the same for the other versions of Ubuntu.
Prerequisites
Download the Ubuntu 20.04 LTS ISO from the official download pages as listed below. The download pages provide options to download Desktop ISO and Live Server ISO. These pages also provide the torrent files to download using the preferred peer-to-peer software.
Ubuntu 20.04 LTS - Focal Fossa
Ubuntu 19.04 - Disco Dingo
Ubuntu 18.04 LTS - Bionic Beaver
Ubuntu 16.04 LTS - Xenial Xerus
The download options of Ubuntu 20.04 LTS are shown in Fig 1.

Fig 1
We can download the Desktop and Live Server ISOs to follow this tutorial. The same can also be downloaded using the torrent files.
This tutorial also assumes that you have a USB stick having at least 4GB space on it.
Rufus On Windows
This section provides the steps to create the Ubuntu bootable USB on Windows using Rufus. It assumes that you have access to Windows PC with USB ports. This tutorial used Windows 10 PC to create the bootable USB.
Step 1 - Download Rufus - Open the Official Website of Rufus and scroll down to view the download options as shown in Fig 2.

Fig 2
Click the Download Link as highlighted in Fig 1 to start downloading the latest version of Rufus. There is no need to install Rufus since we have downloaded the executable file.
Step 2 - Mount USB - Insert the USB stick
Step 3 - Launch Rufus - Execute Rufus using the executable downloaded in Step 1. It might ask for system permissions. Click the Yes Button to allow Rufus. It shows the default options as shown in Fig 3.

Fig 3
Step 4 - Select ISO - Now click the Select Button and browse the file system to select the Ubuntu 20.04 LTS ISO. After selecting the ISO, Rufus shows the ISO selection as shown in Fig 4.

Fig 4
Step 5 - Make Bootable USB - Click the Start Button to start creating the bootable USB of Ubuntu 20.04 LTS. It also asks to download additional files as shown in Fig 5.

Fig 5
Click the Yes Button to accept and allow Rufus to download the additional files. It asks to choose the ISO mode as shown in Fig 6.

Fig 6
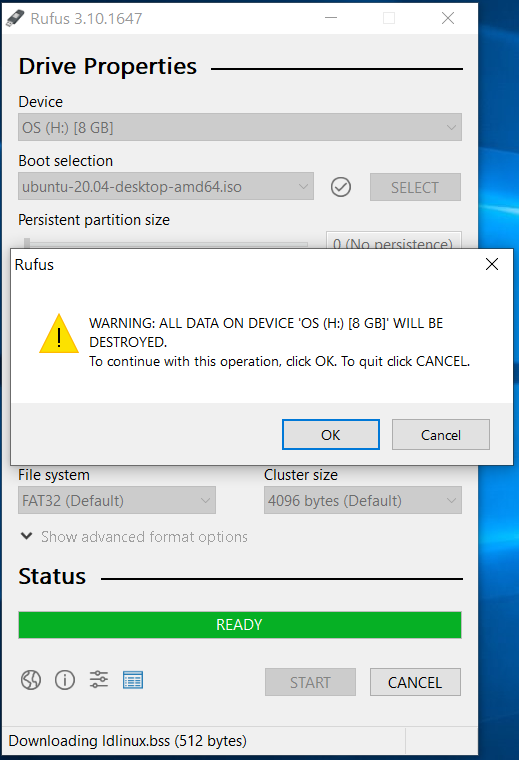
Keep the recommended mode selected and click OK Button. It also asks to erase all the data on the USB as shown in Fig 7. Make sure that you have backed up the important files on the USB since it's an irreversible process.

Fig 7
Now click the OK Button to start creating the bootable USB. Rufus shows the initial screen after creating the bootable USB as shown in Fig 8. Do not press the Start Button, else it will again start the process to create the bootable USB.

Fig 8
Summary
This tutorial provided the steps required to create the bootable USB of Ubuntu 20.04 LTS using Rufus on Windows 10.

