You can use Gmail to send emails from your WordPress account. Yes, you heard it right. You can also send emails from your Gmail account using WordPress, Thunderbird, Outlook, and other email clients. It is possible because of the Gmail SMTP server.
Connect using SSL or TLS, and email anyone outside or inside your organization using an SMTP server - smtp.gmail.com.
smtp.gmail.com allows you to configure any external email application to send messages for free with Gmail. The same is true for WordPress. A Gmail SMTP server makes WordPress more reliable, and you can send up to 500 emails daily. This blog will discuss how to configure GMail to send emails in WordPress.
How to configure Wordpress to use the Gmail SMTP server?
To send emails using the Gmail SMTP server in WordPress, you need to create a Google app that connects to the Gmail SMTP server via an API instead of just plugging in the SMTP details. You also need the help of a WordPress SMTP plugin. Here, you can use the free Post SMTP Mailer, Email Log plugin, or WP Mail SMTP plugin.
In our blog, we have decided to use the Gmail SMTP server to send your WordPress site's transactional emails for free. Let's start with four simple steps.
1.Install the Post SMTP Mailer/Email Log plugin.
2.Create a Google app.
3.Add Google app API keys to the Post SMTP Mailer.
4.Send a test email.
Here is a guide for every step!
1. How do you install the Post SMTP Mailer/Email Log plugin?
First, install and activate the free Post SMTP Mailer/Email Log plugin from WordPress.org. It helps you configure your WordPress site to send emails via the Gmail API/SMTP server. After activating the plugin, follow the instructions:
A. Go to the Post SMTP tab in your WordPress dashboard, check the big Start the Wizard button, and click the Show All Settings link.
B. Next, go to the Message tab. You must set your "from" email address and name here. (You can use your personal Gmail address as the "from" email or a different email address you prefer over your mail.)
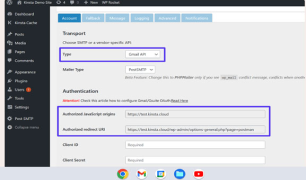
C. Next, go to the Account tab -> click on the Gmail API in the Type dropdown. Select a choice; additional options are in the Authentication box below. You should keep this page open for Authorized JavaScript origins and Authorized redirect URI details that you need in step 2.
2. Create a Google Application
In step 2, you must create a Gmail app. This allows your WordPress site to send emails securely via Gmail API. We have further divided this step into four steps to make the process easy for our readers to understand. Let's start!
A. Create a project: First, open a new tab and copy the Google Cloud console URL to the Google Developers Console. Create a new project (If you are logging into the Developers Console for the first time, create your first project. If not, that is, you already have some projects. Click the dropdown in the top-left corner to create a new one represented by 1 in the following screenshot).
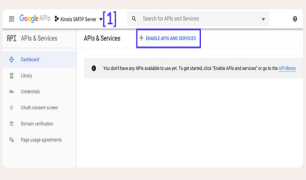
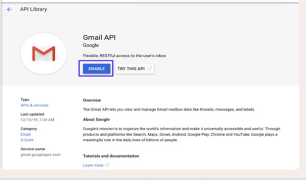
B. Enable Gmail API: Now, click Enable APIs and Services, which we have shown in the above screenshot. You should now search Gmail. On doing so, you will have the following on the next screen.
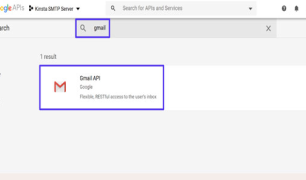
Choose Gmail API and click Enable on the full Gmail API page.
C. Create Credentials: You are now in a dedicated interface for the Gmail API. Click on the Create credentials button. Fill out the form name and find out what credentials you need.
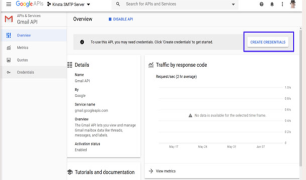
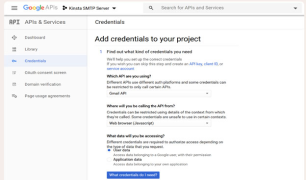
You can fill in the form using the following information:
- Q- Which API are you using?
Gmail API
- Q- Where will you be calling the API from?
Web browser (JavaScript)
- Q- What data will you be accessing?
User data
Next, click the button at the bottom; what credentials do I need?
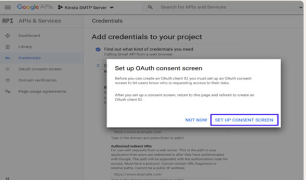
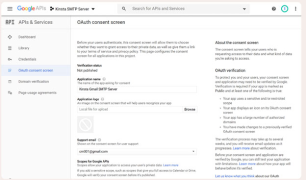
D. Set up a consent screen: After you complete step C, Google will prompt you to set up a consent screen. You need to do this without worrying about the information you enter because you'll only use it for your WordPress site.
So, click the Set up a consent screen button, as shown in the screenshot.
When you click on the set up a consent screen, a new tab will open where you can configure an OAuth consent screen. Here, it would help if you kept the original browser tab open. Go to User Type -> select External -> click Create
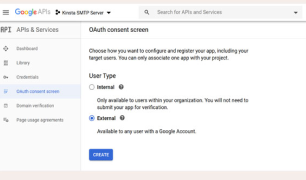
When you click the create button, you will be prompted to enter basic details for your site on the next screen. Don't worry about the information you put in; you can only see it.
After adding information, click on the save option.
E. Adding credentials to your project
It is the finish of the Google application-creating step. Go to Add credentials to your project interface. Fill in the information, including the website's name, Authorized JavaScript origins, and Authorized redirect URIs.
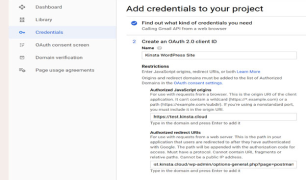
Once you've done so, click the refresh button. When you do so, the Create OAuth client ID button will open. Click the Create OAuth client ID button and then click Done.
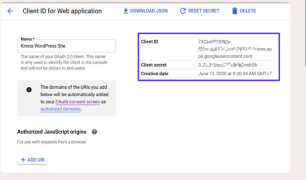
A section for OAuth 2.0 Client IDs in the Credentials tab of your project will open where you have to click on the entry for the name you just created.
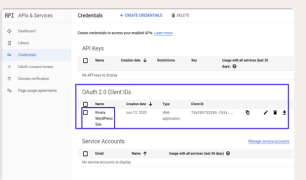
In the next step, fill in the Client ID and Client secret values.
3. Add Gmail App Client ID to Post SMTP mailer/ Email log
In this step, follow the following commands:
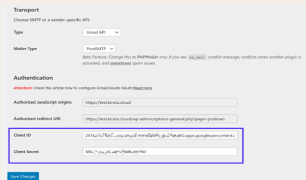
Go back to the Post SMTP Mailer/Email Log settings (in the WordPress dashboard)
Enter the value of Client ID and Client secret
Save the changes
The plugin will prompt permission to be granted to Google.
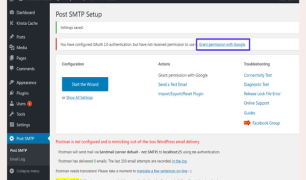
When you click the link, the normal Google authorization process will open. A warning call will appear, but you can safely ignore it.
You should next do the following:
Go to Advanced settings
Check the "yourwebsite.com" link
Continue the authorization process

Allow your WordPress site to access your Gmail account to send emails via the Gmail SMTP server.
4. Send a Test Email to Check It's Working
Post SMTP Mailer/Email Log includes an option to send test emails. Go to the main settings page.
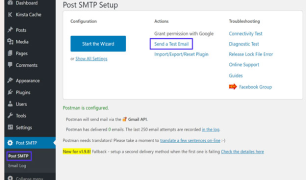
To send an email, enter the email address.
Check for a success message in the plugin's settings.
Go to the email inbox and see an email.
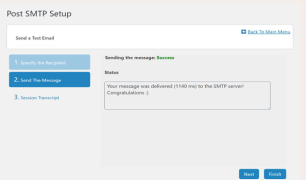
Hurray! It's done. You can check all the emails sent in the Post SMTP -> Email Log.

Key Tips while configuring Gmail to send Email In Wordpress
Here, we have shortlisted some key tips while working on how to configure Gmail to send email via Wordpress:
- You can only use Gmail SMTP to send emails; you should use POP3 or IMAP to receive emails. You can find these tabs in Google Settings.
- To find the Gmail SMTP server, use the following information:
- Gmail SMTP server address: smtp.gmail.com
- Gmail SMTP name: Your name
- Gmail SMTP username: Same Gmail address that you own (e.g. you@gmail.com)
- Gmail SMTP password: The same password as the Gmail account
- Gmail SMTP port (TLS): 587
- Gmail SMTP port (SSL): 465
- Requires SSL: Yes
- Requires TLS: Yes
- Requires authentication / Use authentication: Yes
- Use secure connection: Yes
Summary
Configuring Gmail to send emails in WordPress ensures reliable communication with your audience. The blog discusses the process in four simple-to-understand steps. By following these steps, you can configure WordPress to send emails.
You can confidently send emails, enhance user engagement, and streamline communication efforts. Remember to monitor your email functionality periodically and fix any issues promptly.
