Eclipse is widely used to develop applications using Java, PHP, and C/C++ as the programming languages. It's one of the most popular open-source IDE among the developers. This tutorial provides all the steps required to install Eclipse for C/C++ Developers to develop applications in C or C++.
It assumes that Java is already installed on the system. You may also be interested in How To Install OpenJDK 12 On Windows and How To Install Java 11 On Windows.
It also assumes that appropriate C++ compiler is already installed on the system. You may also be interested in How To Install MinGW on Windows to install MinGW or MinGW-W64 having C++ compiler.
Step 1: Download Eclipse
Open the Eclipse Packages Page to view the various packages distributed by the Eclipse Foundation. It shows the package for C/C++ as shown in Fig 1.

Fig 1
Click on the 64-bit for Windows option as highlighted in Fig 1. It will navigate to the Downloads Page as shown in Fig 2.

Fig 2
Click on the Download Button to start the download. You may also choose other mirror sites as listed on the Downloads Page.
Step 2: Install Eclipse
In this step, we will install Eclipse for C/C++ Developers using the zip downloaded in the previous step. Extract the download to your preferred location having sufficient space on the disk. The extract will look like the one as shown in Fig 3.

Fig 3
You may also create the desktop shortcut to execute it from the desktop using the executable available in the bin directory. Now execute the Eclipse using the executable. It will ask to choose the workspace as shown in Fig 4.

Fig 4
Choose appropriate workspace location and click on the Launch Button to launch Eclipse. Also, make sure to uncheck the checkbox as highlighted in Fig 4 to show the Workspace Selection Option at the start of Eclipse. It will show the welcome screen as shown in Fig 5.

Fig 5
Close the Welcome Screen to view the default layout of the Workspace for C/C++ as shown in Fig 6.

Fig 6
Step 3: C++ - Hello World
In this step, we will create the hello.

Fig 7
The New Project Dialog will show options to choose Project Type as shown in Fig 8.

Fig 8
I have selected C++ Project as highlighted in Fig 8. Now click on the Next Button to configure the Project as shown in Fig 9.

Fig 9
I have selected an Empty Executable Project with MinGW GCC as highlighted in Fig 9. Right-click on the Project and hover over New to view file options as shown in Fig 10.

Fig 10
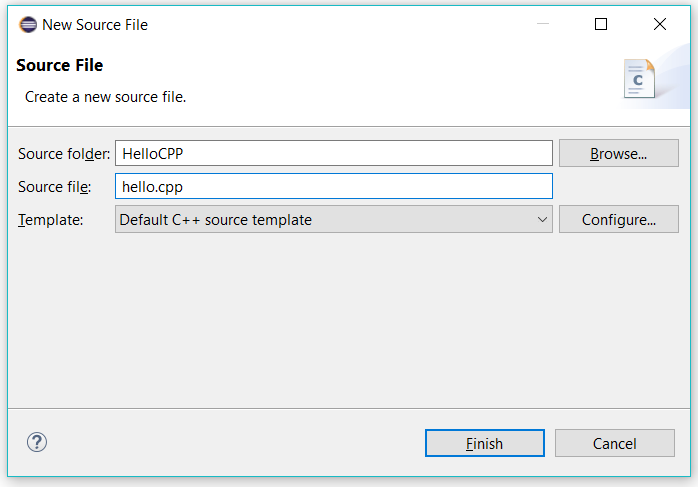
Click on the Source File as highlighted in Fig 10. It will show options to configure the File as shown in Fig 11.

Fig 11
Now click on the Finish

Fig 12
Right-click the project and choose the option to build as highlighted in Fig 13.

Fig 13
It will show the build results on the Console as shown in Fig 14.

Fig 14
Now again right-click the project and choose the option to run it as local application as highlighted in Fig 15.

Fig 15
After executing successfully, it will show the result on the console as shown in Fig 16.

Fig 16
Step 4: C - Hello World
In this step, we will create the hello.c file and update it to print Hello World on the Console.
Create a C Project with the name HelloC following the same steps as we did for C++ Project. Also, create a file hello.c with the source code as shown in Fig 17.

Fig 17
Follow the same steps as we did with HelloCPP Project to build and execute it as Local Application. It will show the output as shown in Fig 18.

Fig 18
This is how we can install Eclipse for C and C++. We have also created the projects for C and C++, built and executed them to print Hello World on the console.

