Eclipse is the most popular IDE used for Java application development. The other popular options for Java development include IntelliJ IDEA and NetBeans.
Notes: It assumes that Java is already installed on the system. You may also be interested in How To Install OpenJDK 14 On Mac, How To Install Java 14 On Mac, and How To Install Java 8 On Mac.
Download Eclipse For Java
Open the Eclipse Packages Page to view the various Eclipse packages distributed by the Eclipse community. It lists the Java packages as shown in Fig 1.

Fig 1
Eclipse IDE for Enterprise Java Development and Eclipse IDE for Java Developers are the popular Java packages distributed by the Eclipse Foundation. We can install Eclipse using the package Eclipse IDE for Java Developers or installer for Mac OS X. I have highlighted both the download options in Fig 1. This tutorial provides the steps to install Eclipse IDE for Java Developers and creating the Hello World Project to print Hello Java !! on the console.
Click on the link Eclipse IDE for Java Developers to view the description, features, and download options as shown in Fig 2.

Fig 2
Click on the Mac OS X Link to view the download locations for Eclipse For Java Developers as shown in Fig 3.

Fig 3
Click the Download Button to start the download.
Install Eclipse For Java Developers
In this step, we will install Eclipse for Java using the image downloaded by us in the previous step. Now double-click the DMG file downloaded by us. It will show the mount progress and open the installer as shown in Fig 4 and Fig 5.

Fig 4

Fig 5
Now drag and drop the Eclipse to install it on the Mac machine as shown in Fig 6 and Fig 7.

Fig 6

Fig 7
It will start installing Eclipse on Mac as shown in Fig 8 and complete the installation as shown in Fig 9.

Fig 8

Fig 9
Now unmount the Eclipse Disk as shown in Fig 10.

Fig 10
This completes the installation of Eclipse on Mac.
Launch Eclipse and Configure Workspace
In this step, we will launch the Eclipse and configure the workspace. A workspace is a collection or library of projects and arrangements of the development IDE. The actual project location might be different than the workspace location. Launch the Eclipse IDE by double-clicking the application from the Applications Folder. It will ask to launch the IDE for the first time as shown in Fig 11.

Fig 11
Click the Open Button to launch the IDE. It will show the default Workspace to store the projects library and also provide options to change it as shown in Fig 12.

Fig 12
I have changed my workspace location as shown in Fig 13.

Fig 13
Now click the Launch Button to launch the Eclipse IDE with the selected workspace. It might ask to install the command line developer tools if not installed on the system as shown in Fig 14.

Fig 14
Click the Install Button. Also, accept the command line developer tools license as shown in Fig 15.

Fig 15
Click the Agree Button to start installing the command line developer tools license as shown in Fig 16 and Fig 17.

Fig 16

Fig 17
Click the Done Button to close the installer. The Eclipse will show the Welcome Screen as shown in Fig 18.

Fig 18
Close the Welcome Screen. The default workspace looks like the one shown in Fig 19.

Fig 19
Hello World Project
In this step, we will create the Hello World Project and print Hello World !! on Console. Click on File -> New -> Java Project to start creating the project as shown in Fig 20. It will show the Create Java Project Wizard as shown in Fig 21.

Fig 20

Fig 21
Click the Next Button to continue with Project Settings as shown in Fig 22.

Fig 22
Now click the Finish Button to create the Project. It will also ask to create the Module File as shown in Fig 23.

Fig 23
I have skipped creating the module as part of this tutorial. Finally, it will create the project and show it on the Projects Panel as shown in Fig 24.

Fig 24
Now we will create the java file HelloWorld.java. Right-click the src folder -> New -> Class to start creating the Java class file as shown in Fig 25. It will show the New Java Class dialog as shown in Fig 26.

Fig 25

Fig 26
Click the Finish Button to create the Java Class using the class package com.example as shown in Fig 27.

Fig 27
Now update the HelloJava class as shown in Fig 28.

Fig 28
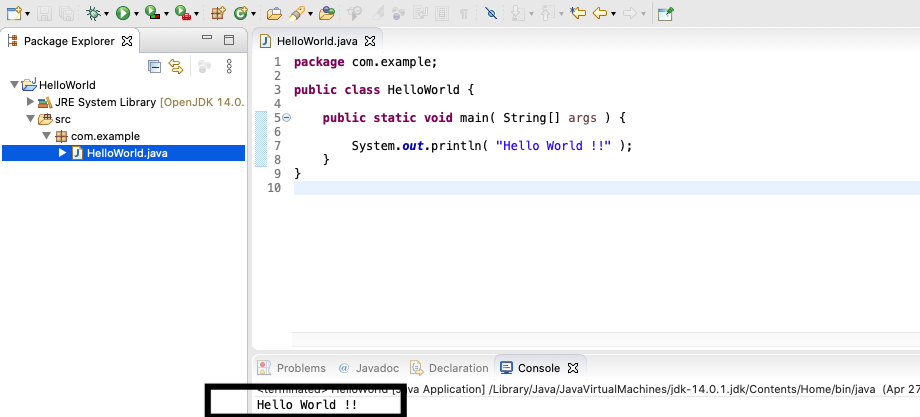
Now right-click the HelloWorld.java -> File -> Run As -> Java Application to compile and execute the program as shown in Fig 29. It will show the output on Console as shown in Fig 30.

Fig 29

Fig 30
Summary
This tutorial provided all the steps required to install Eclipse for Java on Mac and also provided the steps to create the project and execute Java programs.

