This tutorial explains all the steps required to print the grid in Photoshop using Vanishing Point Filter.
To print the grid in Photoshop, We will start with the setup as shown in Fig 1. I have created 3 layers having a device picture. All the 3 layers are also having a corresponding empty layer on which we will print the grid.

Fig 1
Keep your layer selected on which you want to pint the grid. In my case, it is device-grid-1. Now Click on Filter -> Vanishing Point as shown in Fig 2. You can also use the standard shortcut Alt + Ctrl + V keys to open the Vanishing Point pop-up.

Fig 2
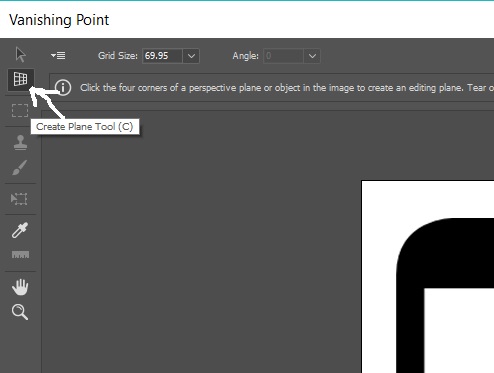
Click on the Create Plane Tool as shown in Fig 3.

Fig 3
Now draw your plane and adjust the grid value to get the desired results. I have made a grid having 3 columns as shown in Fig 4.

Fig 4
Click on the Settings Menu on top left corner as shown in Fig 5. Click on Render Grids To Photoshop option to print the grid on the layer selected by us in previous steps. Make sure that your grid is in blue color in order to print it. In case it turns to yellow or red, click on the plane points to turn it back to blue.

Fig 5
Now press the OK Button. We can see the grid printed on the layer selected by us as shown in Fig 6.

Fig 6
Now we can change the color of the grid printed by us. I have filled the other two devices with different grid sizes. The final result is as shown in Fig 7.

Fig 7
This is how we can print the Grid in Photoshop using Vanishing Point Filter.

