Python has emerged as one of the major programming languages used to develop different types of applications including Web Applications, Desktop Applications, Numeric and Scientific Applications, etc. It soon entered into mainstream programming and majorly popular among data science engineers.
In this tutorial, we will discuss all the steps required to install Python 3 i.e. Python 3.9 on the popular Linux distribution Ubuntu. It provides the steps for Ubuntu 20.04 LTS. The steps should be the same for other distributions of Linux.
Verify Python
Ubuntu 20.04 LTS does not ship with Python 2 by default like the older versions including Ubuntu 18.04 LTS. In older versions of Ubuntu, we can use the command python to check the Python version which was specifically used for Python 2, though we can configure it to use for Python 3. In this step, we will check the existing Python that ships by default with Ubuntu 20.04 LTS using the commands as shown below.
# Refresh the packages index
sudo apt update

# Check Python version
python --version

# Output
Command 'python' not found, did you mean:
  command 'python3' from deb python3
  command 'python' from deb python-is-python3

# Check Python Version
python3 --version

# Output
Python 3.8.2
We can see that Python 2 is not available by default and Python 3.8 is pre-installed on Ubuntu 20.04 LTS as shown in Fig 1.

Fig 1
You can continue with the next sections to install the most recent version of Python either using the PPA or build from source.
Not preferred on Ubuntu 20.04 LTS - Optionally, you may wish to remove Python completely before moving ahead with the next sections using the commands as shown below. Make sure before removing existing Python 3.8 since several other packages and programs depend on it. If you are not sure, keep the existing version of Python installed on your system since we can install multiple versions of Python on the same system.
# Uninstall Python - Make sure before going for it
# It will also remove all the dependent packages including gimp, mysql etc
sudo apt purge python3
Notes: My system was crashed after following the above step.
Install Python using PPA
Install Python 3.9 using the commands as shown below. In several cases, it's not preferred to install Python using PPA. In such a case, you may follow the next section to install it from the source code.
# Refresh the packages index
sudo apt update

# Install Prerequisites
sudo apt install software-properties-common

# Add deadsnakes PPA to sources
sudo add-apt-repository ppa:deadsnakes/ppa

# Press Enter to continue
# Install Python 3.9
sudo apt install python3.9
The above command will install Python 3.9 at /usr/lib/python3.9. The default version of Python 3 i.e. Python 3.8 remains installed at /usr/lib/python3.8. Now verify the installation using the commands as shown below.
# Check Python version
python3.8 --version

# Check the version
Python 3.8.2

# Check Python version
python3.9 --version

# Check the version
Python 3.9.0
You can follow the same steps to install older versions of Python i.e. Python 3.6, Python 3.7 using the same PPA. It installs it at separate locations i.e. /usr/lib/python3.6 and /usr/lib/python3.7. In this way, we can have multiple versions of Python installed on the same system.
# Check Python version
python3.6 --version

# Check the version
Python 3.6.12

# Check Python version
python3.7 --version

# Check the version
Python 3.7.9
Install Python using Source
In this section, we will install Python 3.9 using the source code without using PPA as shown in the previous step.
# Refresh the Packages Index
sudo apt update

# Uninstall Python 3.9 - Installed using PPA in previous step
sudo apt purge python3.9

# Refresh the Packages Index
sudo apt update

# Install Prerequisites
sudo apt install build-essential zlib1g-dev libncurses5-dev libgdbm-dev libnss3-dev libssl-dev libreadline-dev libffi-dev
Now download the latest release of Python 3.9 using wget as shown below.
# Download Python 3.9.0
sudo wget https://www.python.org/ftp/python/3.9.0/Python-3.9.0.tar.xz
Extract the tarball after the download completes.
# Extract
tar -xf Python-3.9.0.tar.xz
Now compile and build the Python from source and install it using the commands as shown below. The make command will take some time to build the binaries from the source files. Also, use altinstall option to avoid overwriting the existing installation.
# Change directory
cd <path to download location>/Python-3.9.0

# Check dependencies
sudo ./configure --enable-optimizations

# Make - Compile and build Python - It will take some time, have a coffee or tea break
sudo make
# OR - specify processor units
sudo make -j 4

# Install Binaries
sudo make altinstall

# Switch active Python
sudo update-alternatives --config python3

# It won't show any option for python3

# Verify Installation
python3 --version

# It shows version
Python 3.8.2

# Verify Installation
python3.9 --version

# It shows version
Python 3.9.0
The above commands will install the most recent version of Python 3.9, but won't enable it to be used using the command python3 from the console as shown above. The next section explains the steps to access Python 3.9 from the command line using python3.
Switch Installation (Optional)
If you have installed multiple minor versions of Python i.e. python3.6, python3.7, python3.9, etc, you can use the below mentioned commands to activate one installation at a time to use python3 instead of using python3.6, python3.7, or python3.9 on the command line. We can also switch to other versions by configuring the active command.
Notes: Configuring python3 to use the python installed using the PPA or source will disable the default installation of python3 i.e. python3.8. You may use a different command instead of python3 to avoid any system discrepancy.
# Add python3 choice using python3.7
sudo update-alternatives --install /usr/bin/python3 python3 /usr/bin/python3.7 1

# Add python3 choice using python3.8
sudo update-alternatives --install /usr/bin/python3 python3 /usr/bin/python3.8 2

# Add python3 choice using python3.9
sudo update-alternatives --install /usr/bin/python3 python3 /usr/bin/python3.9 3

# Verify Installation
python3 --version

# It shows version
Python 3.9.0
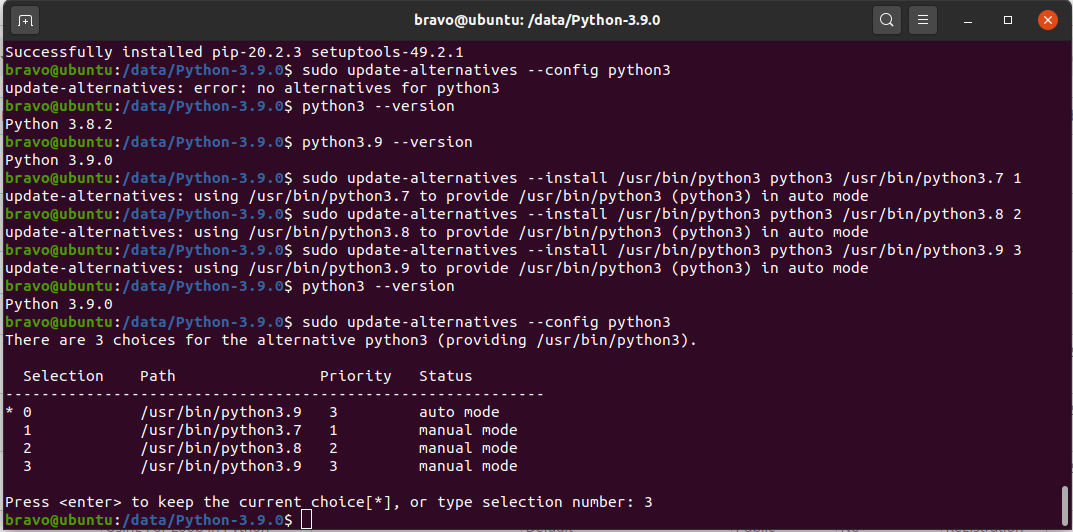
Since we have provided the choices to switch between multiple versions of python3, we can switch the active version using the command as shown below.
# Switch active Python
sudo update-alternatives --config python3
I have used my local installation of Python 3.9 as shown in Fig 2.

Fig 2
As soon as we enable the command python3 to refer to Python 3.9 installed by us using the source code, the terminal stops working. So make sure to fix the terminal before closing it as shown below. In case you have accidentally closed the terminal, you may install terminology to fix the terminal as shown below.
# Update Terminal Script
sudo nano /usr/bin/gnome-terminal

# Replace the first line to use python3.8
#! /usr/bin/python3.8
Apart from breaking the terminal, you will also get an error of missing apt_pkg while running the command sudo apt-get update as shown below.
ubuntu@ubuntu:~$ sudo apt-get update
Hit:1 http://us.archive.ubuntu.com/ubuntu focal InRelease
Hit:2 http://ppa.launchpad.net/deadsnakes/ppa/ubuntu focal InRelease
Get:3 http://security.ubuntu.com/ubuntu focal-security InRelease [107 kB]
Get:4 http://us.archive.ubuntu.com/ubuntu focal-updates InRelease [111 kB]
Get:5 http://us.archive.ubuntu.com/ubuntu focal-backports InRelease [98.3 kB]
Fetched 317 kB in 3s (104 kB/s)
Traceback (most recent call last):
  File "/usr/lib/cnf-update-db", line 8, in <module>
    from CommandNotFound.db.creator import DbCreator
  File "/usr/lib/python3/dist-packages/CommandNotFound/db/creator.py", line 11, in <module>
    import apt_pkg
ModuleNotFoundError: No module named 'apt_pkg'
Reading package lists... Done
E: Problem executing scripts APT::Update::Post-Invoke-Success 'if /usr/bin/test -w /var/lib/command-not-found/ -a -e /usr/lib/cnf-update-db; then /usr/lib/cnf-update-db > /dev/null; fi'
E: Sub-process returned an error code
The apt_pkg can be fixed using the commands as shown below.
# Navigate to default Python 3
cd /usr/lib/python3/dist-packages/

# Fix apt_pkg
sudo ln -s apt_pkg.cpython-38-x86_64-linux-gnu.so apt_pkg.so
You can also fallback and fix the python3 command as shown below.
# Remove python3 link
sudo rm /usr/bin/python3

# Fallback to python3.8
sudo ln -s /usr/bin/python3.8 /usr/bin/python3

# Update Terminal Script
sudo nano /usr/bin/gnome-terminal

# Replace the first line to use python3
#! /usr/bin/python3
You can use some other short name instead of python3 or simply use python3.9 to access the most recent version of Python(installed from source) from the terminal.
This is how we can install the latest Python on Ubuntu 20.04 LTS. We have also checked how to install and switch among the multiple versions of Python installed on the same system.
Hello World
In this section, we will write our first program in Python using the nano editor.
>sudo mkdir -p /data/programs/python
>cd /data/programs/python
>sudo nano helloworld.py
Now write the first program in Python as shown below, save the program by pressing Ctrl + O and hit Enter, and exit the editor by pressing Ctrl + X.
# Print Hello World
print("Hello World !!")
Use the python3 installed by us to execute the program as shown below.
# Execute the program
python3 helloworld.py
# OR
python3.9 helloworld.py

# Program output
Hello World !!
These are the basic steps to write and execute Python programs.
Summary
This tutorial provided the steps to install Python 3.9 on Ubuntu 20.04 LTS and showed the process to manage multiple installations of Python on the same system.

