Ubuntu is among the popular operating systems used for production and development purposes. This tutorial provides all the steps required to install Ubuntu 20.04 LTS Desktop using the bootable USB or Flash Drive. The steps should be similar for other versions of Ubuntu.
Prerequisites
This tutorial assumes that you have access to a system with at least 4 GB of memory, 25 GB of disk space, and 2 GHz dual-core processor.
Download Ubuntu
Open the Official Page to download the Ubuntu 20.04 LTS Desktop. It provides the options to download Ubuntu Desktop as shown in Fig - Download Ubuntu.

Fig - Download Ubuntu
Create the Bootable USB
In this section, we will create the Bootable USB using the ISO downloaded by us in the previous step. You can follow How To Make Bootable USB Of Ubuntu 20.04 LTS On Ubuntu OR How To Make Bootable USB Of Ubuntu 20.04 LTS On Windows to create the bootable USB using the Ubuntu 20.04 LTS ISO.
Boot USB
This section provides the steps required to boot the bootable USB prepared by us in the previous section. Most of the modern systems with a fresh setup auto-detects the bootable USBs which simply starts loading the Operating System. In older systems or newer system having an existing Operating System, it might be required to enter the Boot Menu to change the boot priority or boot from the selected device. Also, it depends on the BIOS or UEFI interface to view the Boot Menu. The most common keys used to enter Boot Menu are Esc, F2, F10, or F12.
We can either enter the BIOS or UEFI to change the boot priority or directly enter the Boot Menu by pressing the appropriate keys on the system startup. The motherboard splash screen shows the keys to enter the BIOS or the Boot Menu.
I have had Ubuntu 18.04 LTS pre-installed on my system, hence I have entered the Boot Menu to view the available options boot from the bootable USB.
It shows the list of Hard Drives of USBs attached to the system. Now select your device having the Ubuntu 20.04 LTS and press enter to boot from the selected device. It should start loading the Ubuntu 20.04 as shown in Fig 2.

Fig 2
Ubuntu 20.04 also performs disk checks before starting the installation as shown in Fig 3 and Fig 4.

Fig 3

Fig 4
After completing the disk checks, it shows the options to either try out or install Ubuntu 20.04 as shown in Fig 5. If we choose the option to try out Ubuntu 20.04, it won't make any changes to the existing Operating System.

Fig 5
Install Ubuntu
In this section, we will continue with the installation and complete the steps to fresh install Ubuntu 20.04 LTS. The installer provides the options to choose the language as shown in Fig 5. Choose appropriate language and click the Install Ubuntu Button. It will provide the options to choose the Keyboard Layout as shown in Fig 6.

Fig 6
Now click the Continue Button to choose the update option (Normal installation) and installation type (Something else) as shown in Fig 7 and Fig 8.

Fig 7

Fig 8
Choose the installation type as something else as shown in Fig 8. Click the Continue Button to view the partitioning options as shown in Fig 9.

Fig 9
It shows my existing Operating System as Ubuntu 18.04 LTS. It might show the entire disk as free on the fresh system. It might be required to click the New Partition Table button to create the partition table on a fresh system. I have backed up my files on the existing system and deleted the existing partitions to start a fresh install as shown in Fig 10.

Fig 10
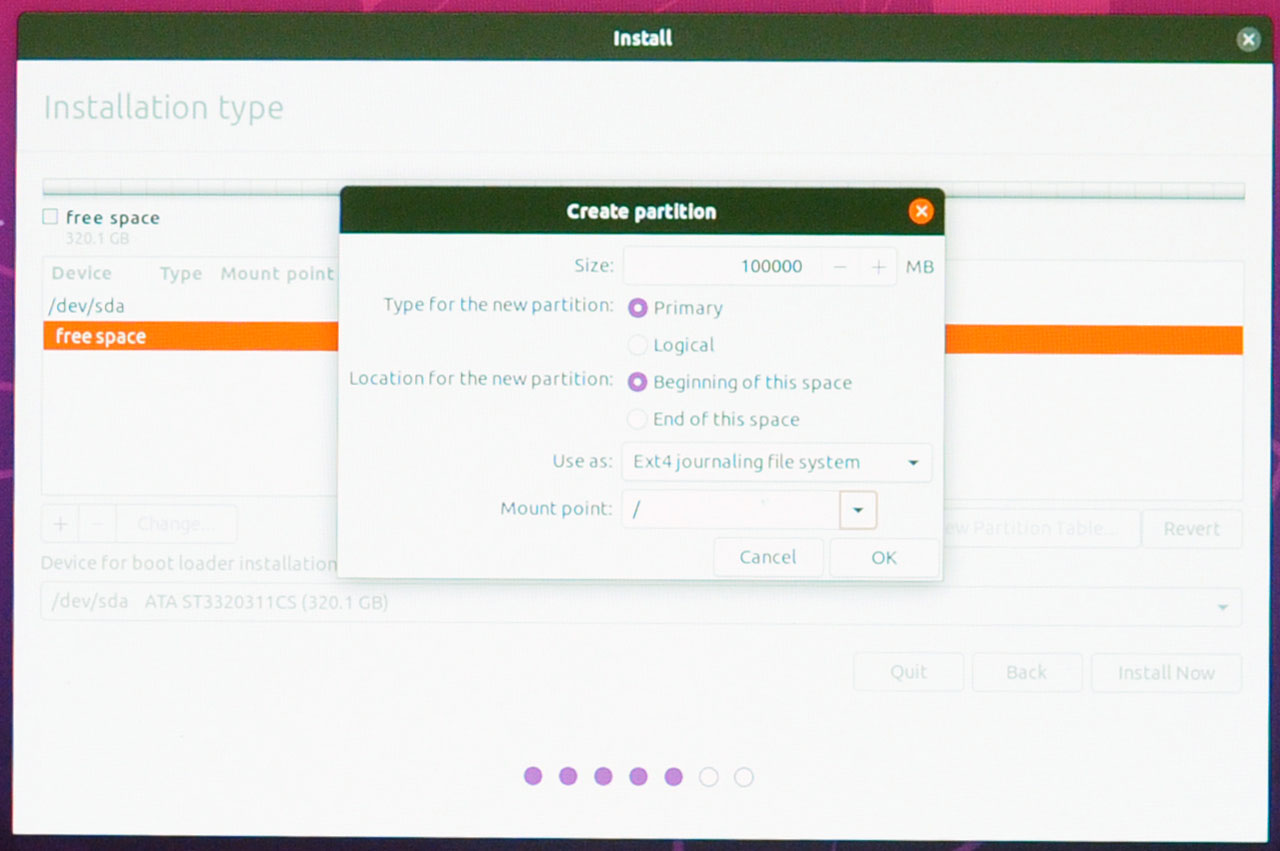
Now click the Plus Icon to create the root partition as shown in Fig 11.

Fig 11
Allocate the required space to the root drive and create additional partitions if required. I have allocated 100 GB to the root partition and configured the mount point to / with the Ext4 journaling file system as shown in Fig 11. Now click the OK Button to create the partition and also create the other partitions as shown in Fig 12.

Fig 12
Now keep the root partition selected and also check the Format Checkbox as shown in Fig 12. Click the Install Now Button to start installing Ubuntu 20.04. It will also ask to confirm the disk changes as shown in Fig 13.

Fig 13
Now click the Continue Button to choose the Timezone as shown in Fig 14 and also configure the root user as shown in Fig 15.

Fig 14

Fig 15
Now click the Continue Button to continue the installation. It will show the installation progress as shown in Fig 16, Fig 17, and Fig 18.

Fig 16

Fig 17

Fig 18
It will show the success message on completing the installation as shown in Fig 19.

Fig 19
Click the Restart Now Button to restart Ubuntu It will ask to remove the installation media as shown in Fig 20.

Fig 20
Remove the bootable USB and restart the system. It will boot from the system hard drive and shows the loader and login screens as shown in Fig 21, Fig 22, and Fig 23.

Fig 21

Fig 22

Fig 23
Now enter the password provided by you while installing Ubuntu. The Ubuntu Dashboard should be similar to Fig 24 and shows the intro steps as shown in Fig 25, Fig 26, Fig 27, and Fig 28.

Fig 24

Fig 25

Fig 26

Fig 27

Fig 28
This completes the installation of Ubuntu 20.04 LTS using the bootable USB or Flash Drive.
Default Applications
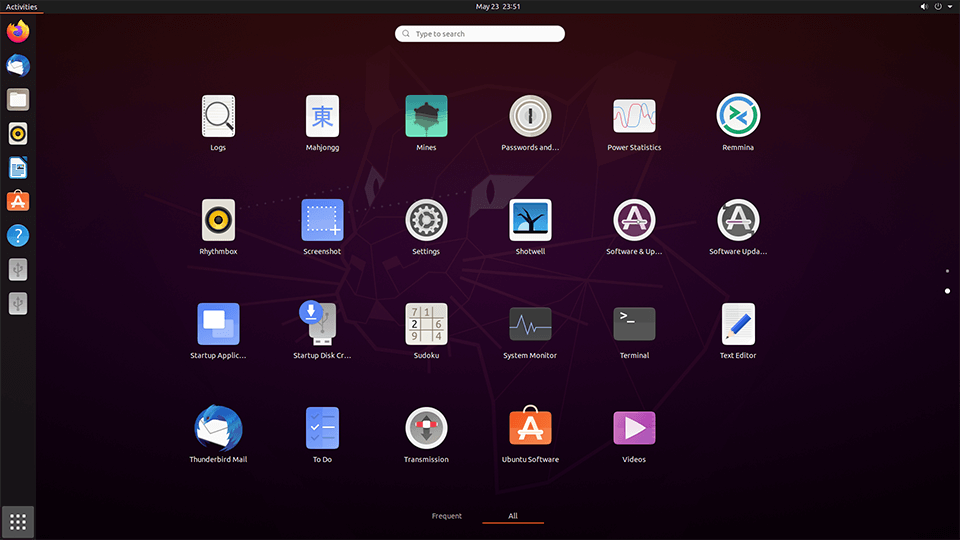
Ubuntu 20.04 LTS Desktop pre-installs the essential applications as shown in Fig 29 and Fig 30.

Fig 29

Fig 30
Summary
This tutorial explained the steps required to download the Ubuntu Desktop Image from the official website of Ubuntu. It also explained the steps to create the bootable USB using the ISO downloaded from the official website and fresh install Ubuntu 20.04 LTS on the system. Keep commenting to join the discussion about installing Ubuntu on real hardware using the comment options as shown below. You can also follow How To Install Ubuntu 20.04 LTS On Windows Using VMware Workstation Player without any additional system.

