EC2 (Elastic Compute Cloud) is among the popular services from AWS (Amazon Web Services). AWS users can create Virtual Machines using this service. Also, AWS users can pay per hour of the instance usage without going for monthly or annual plans. Though, AWS also provides reserved instances with up to 30 to 35 percent discount. This tutorial provides the steps to start Ubuntu 20.04 LTS server on the AWS EC2 instance.
Spin Up the Ubuntu 20.04 EC2 Instance
This section provides the steps to launch an EC2 instance having Ubuntu 20.04 LTS as the server software. Now log in to the AWS Console. It shows the dashboard similar to Fig 1.

Fig 1
I have highlighted the option to quickly launch AWS EC2 instance in Fig 1. Now click the Services Option and click the EC2 Option as highlighted in Fig 2.

Fig 2
It will open the EC2 dashboard as shown in Fig 3.

Fig 3
We can also launch AWS EC2 instance from the EC2 dashboard as highlighted in Fig 3. Now click the Instances on the Left Menu to open the Instances Panel as shown in Fig 4.

Fig 4
The Instances Panel lists the existing EC2 instance and also provides an option to launch a new EC2 instance as highlighted in Fig 4. Now click the Launch Instance Button to start creating the virtual machine. It will navigate to the Launch Instance Wizard showing the list of available AMIs. Now enter Ubuntu in the Search Filed and hit Enter Key. It will filter the AMIs and shows the Ubuntu AMIs as shown in Fig 5.

Fig 5
Now click the Select Button next to Ubuntu 20.04 LTS AMI as highlighted in Fig 5. The next screen shows the available Instance Types as shown in Fig 6.

Fig 6
I have highlighted a few possible Instance Types in case you are just starting up and not sure about your instance type. You may also spin up the Instance Type eligible for Free Tier usage for experimental purposes. I prefer to choose an Instance Type with at least 2 GB of memory to set up a LAMP server. In case you are also planning to install an Email Server, you must go for an instance having at least 4 GB of memory. I have selected the latest generation t3.medium with 2 vCPUs and 4 GiB of Memory. Click the button Next: Configure Instance Details to further configure the instance. It provides options to configure the instance as shown in Fig 7.

Fig 7
You may select an existing VPC or create a new VPC at this state if required. Also, make sure that the Shutdown Behavior is Stop and also Enable termination protection in case you are not familiar with AWS EC2 instances. Now click the button Next: Add Storage to configure the storage drives as shown in Fig 8.

Fig 8
Though we can use a single storage volume to store the operating system specific files and the project files, I prefer to have at least two storage volumes - one for the server i.e. server volume, and the other i.e. data volume to store the project files and websites. Click the button Next: Add tags to assign tags to your instance as shown in Fig 9.

Fig 9
Tags make it easy to search the instances and volumes if required. Now click the button Next: Configure Security Group to configure the security group as shown in Fig 10.

Fig 10
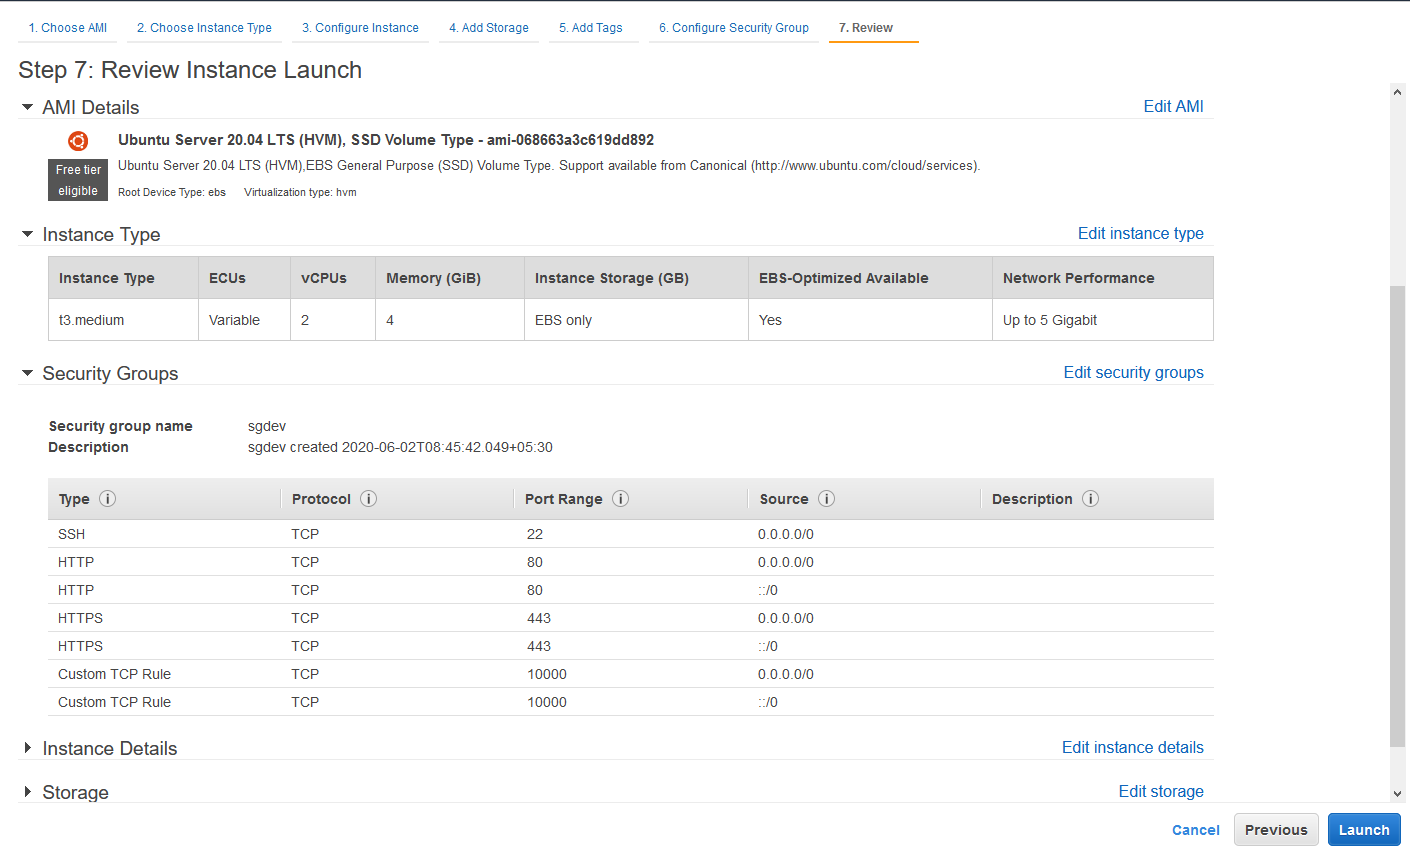
Provide an appropriate name to your security group and also open the standard ports 22, 80, and 443 as shown in Fig 10. The port 22 is required to connect to the server via SSH and ports 80 and 443 are the standard web server ports. I have also opened the port 10000 to access Webmin. Now click the button Review and Launch to launch the instance. It shows the instance details on the Review Tab as shown in Fig 11.

Fig 11
Click the Launch Button to launch the instance. It asks to choose an existing key pair or to generate a key pair as shown in Fig 12. We need the key pair to access the server from SSH.

Fig 12
In case you are generating the key pair, provide an appropriate name as shown in Fig 12 and click Download Key Pair Button to download the Key Pair. Also, store the key pair at a safe location since it's required to access the server. It also enables the Launch Instance Button after generating the Key Pair. Now click the Launch Instance Button to finally launch the instance. It starts creating the instance and shows the Launch Status Screen as shown in Fig 13.

Fig 13
Now click the View Instances Button to view the available instances. It should show your newly created instance as shown in Fig 14. Click the Instance to view the server details as shown in Fig 14.

Fig 14
These are the basic steps required to launch an EC2 instance or virtual machine having Ubuntu 20.04 LTS as the server software.
Connect To Server Using Putty
We can use Putty on the Windows systems to access the server installed on EC2 instance. In case you are using a Linux based system, you can move to the next section.
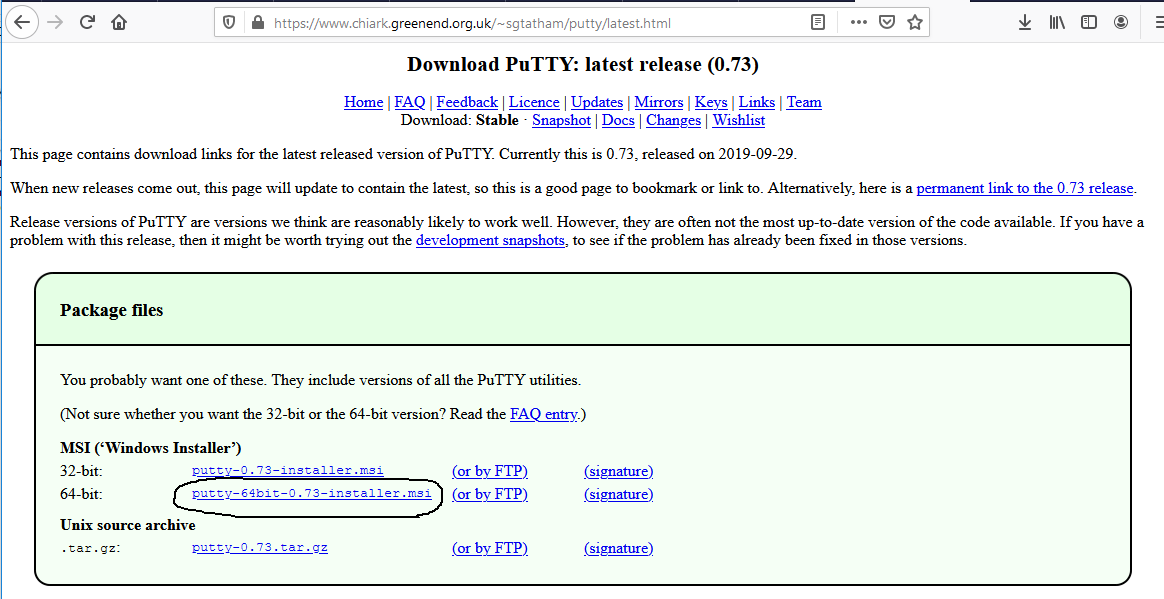
Open the official Download Page of Putty to download the MSI installer as highlighted in Fig 15.

Fig 15
We can also use the Putty executable without installing it. Scroll down the Download Page to download the executable file. Now launch Putty KeyGen. The default options of Putty KeyGen are shown in Fig 16.

Fig 16
Make sure that the RSA Option is selected within the Parameters Section. Now click the Load Button and choose file type as All Files while browsing for the Key Pair downloaded by us while installing the Ubuntu 20.04 Server. Select the Key Pair file and click the Open Button. It will load the Key Pair and shows a success message as shown in Fig 17.

Fig 17
Now click the OK Button to hide the success message. Also, click the Save private key Button to save the private key. You can also provide the Passphrase to add additional security while saving the private key. The Passphrase will be required to access the server using the private key if it's set at this stage. We can also save the private key without Passphrase as shown in Fig 18.

Fig 18
Now launch Putty. The default options of Putty should be similar to Fig 19.

Fig 19
Now provide the Host Name (Public DNS of the EC2 Instance as highlighted in Fig 14) using the prefix ubuntu@ as shown in Fig 20.

Fig 20
We also need to configure Putty to use the PPK generated by us using the Puttygen. Now click Connection -> SSH -> Auth to configure the PPK as shown in Fig 21.

Fig 21
Now again Click the Session, provide a name to your session, and save it as shown in Fig 22.

Fig 22
After saving your session, highlight it, and click the Open Button as shown in Fig 23.

Fig 23
Putty opens the session and shows a Security Warning on the first launch as shown in Fig 24.

Fig 24
Click the Yes Button to open the terminal as shown in Fig 25.

Fig 25
You must be able to see the Ubuntu Server details on a successful connection as shown in Fig 25. Now we can use the Ubuntu commands to further install the applications and software required to build the server.
Connect To Server Over SSH
It's easy to connect the AWS EC2 instance on the Linux Systems as compared to Windows. We can simply connect to the EC2 instance using the SSH command as shown below.
# Connect Using PEM
ssh -i mykey.pem ubuntu@ec2-xx-xx-xx-xx.compute-1.amazonaws.com
Replace mykey.pem with your key name and also change the Public DNS. It might throw the error - Permissions 0644 for 'mykey.pem' are too open. Change the permissions of the mykey.pem file as shown below.
# Secure the Key
chmod 400 mykey.pem
Now again connect using the SSH command. It should open the connection and show the server details as shown in Fig 26.

Fig 26
Update Server
Update the server to the most recent packages and software using the commands as shown below.
# Refresh Packages List
sudo apt-get update

# Dist Upgrade
sudo apt-get dist-upgrade

# Auto Clean
sudo apt-get autoclean

# Auto Remove
sudo apt-get autoremove
# OR Complete Auto Remove with configurations
sudo apt-get --purge autoremove
Format Data Volume
In case you have created two different volumes i.e. server and data volume similar to me, the data volume must be formatted before we further use it. This section provides the commands to format the data volume.
# List the drives with UUID
sudo lsblk -o +UUID

# Output
NAME        MAJ:MIN RM  SIZE RO TYPE MOUNTPOINT                  UUID
----
----
nvme1n1     259:0    0   32G  0 disk
nvme0n1     259:1    0   16G  0 disk
└─nvme0n1p1 259:2    0   16G  0 part /                           xxxxxxxx-xxxx-xxxx-xxxx-xxxxxxxxxxxx
Now check the status of unformatted drive without UUID.
# Check Drive Status
sudo file -s /dev/nvme1n1
/dev/nvme1n1: data
If the file check returns data as highlighted above, we can format the data drive. Now format the data drive and mount it to /data path as shown below.
# Format
sudo mkfs -t ext4 /dev/nvme1n1

# Data Path
sudo mkdir /data

# Mount Data Drive to Data Path
sudo mount /dev/nvme1n1 /data
Now we will update the fstab to make the changes permanent as shown below.
# Backup FSTAB
sudo cp /etc/fstab /etc/fstab.orig

# List the drives with UUID
sudo lsblk -o +UUID

# Output
NAME        MAJ:MIN RM  SIZE RO TYPE MOUNTPOINT                  UUID
----
----
nvme1n1     259:0    0   32G  0 disk /data                       yyyyyyyy-yyyy-yyyy-yyyy-yyyyyyyyyyyy
nvme0n1     259:1    0   16G  0 disk
└─nvme0n1p1 259:2    0   16G  0 part /                           xxxxxxxx-xxxx-xxxx-xxxx-xxxxxxxxxxxx

# Update FSTAB
sudo nano /etc/fstab

# FSTAB Content
LABEL=cloudimg-rootfs   /        ext4   defaults,discard        0 0
UUID=yyyyyyyy-yyyy-yyyy-yyyy-yyyyyyyyyyyy  /data  ext4  defaults  0  2
# Press Ctrl + O to write the changes and Ctrl + x to exit nano editor

# Test Data Volume
sudo umount /dev/nvme1n1
sudo mount -a
sudo lsblk -o +UUID
The above-mentioned commands will preserve and mount the data drive on server boot. We can further test the mount point /data by rebooting the server.
Summary
This tutorial provided the steps required to spin up the Ubuntu 20.04 LTS server using the AWS EC2 instance. It also provided the steps required to access the server using Putty on Windows and SSH on Linux systems.

