WordPress is the world's most popular content management system and dominates in eCommerce and Blogging market. Around one-third of the websites are installed using WordPress. This tutorial provides all the steps required to install the most recent version of WordPress on Ubuntu 18.04 LTS. The steps should be similar for other versions of Ubuntu including Ubuntu 16.04 and Linux systems.
Note: This tutorial provides all the steps required to install WordPress for development purposes using Ubuntu Desktop. It also provides the steps required to configure the website in production mode using the real domain.
I have used the name mywpsite for the database and the WordPress installation. You can use your project name instead of mywpsite.
Prerequisites
We need to prepare the system for WordPress before downloading and installing it on Ubuntu. It needs Apache Web Server, PHP, and MySQL or MariaDB. We can install all three prerequisites by following the tutorials as listed below. The steps to install PHP, Apache, and MySQL are the same for both desktop systems and remote servers. You can also skip installing PHP, Apache, and MySQL on the remote server in case you will be using the control panel provided by your hosting service.
PHP 7.2 - How To Install PHP 7 On Ubuntu 18.04 LTS
Apache 2.4 - How To Install Apache 2 On Ubuntu 18.04 LTS
MySQL 8 - How To Install MySQL 8 on Ubuntu
Make sure that appropriate Apache HTTP Server, PHP, and MySQL are already installed on the system before moving to the next step. This tutorial also expects that a database is already created for the WordPress installation. I have already created the database mywpsite using the command as shown below. You can use any database name of your choice. The phpMyAdmin, Adminer or Workbench can be used to create the database without commands. On the live server, the database can be created using phpMyAdmin. Almost all the hosting providers provide access to phpMyAdmin.
# Create Database
CREATE SCHEMA mywpsite DEFAULT CHARACTER SET utf8mb4 COLLATE utf8mb4_unicode_ci;

# Create User
CREATE USER 'mywpsite'@'localhost' IDENTIFIED WITH mysql_native_password BY 'My#was2!te';

# Grant Privileges
GRANT ALL PRIVILEGES ON mywpsite.* TO 'mywpsite'@'localhost';

# Apply User
FLUSH PRIVILEGES;
Download - Localhost - Ubuntu Desktop
Open the Download Page of WordPress and click the Download Button as highlighted in Fig 1.

Fig 1
It will start downloading the most recent version of WordPress. You can also download the tarball using the Download .tar.gz Link as shown in Fig 1.
Download - Remote Server - Ubuntu Server
In case you have access to SSH, you can also download the most recent version of Wordpress using the commands as shown below. These commands are useful for remote servers when we do not have access to GUI.
# Download Zip
sudo wget https://wordpress.org/latest.zip
# OR
# Download tarball
sudo wget https://wordpress.org/latest.tar.gz
In the absence of SSH access, you can also upload the local download using the FTP client.
Deploy - Localhost
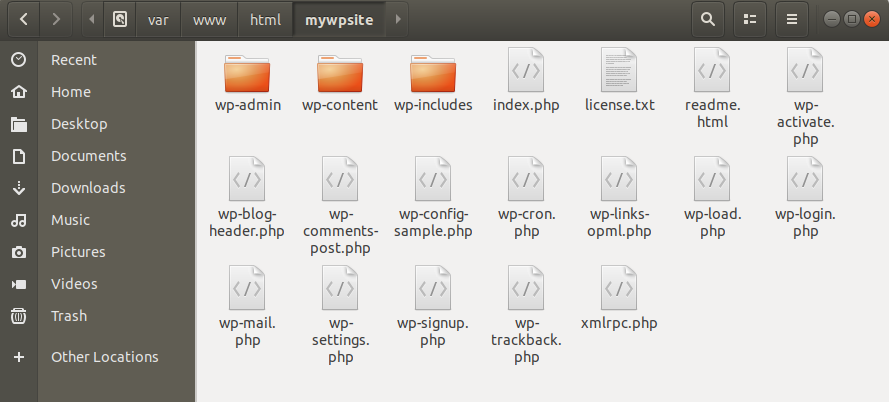
In this step, we will install WordPress at the root directory of the Apache HTTP Server installation. The location of root directory for Apache HTTP Server is /var/www/html. It will differ on the remote server depending on the hosting services used by you.
Now extract the WordPress file downloaded in the previous steps to the root location depending on your Apache installation. I have renamed the directory wordpress to mywpsite as shown in Fig 2.

Fig 2
We also need to change the directory ownership and file permissions as shown below.
# Change Directory Owner
sudo chown -R www-data:www-data /var/www/html/mywpsite

# Change file permissions
sudo find /var/www/html/mywpsite/ -type d -exec chmod 750 {} \;
sudo find /var/www/html/mywpsite/ -type f -exec chmod 640 {} \;
Deploy - Remote Server
In this step, we will install WordPress at the root directory of the Remote Server. The default location of root directory for Apache HTTP Server is /var/www/html. It will differ on the remote server depending on the hosting services used by you.
Now extract the WordPress file downloaded in the previous steps to the root location depending on your webroot directory. I have renamed the directory wordpress to mywpsite.
Also, change the directory ownership as shown below.
# Change Directory Owner
sudo chown -R www-data:www-data /var/www/html/mywpsite

# Change file permissions
sudo find /var/www/html/mywpsite/ -type d -exec chmod 750 {} \;
sudo find /var/www/html/mywpsite/ -type f -exec chmod 640 {} \;
Access WordPress - Localhost
Now open the WordPress in a browser using the URL http://localhost/mywpsite. It will show the Welcome Screen having language selection options as shown in Fig 3.

Fig 3
Access WordPress - Remote Server - IP
If you know the IP address of your remote server, you can open the WordPress in a browser using the URL http://xxx.xxx.xxx.xxx/mywpsite. It will show the Welcome Screen having language selection options as shown in Fig 4.

Fig 4
Access WordPress - Remote Server - Primary Domain
If you have access to Domain, you have to configure the Domain either by updating the nameservers or by updating the domain record using the IP address of your remote server. After pointing the Domain to the remote server, we also need to create the virtual host. Most of the shared hosting providers manage the virtual hosts and SSL certificate installation in the background which makes it easy to deploy the site. I have also configured and secured the Virtual Host by following Configure Virtual Host On Apache, How To Install Let's Encrypt For Apache On Ubuntu, and Redirect HTTP to HTTPS on Apache. My virtual hosts are shown below. The virtual host redirects non-www to www and non-https to https which might differ in your case.
mywpsite.com.conf
<VirtualHost *:80>
	ServerName mywpsite.com
	ServerAlias www.mywpsite.com
	ServerAdmin admin@mywpsite.com

	DocumentRoot /var/www/html/mywpsite.com
	<Directory /var/www/html/mywpsite.com>
		Options -Indexes +FollowSymLinks
		DirectoryIndex index.php
		AllowOverride All
		Require all granted
	</Directory>

	RewriteEngine On
	RewriteCond %{HTTPS} off [OR]
	RewriteCond %{HTTP_HOST} !^www\. [NC]
	RewriteCond %{HTTP_HOST} ^(?:www\.)?(.+)$ [NC]
	RewriteRule ^ https://www.%1%{REQUEST_URI} [L,NE,R=301]
	RewriteCond %{SERVER_NAME} =mywpsite.com [OR]
	RewriteCond %{SERVER_NAME} =www.mywpsite.com
	RewriteRule ^ https://%{SERVER_NAME}%{REQUEST_URI} [END,NE,R=permanent]
</VirtualHost>
mywpsite.com-le-ssl.conf
<IfModule mod_ssl.c>
	<VirtualHost *:443>
		ServerName mywpsite.com
		ServerAlias www.mywpsite.com
		ServerAdmin admin@mywpsite.com
		Header always set Strict-Transport-Security "max-age=31536000; includeSubDomains; preload"
		Header set X-Frame-Options "SAMEORIGIN"
		Header set X-Content-Type-Options "nosniff"
		DocumentRoot /var/www/html/mywpsite.com
		<Directory /var/www/html/mywpsite.com>
			Options -Indexes +FollowSymLinks
			DirectoryIndex index.php
			AllowOverride All
			Require all granted
		</Directory>

		RewriteEngine On
		RewriteCond %{HTTP_HOST} ^mywpsite\.com$ [NC]
		RewriteRule ^ https://www.mywpsite.com%{REQUEST_URI} [R=301,L]

		SSLEngine on

		Include /etc/letsencrypt/options-ssl-apache.conf
		SSLCertificateFile /etc/letsencrypt/live/mywpsite.com/fullchain.pem
		SSLCertificateKeyFile /etc/letsencrypt/live/mywpsite.com/privkey.pem
	</VirtualHost>
</IfModule>
Now enable the sites using the commands shown below.
# Enable HTTP Config
sudo a2ensite mywpsite.com

# Enable HTTPS Config
sudo a2ensite mywpsite.com-le-ssl
After configuring the Nameservers, DNS records, and creating the appropriate virtual hosts, we can access the WordPress in a browser using the URL https://mywpsite.com. It will show the Welcome Screen having language selection options as shown in Fig 5.

Fig 5
Access WordPress - Remote Server - Sub-Directory
We can also configure WordPress to access via sub-directory by updating the virtual hosts as shown below. This will allow us to keep the primary domain as it is without any modifications to it.
Update mydomain.com.conf and mydomain.com-le-ssl.conf as shown below.
....
....
DocumentRoot /var/www/html/mydomain.com
<Directory /var/www/html/mydomain.com>
	Options -Indexes +FollowSymLinks
	DirectoryIndex index.php
	AllowOverride All
	Require all granted
</Directory>

Alias /mywpsite "/var/www/html/mydomain.com/mywpsite"
<Directory "/var/www/html/mydomain.com/mywpsite">
	Options -Indexes +FollowSymLinks
	DirectoryIndex index.php
	AllowOverride All
	Require all granted
</Directory>
....
....
We can access WordPress vis sub-directory in a browser using the URL https://mydomain.com/mywpsite. It will show the Welcome Screen having language selection options as shown in Fig 6.

Fig 6
Install Wordpress
Choose your preferred language and click the Continue Button. The next screen shows the installation instructions as shown in Fig 7.

Fig 7
Make sure that you have your database name, username, and password ready to continue the installation. Now click the Let's go! Button to continue. The next page shows options to configure the database as shown in Fig 8.

Fig 8
Click the Submit Button after filling all the fields as shown in Fig 8. The next page shows ready to install message as shown in Fig 9.

Fig 9
Click Run the installation Button to test the database connection. It will ask for the website settings as shown in Fig 10.

Fig 10
Make sure to disable search engine indexing as highlighted in Fig 10. We can always enable it while deploying the website to the production environment. Now click the Install WordPress Button. It will create all the database tables and files required to complete the installation. The Success Page shows the success message and provides options to log in as shown in Fig 11.

Fig 11
Click the Log In Button to access the Admin Panel. It will show the Log In Page of the WordPress Admin Panel as shown in Fig 12.

Fig 12
Now enter the username and password and click the Log In Button. It will show the WordPress Dashboard as shown in Fig 13.

Fig 13
Now logout from the Admin Panel and access the Home Page using URLs as shown below.
Localhost - http://localhost/mywpsite/
IP Address - http://xxx.xxx.xxx.xxx/mywpsite/
Primary Domain - https://www.mywpsite.com/
Sub-Directory - https://www.mywpsite.com/mywpsite/
It will show the default page as shown in Fig 14.

Fig 14
Initial Setup
This step provides the list of initial actions that can be done to enhance the WordPress setup. You must be logged in to the Admin to perform these actions.
Change Permalinks - WordPress provides few options to change the link patterns and allows you to form the links using ID Parameter, Day and Slug, Month and Slug, ID, and Slug. It also provides options to follow a custom structure. Make sure that you apply this change before going to production since changing it after publishing your content will impact your SEO. To change the permalinks, login to Admin and navigate to Settings -> Permalinks. Choose your link pattern and click the Save Changes Button to apply the changes.
Theme - Using a good theme for the WordPress installation should be the next action to be considered for a better user experience. Change the appropriate theme by navigating to Appearance -> Themes. It shows all the themes installed on your WordPress installation. You can activate the theme of your choice and start writing the pages and posts. In case none of the theme match your requirements, you can browse for other free and commercial themes by following ThemeForest*.
Plugins - You can also install the popular and must-have plugins including Akismet, Contact Form 7, Yoast SEO or All in One SEO Pack. Learn more about these plugins by following Akismet, Contact Form 7, Yoast SEO* or All in One SEO Pack.
* The links with an asterisk are affiliate links which adds little revenue to us without adding any additional cost to your actual purchase in case you buy something by following these links.
Summary
This tutorial provided all the steps required to install the most recent version of WordPress i.e. WordPress 5.3.2 on Ubuntu 18.04 LTS on Localhost and Remote Server. It also provided the steps to deploy WordPress on Remote Server using IP Address, Primary Domain, and Sub-Directory. You may join the discussion by submitting your comments either directly to Tutorials24x7 or using the Disqus as shown below.

