We might be required to keep all our PHP projects in a directory outside of the WampServer installation. This will prevent the deletion of our projects while uninstalling WampServer and also make it easy to manage the projects. This tutorial provides all the steps required to change the WWW root directory of WampServer installed on Windows PC.
In case you have not installed WampServer, you may follow How To Install WampServer on Windows. The default installation of WampServer opened in a Web Browser using http://localhost or appropriate URL should be similar to Fig 1.

Fig 1
Now we will change the default www directory of WampServer to use a different www directory having all the PHP projects. Click the WampServer tray icon as shown in Fig 2.

Fig 2
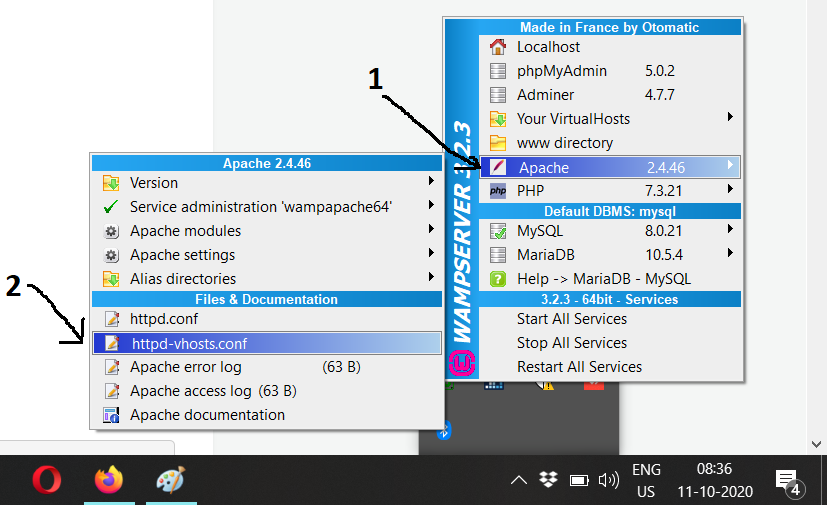
Now hover over the Apache Option and click the httpd-vhosts.conf Option as shown in Fig 3.

Fig 3
It will open the file httpd-vhosts.conf using the default editor as shown in Fig 4.

Fig 4
Now comment out the DocumentRoot path and add the new path as shown below.
# Virtual Hosts
#
<VirtualHost *:80>
  ServerName localhost
  ServerAlias localhost
  #DocumentRoot "${INSTALL_DIR}/www"
  DocumentRoot "E:/development/www"
  #<Directory "${INSTALL_DIR}/www/">
  <Directory "E:/development/www/">
    Options +Indexes +Includes +FollowSymLinks +MultiViews
    AllowOverride All
    Require local
  </Directory>
</VirtualHost>
Provide the appropriate path of the www directory based on your needs and save the file and close the editor. Also, restart all the services as shown in Fig 5. This will change the default WWW directory of the WampServer.

Fig 5
Now again access the Apache Web Server root/www directory using http://localhost. It will show the directories available in the www directory configured by you.

Fig 6
This is how we can change the default WWW directory of the WampServer on Windows.
Summary
This tutorial provided all the steps required to change the default www directory of the WampServer on Windows 10. You may also be interested in How To Install WampServer on Windows.

