This tutorial provides all the steps required to install macOS Catalina, the most recent version of the macOS Operating System from Apple. The macOS is proprietary to Apple and runs on apple computers including Mac mini, iMac and MacBook. In several cases, it might be required to try it out or run in the dual-mode without allocating dedicated hardware to it. We can run it as a guest operating system on Windows 10 using the VMware Workstation Player without actually installing it on dedicated hardware. VMware Workstation Player provides options to create and manage Virtual Machines having their own configurations including CPUs, Memory, Hard Disk. We can use VMware to create several virtual machines on the same system. This tutorial provides all the steps required to install macOS Catalina as a guest operating system on Windows 10 using the VMware Workstation Player. The steps should be the same for other versions of macOS.
Notes: Make sure that you have at least 8GB of memory on the system for optimal performance to install macOS on Windows 10 using the VMware player. Also, I have used VMware Workstation Player 15.5.2 build-15785246 while writing this tutorial. Make sure that you are following the installation steps on an Apple branded system to follow the License Agreement.
Prerequisites
This tutorial assumes that you have access to a machine with at least 8 GB of memory and VMware Workstation Player is already installed on it. I have used Windows 10 and VMware Workstation Player 15.5 while writing this tutorial. It also assumes that you have access to the ISO file of macOS Catalina. You can also follow How To Install VMware Workstation Player On Windows 10 and How To Create macOS Catalina ISO File.
Get macOS Catalina ISO
We need the ISO file of macOS Catalina to continue the tutorial. You can follow How To Create macOS Catalina ISO File to obtain the ISO file.
Create the Virtual Machine
In this step, we will create the virtual machine to install macOS Catalina on VMware Workstation Player on the Windows 10 PC. There is no Easy Install for macOS on VMware Workstation Player 15.5. Launch VMware Workstation Player using the launcher icon in the Applications Panel. It will show the home screen of the VMware Workstation Player as shown in Fig 1.
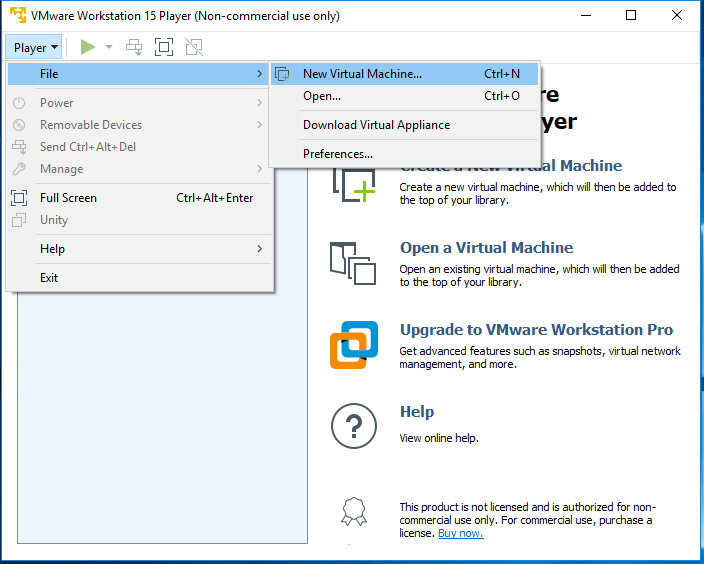
Fig 1
Now click the Player -> File -> New Virtual Machine as shown in Fig 1. It provides the options to choose the macOS Catalina ISO file as shown in Fig 2.

Fig 2
On selecting the macOS Catalina ISO file, it shows the error as highlighted in Fig 2. The VMware Workstation Player does not detect macOS by default. We need the macOS unlocker to activate this feature. You can download the unlocker from the GitHub as shown in Fig 3.

Fig 3
Now extract the unlocker and run the CMD as administrator. Navigate to the extract and execute the win-install.cmd file. The final output should be similar to Fig 4.

Fig 4
We can also right-click the installer and choose Run as administrator option as shown in Fig 5.

Fig 5
Now again open the VMware Workstation Player, and click the Player -> File -> New Virtual Machine to create the virtual machine. Also, choose the option I will install the operating system later as shown in Fig 6.

Fig 6
Now click the Next Button to choose the operating system as shown in Fig 7.

Fig 7
I have selected Apple Mac OS X as the guest operating system and version macOS 10.15 to install macOS Catalina. Now click the Next Button to configure the virtual machine name and location as shown in Fig 8.

Fig 8
Click the Next Button to configure the Disk as shown in Fig 9.

Fig 9
Click the Next Button to view the virtual machine settings as shown in Fig 10.
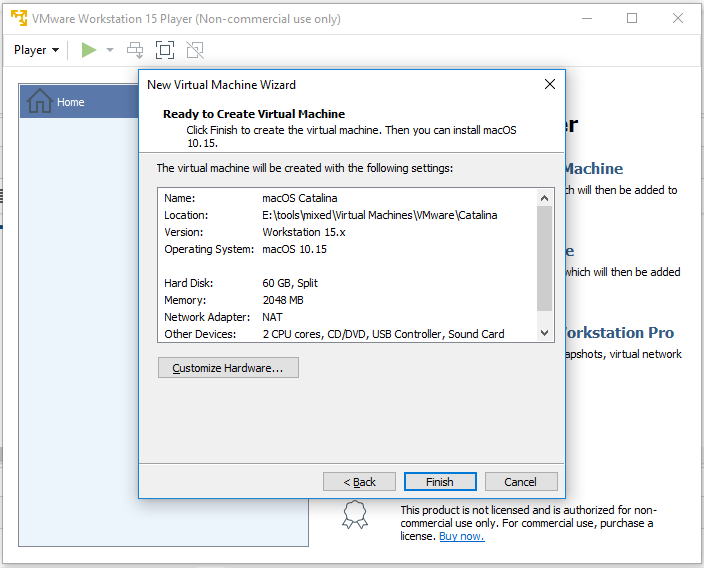
Fig 10
Now click the Customize Hardware Button to further refine the virtual machine and also choose the ISO as shown in Fig 11. Make sure to configure memory and cores based on your system configurations. We must leave sufficient memory and cores for Windows 10 to work properly.

Fig 11
Click the Close Button to apply the settings and click Finish Button to create the virtual machine. It will create and add the virtual machine to the VMware library as shown in Fig 12.

Fig 12
This is all about creating the virtual machine to install macOS.
Install macOS Catalina
In this step, we will launch the virtual machine created in the previous step and install macOS Catalina. Click the Play virtual machine Button to run it. It will start the virtual machine and start loading the macOS as shown in Fig 13.

Fig 13
It will ask to choose the language after completing the loading process as shown in Fig 14. It also asks to install VMware Tools which is essential for optimal performance.

Fig 14
Do not click the Install Tools Button to install VMware Tools. Click the Remind Me Later Button. We will install it later after completing the macOS installation. Now click the Next Button to continue the installation. It will provide options to do fresh install and disk utility to format the disk as shown in Fig 15.

Fig 15
Click the Disk Utility Option to format the virtual disk created by us. It will show the list of available disks as shown in Fig 16. I have also highlighted the 60GB disk opted by me in the previous steps. We will create the APFS partition on this disk to install macOS.

Fig 16
Now click the Erase Button to start formatting the disk. Provide the appropriate disk name and choose APFS format as shown in Fig 17.

Fig 17
Click the Erase Button to format the drive. It will complete the formatting and shows a success message as shown in Fig 18.

Fig 18
Now click the Done Button and choose the drive formatted by it as shown in Fig 19.

Fig 19
Now close the Disk Utility and choose Install macOS Option as shown in Fig 20.

Fig 20
Click the Continue Button. It will show the confirmation screen as shown in Fig 21.

Fig 21
Now click the Continue Icon to start the installation. It will ask to accept the License Agreement as shown in Fig 22. Also, make sure that you are following this tutorial on an Apple branded system to agree with the license terms.

Fig 22
Click the Agree Button to continue the installation. It will again ask to confirm the License Agreement as shown in Fig 23.

Fig 23
Click the Agree Button. The next screen provides options to choose the disk for installing the OS as shown in Fig 24.

Fig 24
Choose the disk formated by us in the previous step and click the Install Button. It will start installing macOS and shows the installation progress as shown in Fig 25.

Fig 25
It will restart several times to complete the installation. After completing the installation, it will provide several screens to set up the machine as shown in Fig 26 to Fig 33. It will also ask for account setup while completing the setup process.

Fig 26

Fig 27

Fig 28

Fig 29

Fig 30

Fig 31

Fig 32
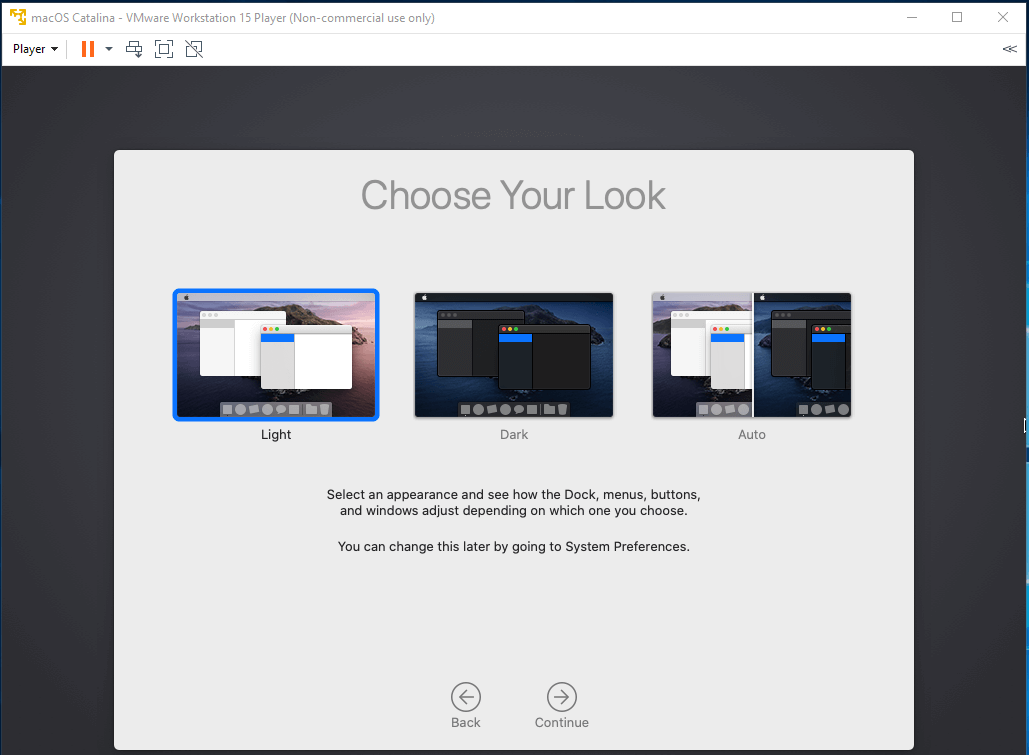
Fig 33
It will finally show the desktop screen after completing the setup process as shown in Fig 34.

Fig 34
This completes the installation of macOS Catalina on VMware Workstation Player installed on Windows 10.
Install VMware Tools
In this step, we will install VMware Tools on the macOS Catalina installed by us. Eject the ISO file by right click and choose the Eject option as shown in Fig 35.

Fig 35
Now click Player -> Manage -> Install VMware Tools as highlighted in Fig 36.

Fig 36
It will mount the VMware Tools CD and shows the options to install VMware Tools as shown in Fig 37.

Fig 37
Now double click Install VMware Tools Icon to start installing it on macOS. Also complete the installation steps as shown in Fig 38, Fig 39, and Fig 40. It will show the success message as shown in Fig 41.

Fig 38

Fig 39
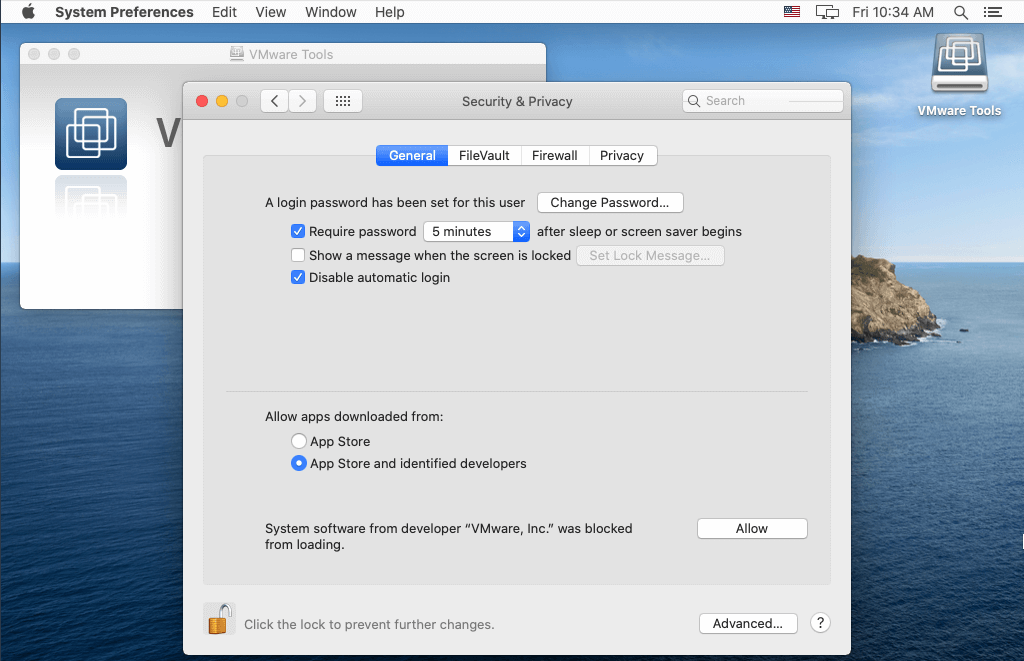
Fig 40

Fig 41
Click the Restart Button to restart macOS to apply the VMware Tools changes. It will restart the macOS and shows the Login Screen as shown in Fig 41.

Fig 42
Now we can maximize the screen and start working on the newly installed macOS Catalina.

Fig 43
Summary
This tutorial provided all the prerequisites and the steps required to create the virtual machine for macOS Catalina on VMware Workstation Player installed on Windows 10. It also provided the steps required to format the disk and complete the installation and setup of macOS Catalina on VMware Workstation Player. You may also join the discussion to install macOS Catalina on the VMware player by submitting your comments.
