Windows Operating System, developed by Microsoft Corporation is among the popular operating systems used for personal computers. Microsoft also provides the server version of Windows for production usage. In several cases, it might be required to try it out or run in the dual-mode without allocating dedicated hardware to it. We can run it as a guest operating system on macOS using the VMware Fusion without actually installing it on dedicated hardware. This tutorial provides all the steps required to install Windows 10 as a guest operating system on macOS including Sierra, Mojave, Catalina, etc using the VMware Fusion.
Notes: Make sure that you have at least 8GB of memory on the system for optimal performance to install Windows On VMWare Fusion.
This is Part 1 of this tutorial and provides the steps to create the Virtual Machine using VMware Fusion and install Windows 10 as a guest operating system on it. If you have already created the Virtual Machine and installed Windows 10 on it, Click Here to continue this tutorial to install VMware Tools on Windows.
Prerequisites
This tutorial assumes that you have access to a Mac machine with at least 8 GB of memory and VMware Fusion is already installed on it. I have used macOS High Sierra and VMware Fusion 11.5 while writing this tutorial. It also assumes that you have a digital license or a 25-character product key to activate Windows, though you can also install Windows 10 to try out without the activation key. You can also follow How To Install VMware Fusion On Mac.
Get Windows 10 ISO
We need the ISO file of 64-bit Windows 10 to continue the tutorial. You can follow How To Create Windows 10 ISO File to obtain the ISO file.
Create the Virtual Machine
In this step, we create the virtual machine to install Windows 10 on VMware Fusion on the Mac machine. There is no Easy Install for Windows 10 on VMware Fusion 11.5. Launch VMware Fusion using the launcher icon in the Applications Panel. It will show the home screen of VMware Fusion as shown in Fig 1.

Fig 1
Click the Add virtual machines and folders having plus icon at the top of VMware Fusion as highlighted in Fig 1. It will open the panel to select the installation method as shown in Fig 2.

Fig 2
Now click the Install from disc or image Option as shown in Fig 2. You may also drag and drop the Windows 10 ISO within this area. The next screen shows the Windows 10 ISO pre-selected to create the Virtual Machine as shown in Fig 3.

Fig 3
Now click the Continue Button to start creating the Windows 10 virtual machine using the VMware Fusion on Mac. The next screen provides options to choose the firmware as shown in Fig 4.

Fig 4
Keep UEFI selected as shown in Fig 4 and click the Continue Button to view the hardware configuration on the next screen as shown in Fig 5. It auto-selects the Hard Disk capacity, Memory, CPUs, etc as shown in Fig 5. We can change these parameters and re-configure the Virtual Machine after completing the installation.

Fig 5
We can also customize the Virtual Machine by clicking the Customize Settings Button. It provides the options to change the Virtual Machine Name and System Path as shown in Fig 6.
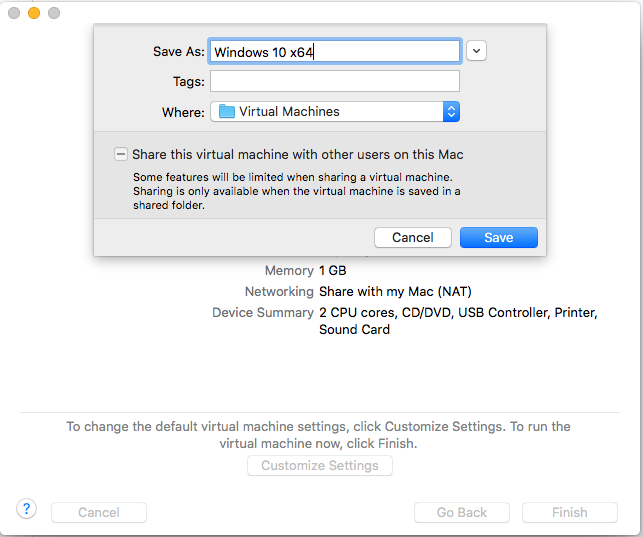
Fig 6
Make the changes if required and click the Save Button to apply the changes. Now click the Finish Button to finalize the virtual machine. It will show the same dialog as shown in Fig 6. Click the Save Button to create the Virtual Machine.
Install Windows
In this step, we will continue with installing Windows 10 on VMware Fusion. The VMware Fusion launches the Virtual Machine and starts playing it using the Windows 10 ISO as shown in Fig 7.

Fig 7
It will ask to press any key to boot from the ISO as shown in Fig 8.

Fig 8
You must be very quick at this step else it will show hardware error as shown in Fig 9 and Fig 10.

Fig 9

Fig 10
In case you have missed the Press any Key action, use the down arrow key to choose the DVD option and press Enter Key to again boot the ISO as shown in Fig 10 a.
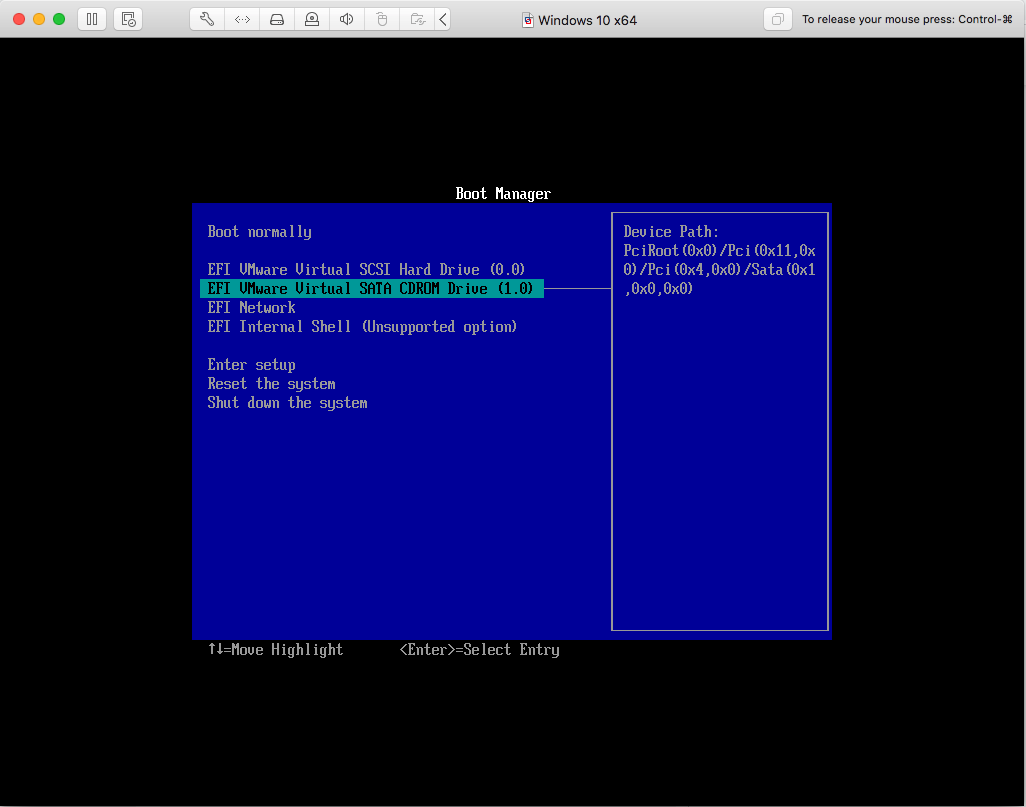
Fig 10 a
On pressing the key quickly, the setup will start loading the Windows 10 as shown in Fig 11.

Fig 11
After completing the loading process, it will show the Windows Setup with Language Selection Options as shown in Fig 12.

Fig 12
Choose Language, Time, and Keyboard using the options shown in Fig 12 and click the Next Button. The next screen shows the Install Button as shown in Fig 13.

Fig 13
Now click the Install now Button to start the installation. It will take some time for the setup and shows a blue screen with messages as shown in Fig 14.

Fig 14
The installer will ask for Activation Key as shown in Fig 15.

Fig 15
Click I don't have a product key Link to install the limited edition of Windows 10. The next screen provides the options to choose the operating system as shown in Fig 16.

Fig 16
Choose the Operating System of your choice and click the Next Button to accept the License Agreement as shown in Fig 17.

Fig 17
Now go through the License Agreement, accept it, and click the Next Button. The next screen provides the options to choose the installation type as shown in Fig 18.

Fig 18
Click the Custom: Install Windows only (advanced option) option. The next screen provides options to partition the disk as shown in Fig 19.

Fig 19
I have kept it the same as shown in Fig 19. Click the Next Button to confirm the installation. It will start installing Windows 10 and shows the progress as shown in Fig 20 and Fig 21.

Fig 20

Fig 21
The Windows will reboot on completing the installation as shown in Fig 22 and Fig 23.

Fig 22

Fig 23
It will start customizing the installation during the first boot. The very first option is to choose the region as shown in Fig 24.
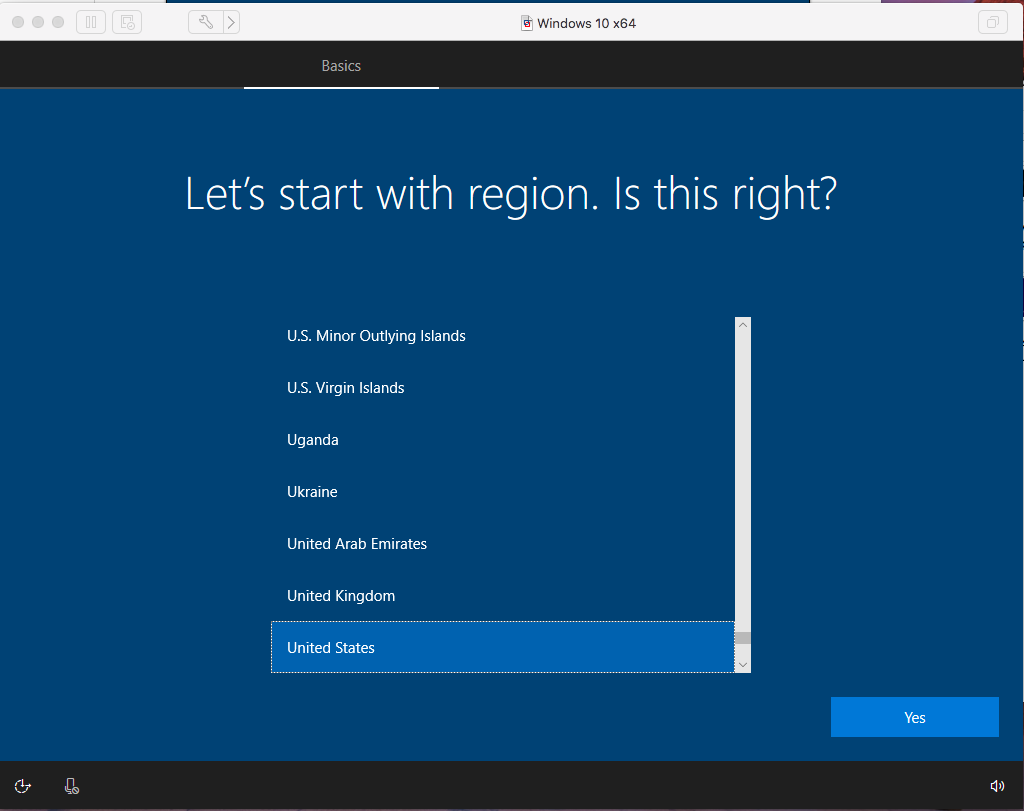
Fig 24
Select the appropriate region and click the Yes Button. The next screen asks to confirm the Keyboard Layout as shown in Fig 25.

Fig 25
Click the Yes Button to confirm the Keyboard Layout. The next screen asks to choose a secondary layout as shown in Fig 26.

Fig 26
You may add the secondary layout if required. I have skipped this option. The setup will finalize the Basic Configurations and shows the progress screen to continue with Network configurations as shown in Fig 27.

Fig 27
After completing the Network setup, the installer will start configuring the User Account and asks for the operating system purpose as shown in Fig 28.

Fig 28
Choose the appropriate option and click the Next Button to configure the User Account as shown in Fig 29.

Fig 29
You can either use your online account of Microsoft or go with Offline account as highlighted in Fig 29. The next screen asks to Sign in to Microsoft account as shown in Fig 30.

Fig 30
You can also go for the Limited experience as highlighted in Fig 30. The next few screens show the configurations to choose name, password, and security hint questions as shown in Fig 31, Fig 32, Fig 33, and Fig 34.

Fig 31

Fig 32

Fig 33

Fig 34
Click the Next Button to finalize the User Account. The next screen provides options to choose activity history options as shown in Fig 35.

Fig 35
Click either Yes or No. The next screen asks to choose digital assistance as shown in Fig 36.

Fig 36
Click either Accept or Decline. The next screen asks to choose privacy settings as shown in Fig 37.

Fig 37
Choose the appropriate options and click the Accept Button. This completes the configurations and launches Windows 10 with Networks Option as shown in Fig 38.

Fig 38
Click either Yes or No to confirm the Networks Settings. You can start using Windows 10 with limited options. Several Settings including change account password remains disabled till we activate it. We can also configure the Virtual Machine by clicking the Tool Icon at the top as shown in Fig 39.

Fig 39
Now maximize the Virtual Machine screen to cover the entire screen area and change the resolution of Windows according to your screen resolution. It will show the Virtual Machine Menu on moving the cursor to the top of the screen as shown in Fig 40.
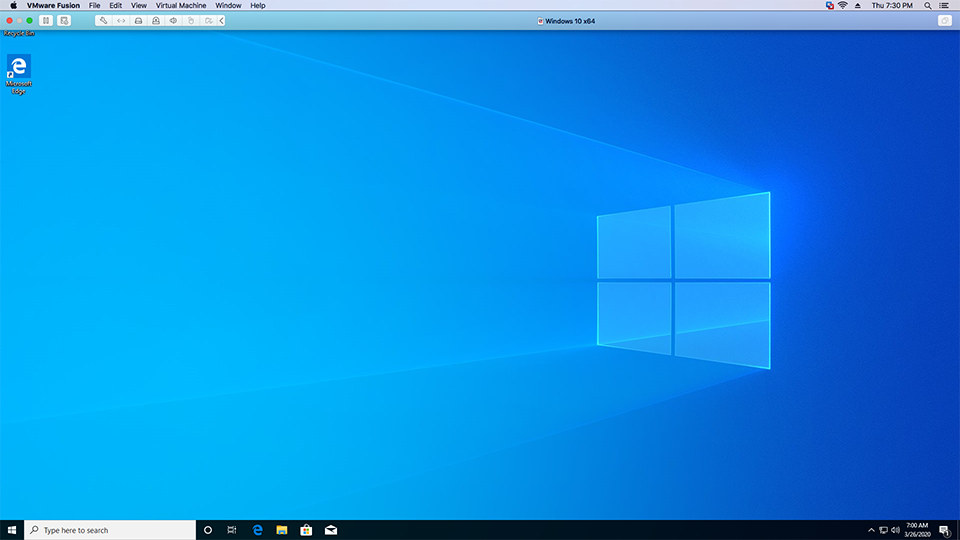
Fig 40
Activate Windows 10
After using Windows 10, you may activate it using the activation key as shown in the next few screens. Also, follow How To Activate Windows 10 On Clean Install to learn more about activating Windows 10 using either the digital license or activation key.

Fig 41

Fig 42

Fig 43

Fig 44

Fig 45
Suspend or Shut Down, Configure, Resume or Start
We can suspend the virtual machine, change the configurations including memory, disk processor, etc and resume it back as shown in Fig 46, Fig 47, and Fig 48. It might be required to reboot Windows in some cases.
Click the Pause Button or Close Icon to suspend it as shown in Fig 46. We can also Shut Down Windows 10 to Power Off the Virtual Machine.

Fig 46
Change the Virtual Machine settings as shown in Fig 47 and Fig 48. In case you have Shut Down Windows, it will show Start Up Option instead of Resume.

Fig 47

Fig 48
Resume the Virtual Machine by right-clicking on it as shown in Fig 49.

Fig 49
VMware Tools
VMware Tools is an optional tool for Windows 10 installed on the VMware Fusion Virtual Machine. We can always install it later. VMware Tools is required to have the optimal performance of the guest operating system installed on the virtual machine.
Click Here to continue this tutorial to install VMware Tools on the Windows installed by us in this tutorial.
Summary
This tutorial explained the steps required to install Windows 10 as a guest operating system using VMware Fusion on macOS. This comes handy in several situations when we do not have options to install Windows 10 directly on the hardware. Keep commenting to join the discussion about installing Windows 10 as a virtual machine on VMware Fusion using the comment options as shown below.
