This post explains all the steps required to install MySQL Community Server 8 on Windows 10. The steps should be similar on other versions of Windows.
Notes: In order to follow this post, you must completely remove the previous installation of MySQL server installed using the installer if it's already installed on the system. You can follow How To Completely Remove MySQL 5.7 From Windows to completely remove the previous installation done using the installer.
You may also be interested in other MySQL specific tutorials including How To Install MySQL 8 on
How To Install MySQL 8 With Workbench On Windows 10 can be followed to install the most recent version of MySQL 8 with Workbench.
Step 1: Download Installer
The MSI installers are available on the official site to install MySQL Community Server edition on Windows. The download is available in either online or offline mode. We will download and install the server using an online download that is smaller than installing selected apps with the latest version, as shown in Fig 1. The MySQL version available while writing this tutorial was 8.0.14, as shown in Fig 1.

Fig 1
The next page asks to either log in and start the download or download it directly as shown in Fig 2.

Fig 2
Complete the download by following either of the approaches.
Step 2: Install MySQL
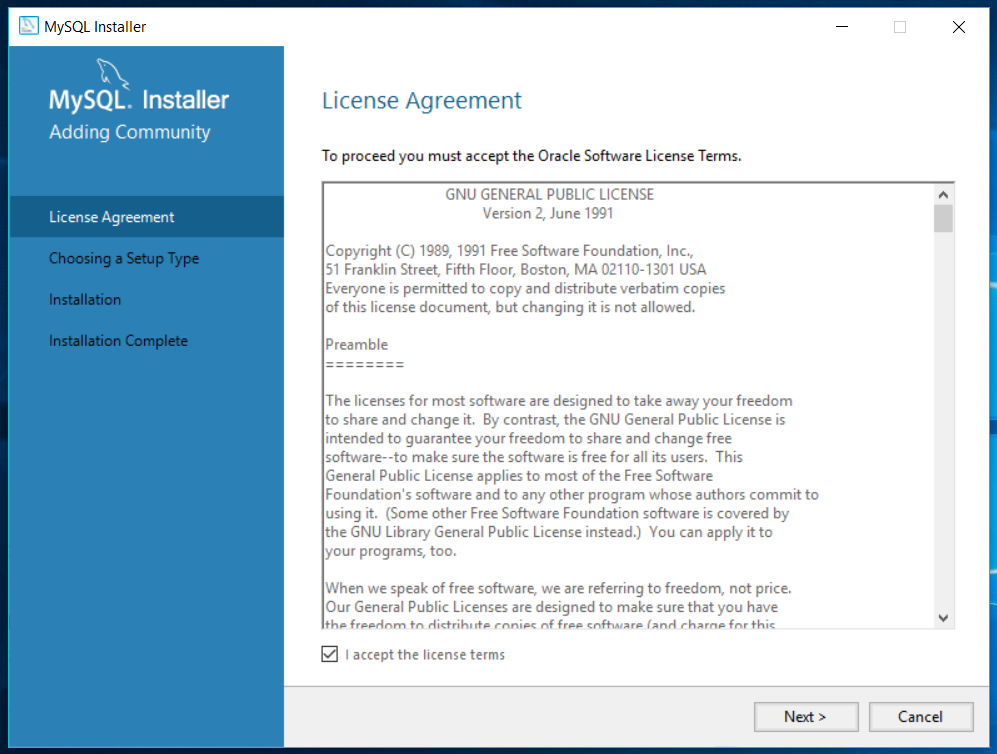
Double click the installer to execute it. It will show the installer dialog window to accept the license agreement as shown in Fig 3.

Fig 3
Accept the License Agreement and click on Next Button. The next screen shows options to choose pre-configured installation options as shown in Fig 4.

Fig 4
We have selected Custom installation to have more control over choosing the applications to be installed. Now click on Next Button which shows the next screen having options to choose applications to be installed as shown in Fig 5.

Fig 5
Expand the MySQL Server option as shown in Fig 5 and click on the Right Arrow Button placed on the separator. It will select the MySQL Server 8 for installation. Our final selection of MySQL server and applications are as shown in Fig 6. You might select or opt-out some of these applications based on your requirements.

Fig 6
Click on Next Button and the next screen shows the selected applications ready for installation as shown in Fig 7.

Fig 7
Now click on Execute Button to start the installation of selected Server and applications. The installer shows the progress as shown in Fig 8.

Fig 8
After downloading all the selected applications, the installer will install these applications and shows the status as shown in Fig 9.

Fig 9
Click on Next Button and the installer shows screen having the message to start the configuration of applicable applications as shown in Fig 10.

Fig 10
Now click on Next Button to start the configuration. The next screen shows options to configure MySQL server either as a standalone server with classic replication strategy or InnoDB Cluster as shown in Fig 11.

Fig 11
We have selected the standalone option to keep the installation simple without using advanced cluster options for this tutorial. Click on Next Button and the next screen shows options to choose server type and port as shown in Fig 12.

Fig 12
Keep the default options selected and click on Next Button. The next screen shows options to choose the authentication method as shown in Fig 13. Though the newer options are good, in

Fig 13
Click on Next Button to configure the Accounts and Roles as shown in Fig 14.

Fig 14
Choose at least a medium strength password and add user accounts if required. Click on Next Button to configure windows service as shown in Fig 15.

Fig 15
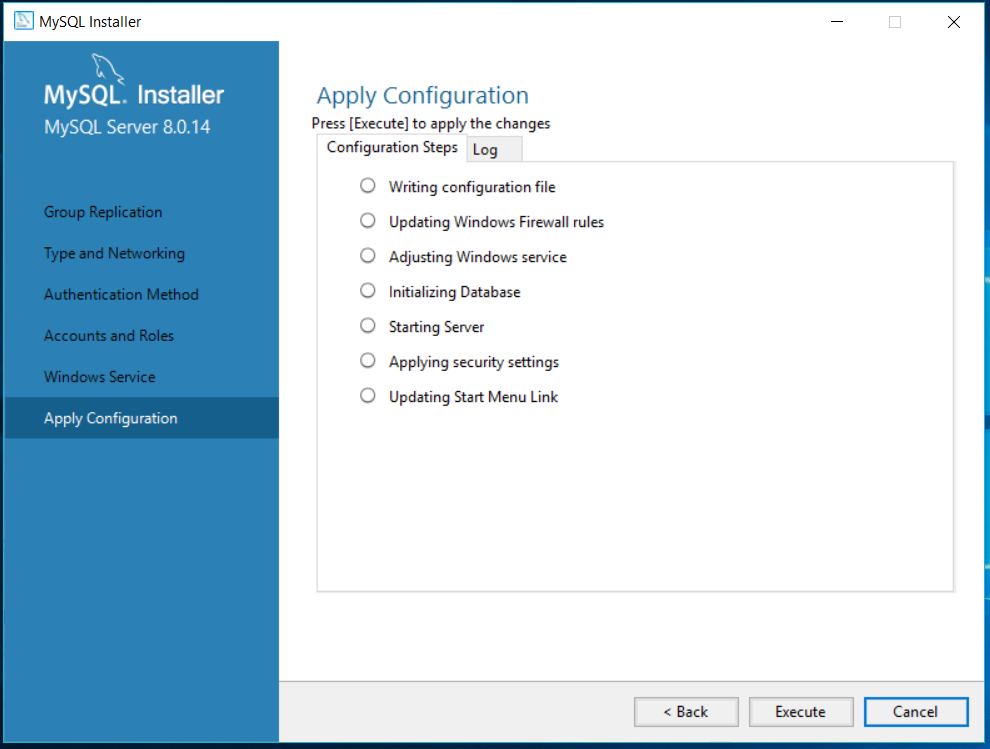
Keep the default options as selected and click on Next Button. The next screen shows the configuration steps as shown in Fig 16.

Fig 16
Click on Execute Button to apply the configurations done by us. It will complete the configuration and add MySQL Notifier on the system tray as shown in Fig 17.

Fig 17
Click on Finish Button to complete MySQL configuration. The next screen shows options to configure the samples and examples as shown in Fig 18.

Fig 18
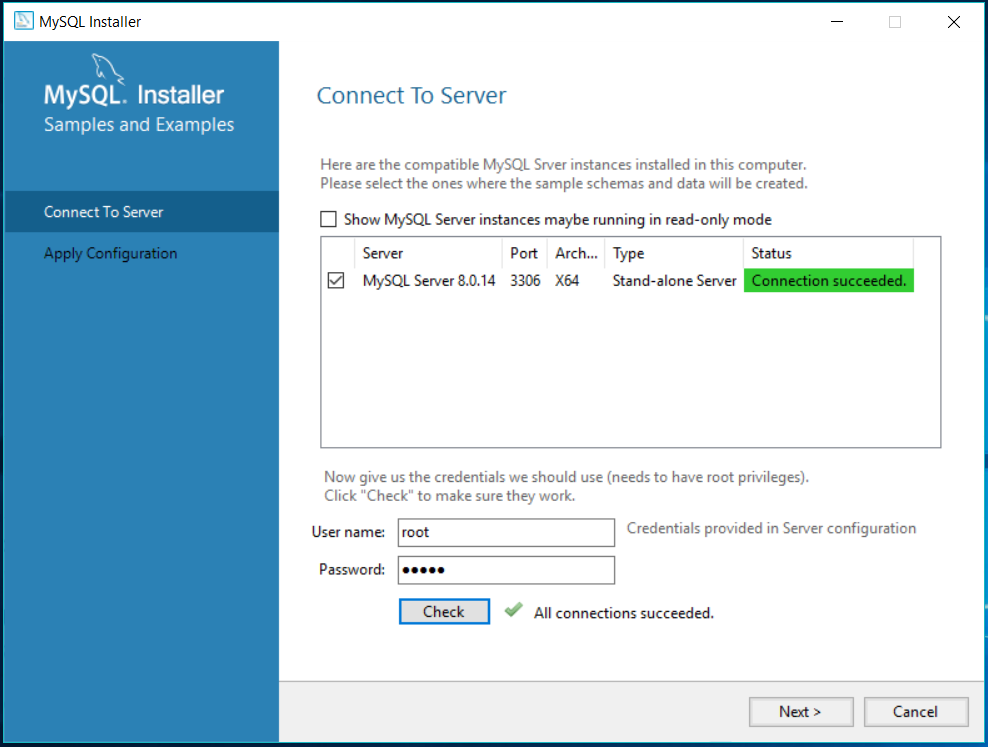
Click on Next Button to configure Samples and Installation. The next screen shows server connection options as shown in Fig 19.

Fig 19
Enter the password and check the server connection. It will show successfully connect message as shown in Fig 20.

Fig 20
Click on Next Button. The screen shows the configuration steps of Samples and Examples as shown in Fig 21.

Fig 21
Click on Execute Button to execute the script. The next screen shows the success message as shown in Fig 22.

Fig 22
Click on Finish Button and the next screen shows configuration status as shown in Fig 23.

Fig 23
Click on Next Button to finalize the installation. The next screen shows the installation success message as shown in Fig 24.

Fig 24
Click on Finish Button to complete the installation. The installer will execute and show the Shell as shown in Fig 25.

Fig 25
Type \quit and press Enter key to exit from Shell.
These steps are required to install the MySQL server with the necessary applications.

