Android Studio is the official IDE supported by Google to develop Android applications. It's based on the IntelliJ IDEA which is being widely used for Java development. It offers a powerful code editor and developer tools. The Android Studio includes Gradle to manage dependencies and build the applications. It also provides several pre-configured templates to rapidly start the development.
Android Studio also ships with built-in support for Google Cloud Platform, which makes it easy to integrate Google Cloud Messaging and Google App Engine.
In this tutorial, we will discuss all the steps required to install Android Studio on the popular Linux distribution i.e. Ubuntu with Java 15. It shows the steps required for Ubuntu 20.04 LTS, but the process should be similar for other Linux distributions. This tutorial assumes that you have installed Android SDK by following How To Install Android SDK Tools On Ubuntu 20.04. You can also continue this tutorial to have a fresh install of Android Studio.
Notes: You may follow the installation instructions from How To Install Java 8 On Ubuntu, How To Install Java 15 On Ubuntu 20.04 LTS, and How To Install OpenJDK 15 On Ubuntu 20.04 LTS. You may also be required to execute the below-mentioned command in case you have set the options previously for Java 9 or Java 10. You may also follow How To Install Android SDK Tools On Windows and How To Install Android Studio On Windows.
# The saviour command
unset JAVA_OPTS
Download Android Studio
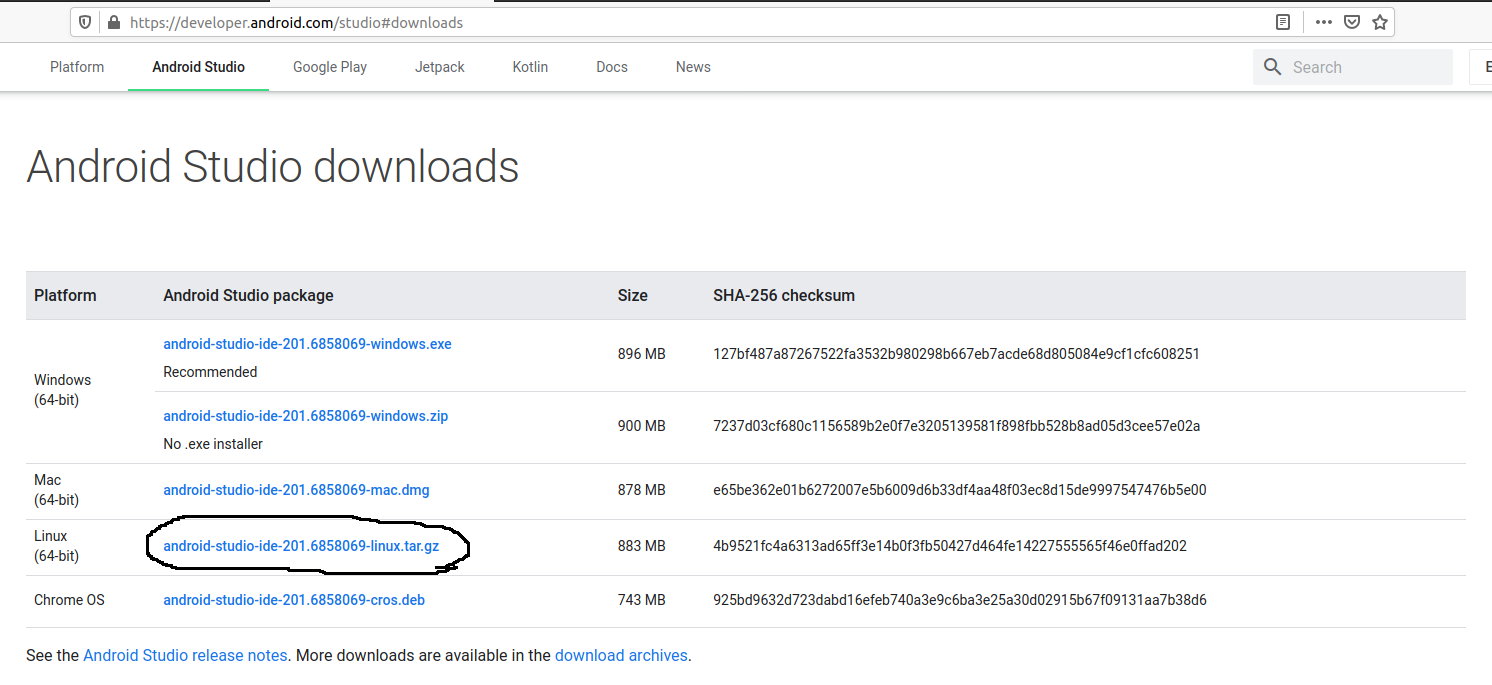
Download the most recent version of Android Studio from the official website. The download page looks like the one as shown in Fig 1.

Fig 1
Click on the Download Button to start downloading Android Studio. It will ask to agree on terms and conditions as shown in Fig 2.

Fig 2
Agree with the terms and conditions and click on the Download Button to start the download.
Install Android Studio
Extract the download to the appropriate location having sufficient space. The installation needs at least 1.5 GB of disk space.
Next, we will use the executable file of Android Studio and Android Studio Icon to create the desktop shortcut. Use the below-mentioned commands to create the Desktop Launcher.
# Create the studio.desktop file
sudo nano ~/Desktop/.desktop

# File Content
[Desktop Entry]
Type=Application
Name=Android Studio
Comment=Android Studio
Exec=/data/tools/android-studio/bin/studio.sh
Icon=/data/tools/android-studio/bin/studio.png
Terminal=false
StartupNotify=false
NoDisplay=false

# Change File Permissions
sudo chmod +x ~/Desktop/.desktop

# Rename the .desktop file
sudo mv ~/Desktop/.desktop ~/Desktop/studio.desktop
Now right-click the file studio.desktop on your desktop and select Allow Launching Option. This will change the studio.desktop file to the Android Studio Launcher using the Android Studio Icon path provided by us.
Android Studio Setup
In this step, we will complete the setup process of Android Studio. Now, double click the Launcher Icon created by us in the previous step to start the installation. It might ask to import settings from the previous installation as shown in Fig 3.

Fig 3
I have opted for the Do not import settings Option as shown in Fig 3. Click the OK Button to continue the setup. It will ask for permission to collect usage statistics as shown in Fig 4.

Fig 4
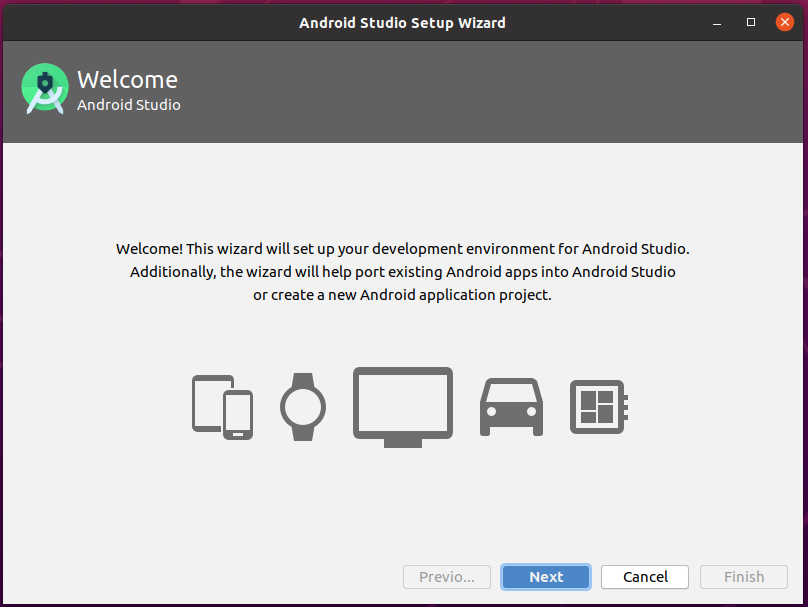
I have opted to send usage statistics to Google. You may avoid it by clicking the Don't send Button. Next, it will show the Welcome Screen as shown in Fig 5.

Fig 5
Click the Next Button to continue the installation. The next screen shows the options to choose Install Type as shown in Fig 6.

Fig 6
Click the Next Button to continue the installation. It shows the next screen to choose the JDK 8 as shown in Fig 7 (embedded JRE 8) and Fig 8 (other JDK 8). I have selected the JDK location installed by me as shown in Fig 8. You may follow How To Install Java 8 On Ubuntu.

Fig 7

Fig 8
Click the Next Button to continue the installation. The next screen provides options to choose a theme as shown in Fig 9.

Fig 9
Choose the appropriate Theme and click the Next Button to continue the installation. The next screen provides options to choose Android components as shown in Fig 10 (default) and Fig 11 (custom). The Android Studio will install Android SDK in case it's not installed on the system as shown in Fig 10. You can provide the Android SDK location in case it's already installed by you as shown in Fig 11. You can also follow How To Install Android SDK Tools On Ubuntu 20.04.

Fig 10

Fig 11
You can choose the components for a fresh installation of the Android SDK. I have opted to use the Android SDK installed in the previous tutorial How To Install Android SDK Tools On Ubuntu 20.04.
Click the Next Button to continue with the setup. It shows the Settings Screen to verify the settings done by us as shown in Fig 12.

Fig 12
Click the Next Button to confirm Emulator Settings as shown in Fig 13.

Fig 13
Click the Finish Button to start downloading components. The setup will download the components in case it's a fresh installation or need an update of Android SDK. Since I have had the most recent installation of Android SDK, the download screens look like the one as shown in Fig 14 and Fig 15.

Fig 14

Fig 15
Click the Finish Button to complete the setup and launch Android Studio. The next screen provides options to create a new project or import an existing project as shown in Fig 16.

Fig 16
Click the Start a new Android Studio project to start creating the Hello World project. The new screen provides options to choose a project template as shown in Fig 17.

Fig 17
I have selected a blank template as shown in Fig 17. Click the Next Button to configure the Hello World project as shown in Fig 18.

Fig 18
You can select your preferred language to develop Android applications among Java or Kotlin. I have selected Java as part of this tutorial. The next screen shows the HelloWorld application with the default workspace as shown in Fig 19. It might take some time to launch the first project.

Fig 19
Hello World
We will create our first activity as the starting point of the application. Right-click on the app -> Hover On New -> Hover On Activity -> Click on Basic Activity. An activity configuration screen will be displayed as shown in Fig 20.

Fig 20
I have kept the values suggested by the Android Studio for the main activity as shown in Fig 20. Click the Finish Button to create the activity. It will open the Main Activity Class Tab of Main Activity as shown in Fig 21.

Fig 21
Open the Layout Editor of the Main Activity by expanding res -> layout and double click the activity_main.xml. It will open the layout editor of the main activity as shown in Fig 22.

Fig 22
Now click the TextView component and drag it to the center of the screen. Also, update the text value from the Common Attributes Panel as shown in Fig 23.

Fig 23
We also need to update the AndroidManifest.xml file to configure the default activity as shown in Fig 24.

Fig 24
Create AVD
In the previous steps, we have installed Android Studio and completed the setup. We have also created the Hello World project as part of the setup process. In the previous step, we have also added the main activity and configured the manifest file to use it while launching the app. In this step, we will create an AVD to deploy the app to the virtual device.
Click on Tools -> AVD Manager to launch the AVD manager as shown in Fig 25.

Fig 25
Click the Create Virtual Device Button to start creating AVD as shown in Fig 26.

Fig 26
Now click on the Next Button to choose the image as shown in Fig 27.

Fig 27
Click the Next Button to configure the virtual device as shown in Fig 28.

Fig 28
Now click on the Finish Button to launch the virtual device. It may take some time based on your system hardware. The AVD will start and show the Home Screen as shown in Fig 29 and Fig 30.

Fig 29

Fig 30
If you can see the home screen - Congratulations on launching your first virtual device from Android Studio.
Launch App
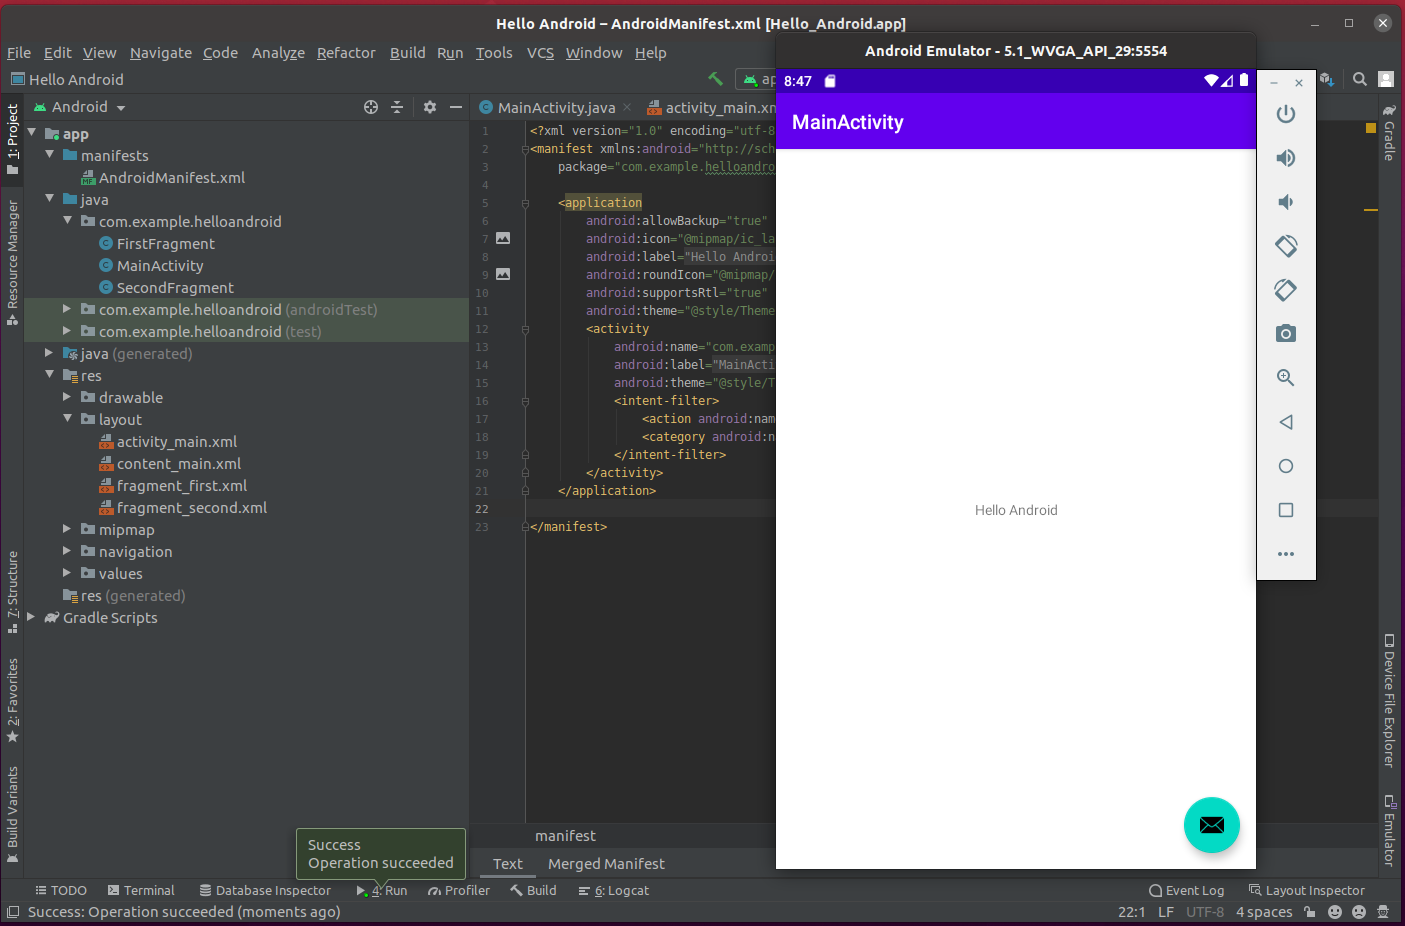
In this step, we will run and deploy the Hello World application to the virtual device created by us in the previous step. Click on Run -> Run App or press Shift + F10 to build and deploy the application to AVD. It will show the success message on the console as shown in Fig 31.

Fig 31
This is how we can install Android Studio, create the project, add an activity, create the virtual device, and deploy and launch the application on the virtual device.
Summary
This tutorial provided all the steps required to install Android Studio on Ubuntu 20.04 LTS. It also provided the steps to create Hello World Project, launch the AVD from Android Studio, and deploy the Hello World App to the AVD. Submit your comments to join the discussion either on Tutorials24x7 or using Disqus as shown below.

