Open the Aptana Studio website and click on the Download Aptana Studio 3 Button. It will open the Aptana Studio repository on GitHub. It provides the link having the most recent release of Aptana Studio and also lists the previous releases. Aptana Studio is built on top of Eclipse and it was considered as one of the best IDE for PHP development. Though the further development of this IDE is slowed down(almost abandoned), it is still a good option to do PHP development. It can be installed either as a standalone application or as a plugin with Eclipse.
Aptana resources also provide information and download links of Appcelerator Studio(latest mobile development tools for iOS, Android and Windows applications) and the version available on the download page is v5.5.1.GA. The newer or preview releases of Appcelerator Studio are available here.
In this tutorial, we will discuss the steps required to install Aptana Studio 3.7.2 released on 30th July 2018. Aptana Studio 3.7.2 is released for Windows(.exe) - 32 bit, Mac(.dmg) and Linux(.zip). The below-listed steps show how to install it for Windows.
Notes: This tutorial assumes that at least PHP is installed on the system. The tutorials to install the latest version of PHP or WampServer can be followed to do the same. It also needs 32-bit Java 1.8 and the steps to install Java can be followed here using Java 8 download link.
Install on Windows 32-bit
Step 1: Download Aptana Studio
Click on the Aptana_Studio_3_Setup.exe link to start the download for Windows from the available options as shown in Fig 1.

Fig 1
Step 2: Install Aptana Studio
Double click the downloaded executable file and the installer shows options to choose install location as shown in Fig 2.

Fig 2
Fill the install location in case it has to be different than the one shown by default and also accept the License Agreement. After accepting the License Agreement, Install Button gets enabled. Click on the Install Button to start the installation.

Fig 3
After completing the installation, it shows the success message as shown in Fig 4.

Fig 4
Now click on the Finish Button to close the installer. It also creates a Desktop Shortcut icon.
Install on Windows 64-bit
We need to follow the above-mentioned steps for 32-bit windows before following the below-mentioned steps.
Step 1: Download Java 8
The Aptana Studio distribution for Windows is 32-bit and it needs 32-bit Java to run the IDE. Download 32-bit Java 8 and install it following the steps mentioned here. Please do not update the environment variable since we might need to use already installed 64-bit Java.
Step 2: Configure
Open the installation path of Aptana Studio and then open the file AptanaStudio3.ini to update the 32-bit Java installation path. Add the line -vm C:\java\32-bit\jdk1.8.0_201\bin\jawaw.exe before -vmargs as shown in Fig 5.

Fig 5
Create Project and write Hello World script
Step 1: Launch the IDE
Double click on the shortcut icon placed on the desktop to run the IDE. It will ask to choose the workspace as shown in Fig 6. Do not check the checkbox having the label - Use this as the default and do not ask again.

Fig 6
It will also show the security warning for the first time and the default layout shows warning messages since the Aptana Server does not run anymore as shown in Fig 7 and Fig 8.

Fig 7

Fig 8
Step 2: Create Project
Follow the below-mentioned steps to create a new Project as shown in Fig 9:
Click on File -> Hover On New -> Click on PHP Project

Fig 9
It will ask to choose Project name and location as shown in Fig 10.

Fig 10
Step 3: Create PHP Script
Follow the below-mentioned steps to create a new PHP script as shown in Fig 11:

Fig 11
Right click on Project -> Hover On New -> Click on File
It will ask to choose File name as shown in Fig 12.

Fig 12
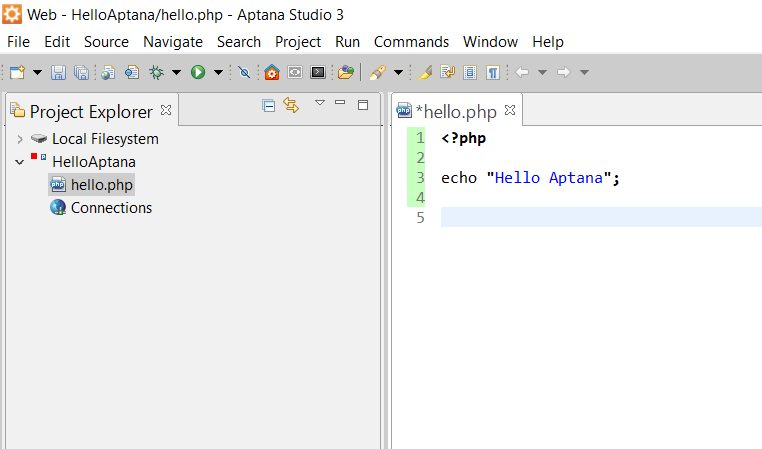
Now write our hello world message as shown in Fig 13.

Fig 13
Step 4: Configure PHP
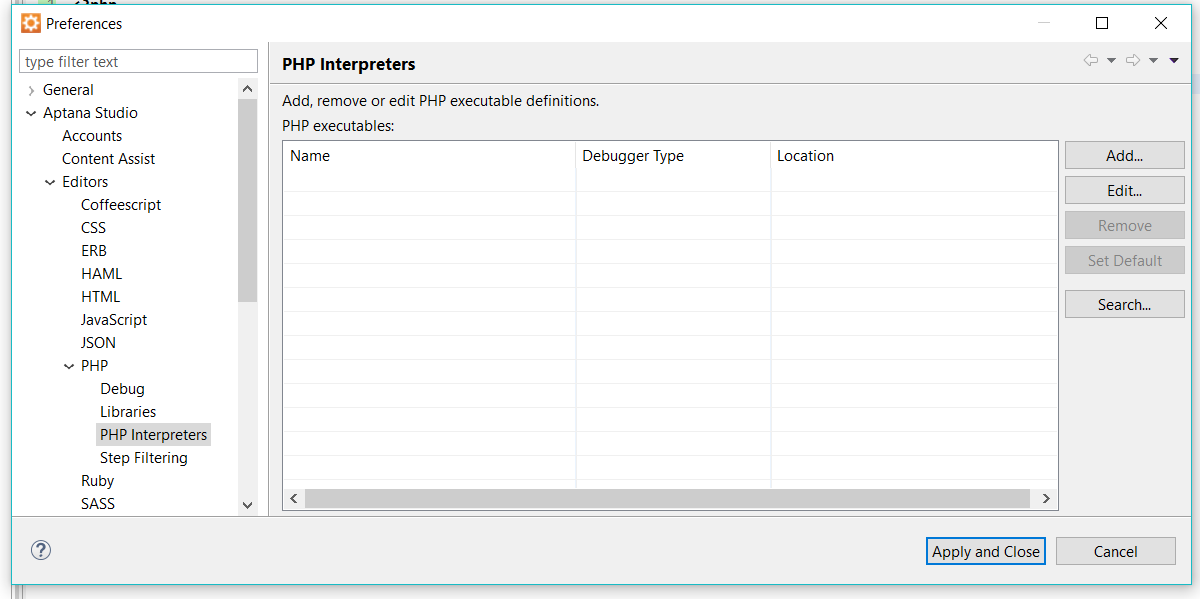
We must also configure PHP interpreter for the first time before executing the program.
Click on Project on Top Menu Bar -> Preferences -> Aptana Studio -> Editors -> PHP -> PHP Interpreters
The right side of the pop will show options to add interpreter as shown in Fig 14.

Fig 14
Click on Add Button and configure the interpreter as shown in Fig 15.

Fig 15
Click on Finish Button and then click on Apply and Close Button to close the popup. This is how we can configure PHP interpreter for Aptana Studio.
Step 5: Execute PHP Script
Follow the below-mentioned steps to execute the scripts as shown in Fig 16.
Right-click on PHP File -> Hover on Run As -> Click on PHP Script.

Fig 16
It will execute the script and show the output on the console as shown in Fig 17.

Fig 17

