Sometimes, we might be required to import an existing virtual machine to the VMware Workstation Player installed on Windows. This tutorial provides the steps required to import an Ubuntu 18.04 Open Virtualization Format (OVF) 1.0 virtual machine to VMware Workstation Player 15 installed on the Windows 10 operating system. The steps should be the same for other versions of the VMware Player and other guest operating systems including Ubuntu.
You might also be interested in How To Install VMware Workstation Player On Windows 10, How To Export Virtual Machine On VirtualBox To OVF, How To Install VirtualBox On Windows, How To Install Ubuntu On Windows Using VirtualBox, and How To Install Ubuntu On Windows Using VMware Workstation Player With Easy Install.
The default screen of the VMware Workstation Player should be the same as shown in Fig 1. I have removed other virtual machines for demonstration purposes.

Fig 1
Import Virtual Machine
Click Player -> File -> Open menu options as shown in Fig 2. You can also press the shortcut keys Ctrl + O.

Fig 2
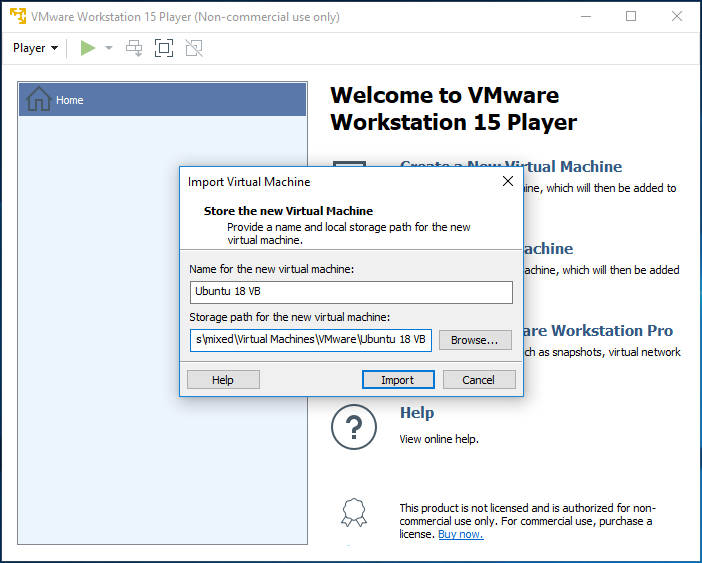
It will show the File Chooser Dialog to select the virtual machine. After selecting the appropriate virtual machine, it shows the options to configure the name and path to store the imported virtual machine as shown in Fig 3.

Fig 3
Now click the Import Button to start importing the virtual machine. It might also ask to Retry OVF Import to relax the OVF specifications as shown in Fig 4.

Fig 4
Click the Retry Button. It will show the import progress as shown in Fig 5.

Fig 5
After successfully importing the OVF, VMware Player will add the Virtual Machine to its library as shown in Fig 6.

Fig 6
Install VMware Tools
In this step, we will install VMware Tools on the Ubuntu 18.04 virtual machine imported by us in the previous step. You can also follow How To Install Windows On Mac Using VMware Fusion - Part 2 to install VMware Tools on Windows 10.
Now click the Play virtual machine option to boot Ubuntu as shown in Fig 6. It will show the boot progress and the Login Screen as shown in Fig 7 and Fig 8.

Fig 7

Fig 8
We can also view the settings of the imported virtual machine as shown in Fig 9 and Fig 10. We can change these settings after suspending or shutting down the guest operating system.

Fig 9

Fig 10
Click the OK Button to close the Settings Panel and login to Ubuntu. Now open the terminal and use the below-mentioned commands to install VMware Tools on Ubuntu as shown in Fig 11 and Fing 12.
# Refresh Packages
sudo apt-get update

# Install VMware Tools
sudo apt-get install open-vm-tools

# Install VMware Tools for Desktop
sudo apt-get install open-vm-tools-desktop
The sample output of the above commands is shown in Fig 11.

Fig 11
Now close the terminal. Power Off the virtual machine and again start it. The blurry screen should be clear and it will occupy the entire screen of the virtual machine as shown in Fig 12.

Fig 12
We can even go to full-screen mode and the guest operating system should cover the entire screen. Apart from the UI, VMware tools also add several other utilities including networking for optimal performance.
Summary
This tutorial provided all the steps required to import an existing virtual machine in Open Virtualization Format (OVF) to the VMware Workstation Player. It also provided the steps to install the VMware Tools in the last section.

